
Installation Guide

Brompton Wall Mounted Range Fitting Instructions
Thank you for purchasing this Croydex product. Please follow the fixing and care
instructions to ensure that your accessory is fitted safely and that it retains its high
quality finish.
Fixing Pack Contents
Long Fixing Screws x 2 (4)
Wall Plug X 2 (4)
Wall Fixing Bracket x 1 (2)
Spare Grub Screw x 1 (2)
Threaded Brass Bush and ‘O’ Ring x 2 (Mirror Only)
Rubber Grommet x 2 (Mirror Only)
Decorative Cap x 2 (Mirror Only)
Contents supplied will vary depending on the product. The quantities shown above in
brackets are for double bracket fixings. Only use the fixings supplied.
Tools Required
Drill Pencil
6mm masonry drill bit Spirit Level
6mm ceramic drill bit (optional) Small flat head screwdriver
Cross head screwdriver Tape measure
KEEP DIY TOOLS OUT OF THE REACH OF CHILDREN
Safety and Care Advice
1. Always take care when using a drill, particularly in the bathroom. Always
check for hidden cables and pipework before drilling and take extreme care if
there is any water in the working area.
2. It is advisable to use a residual current circuit breaker (RCCB). Always wear
suitable eye protection when drilling.
3. If the product is to be fitted on a ceramic tiled wall, a ceramic drill bit should
be used. Always ensure that the drill hole passes through the central tiled
area rather than through the grouted area. To prevent damage to the tile,
mask the area around the hole with tape before drilling.
4. It is recommended that two people fit this product to ensure that it is fitted
safely.
5.
Do not use this product as a grab bar.
6. Do not strike glass surfaces with sharp or hard objects.
Instruction for items with single and double mounting point:
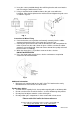
1. Select position of product and mark its centre on wall. (Refer to Fig. 1 for
centre positions of double mounting items.) Centre the wall fixing bracket
over the mark and using it as a template mark the screw fixing positions on
the wall surface.
For Mirror Fixing – Carefully place the mirror glass against the wall and
use as a template to the mark the wall fixing bracket centres. Ensure
centres are level. For mirror assembly follow points 6 - 9
2. Drill the holes to a depth of 40mm in the marked positions using a 6mm
masonry drill. If the product is to be fitted onto a ceramic tiled wall, a ceramic
drill bit should be used.
3. Insert the wall plugs flush to the surface of the wall. If fitting to a tiled surface,
the wall plugs should be inserted below the surface of the tile to
avoid cracking.
WMA 001 R02