® ® PR1000 Home Gym Owner’s Manual Nautilus® 001-7275.101512.
Table of Contents Specifications........................................................................... 2 Important Safety Instructions................................................. 3 Safety Warning Labels and Serial Number................... 4 Features and Use...................................................................... 6 How Often Should You Exercise...................................... 6 What to Wear.....................................................................
Important Safety Instructions This icon means a potentially hazardous situation which, if not avoided, could result in death or serious injury. Before using this equipment, obey the following warnings Read and understand the complete Owner’s Manual. Keep Owner’s Manual for future reference. Read and understand all warnings on this machine. If at any time the Warning stickers become loose, unreadable or dislodged, contact Nautilus ® Customer Service for replacement stickers.
Important Safety Instructions Safety Warning Labels and Serial Number Locate and read all safety warnings before operation. Replace any warning label if it is damaged, illegible, or missing. For replacement labels, call a Nautilus® Representative. Refer to the Contacts page at the back of this manual. 1 2 3 4 5 6 7 8 9 1* Type Description CAUTION Before each use check all snap hooks, cables and pulleys for wear and proper function. Tighten all fasteners as necessary.
Important Safety Instructions Type Description WARNING The Maximum User Weight for this machine is 300 pounds (136 KG). This machine is for Home use only. WARNUNG Das Maximale Belastungsgewicht für diese Maschine beträgt 136 kg. Dieses Gerät ist nur für die nutzung im Heimbereich fregegeben. AVERTISSEMENT Le poids maximum de l’utilisateur pour cette machine est de 136 kg (300 liveres). Cet équipement est destiné à un usage privé uniquement.
Features and Use Consult your physician before starting any exercise program. If you have not exercised recently, are pregnant, have a heart condition, or any physical limitation, consult with your physician before you use your machine. If you experience tightness in your chest, an irregular heartbeat, shortness of breath, feel faint, lightheaded or dizzy, or have any pain, STOP and consult your physician immediately. How Often Should You Exercise • 3 times a week for 20 minutes each day.
Features and Use A B G F E D C A Top Cross Bar E Chest Bar Pully B Top Cross Bar Pully F Rod Box C Leg Attachment G Power Rod® Unit D Chest Pully Cross Bar 7 Owner’s Manual
Features and Use The Bowflex® PR1000 home gym comes with 210 lbs. (95kg) of nominal resistance [one pair of 5 lb. (2.25kg) rods, two pair of 10 lb. (4.5kg) rods, one pair of 30 lb. (13.5kg) rods, and one pair of 50 lb. (22.5kg) rods]. Note: Power Rod® Resistance Rods are manufactured using nylon composite material. The weight resistance measurements are estimates and resistance can vary based on environmental and usage patterns and other factors.
Features and Use The Workout Bench Your Bowflex® home gym has a number of seat and bench positions: Flat bench, 45° incline and free-sliding seat extension. To adjust the seat, pull out the Seat Rail Knob, then slide the seat to one of the two locking holes on the Seat Rail. Release the Seat Rail Knob to secure the seat. Do not make any adjustments to the seat while sitting on it. Do not stand on the seat. Removing the Bench The Bench easily attaches and releases from the Seat.
Features and Use Storing Your Home Gym 1. Lock the Seat and Bench into the flat position. 2. Remove all Power Rod® resistance and then bind the Power Rod® unit with the rod binding strap. 3. Remove the Seat Rail Knob from the seat rail. 4. Tilt the bench toward the Power Rod® unit. 5. Secure the bench by inserting the Seat Rail Knob into the hole in the side of the Seat Rail Bracket. Failure to attach the Seat Rail Securing Device into the seat rail can cause injury.
Features and Use Accessories and Equipment Always inspect for wear prior to use. Handgrips After fitting the handgrips firmly to your hand, ankle, or wrist, attach the pulley cable clips to the D-rings on the handgrips to attach them to the cables. Standard Grip: Grasp the grip and cuff together to form a grip without inserting your hand through the cuff portion. Most of the exercises you perform utilize this grip.
Workouts Define Your Goals It is important to define your goals before you begin your workout routine. The following fitness guidelines will help you define your goals and choose your fitness program. exercise, either at different times or together, will create the greatest changes in body fat weight. Balanced Strength and alignment are the result of equal strength developed in all parts of the body.
Workouts Design Your Own Program You may want to design your own personal program specifically geared to your goals and lifestyle. Designing a program is easy by following the guidelines below. • Understand fitness and its components Improperly designed programs can be dangerous. Take some time to review this manual as well as other fitness guides.
Workouts Workouts 20 Minute Better Body Workout Frequency: 3 days per week (M-W-F) Time: 20 minutes Start by performing one set of each exercise. Warm up with a light resistance that you can perform easily for 5–10 reps without fatigue. Focus on practicing and learning your technique before increasing the resistance. Then move to a more challenging resistance that you can perform no less than 10 reps and no more than 15 reps. As you become stronger, you can advance to two sets for each exercise.
Workouts Days 2 & 4 Body Part Exercise Sets Reps Seated Lat Rows 1-3 10-12 Stiff Arm Pulldowns 1-3 10-12 Shoulders Crossover Seated Rear Deltoid 1-3 Row 10-12 Arms Standing Biceps Curl 1-3 10-12 Triceps Pushdown 1-3 10-12 Trunk Rotation 1-3 10-12 Seated Abdominal Crunch 1-3 10-12 Back Trunk 20 Minute Upper/Lower Body Frequency: 4 days per week (M-T-Th-F) Time: 20 minutes This program provides a quick and effective workout that combines muscle conditioning with some cardiovascular
Workouts Body Building Frequency: 6 days on, 1 day off (Day 6) Time: 45-60 minutes Body building requires focused concentration and dedication to training, as well as proper eating habits. Work each muscle group to fatigue before moving on to the next exercise. Do not neglect any muscle group. If needed, include an aerobic activity to increase your caloric expenditure and help to reduce your body fat levels to achieve a defined muscular look. Rest 30-60 seconds between each set and exercise.
Workouts Circuit Training - Anaerobic/Cardiovascular Frequency: 6 days on, 1 day off (Day 6) Time: 20-45 minutes Circuit training is a great way to achieve the benefits of strength training and cardiovascular training in one quick, challenging routine. The idea is to move quickly from exercise to exercise, taking only as much rest between sets as it takes to set up the next exercise (less than 20 seconds). One circuit equals one set of each exercise. Initially, start with completing one round of Circuit 1.
Workouts True Aerobic Circuit Training Frequency: 2-3 times per week Time: 20-60 minutes Circuit training is a great way to achieve the benefits of strength training and cardiovascular training in one quick, challenging routine. By returning to an aerobic exercise between each set you are increasing your aerobic capacity, endurance and burning fat as energy.
Workouts Strength Training Frequency: 3 days per week (M-W-F) Time: 45-60 minutes This program is designed to emphasize overall strength development. This is an advanced routine to be used only after you have progressed from the advanced general conditioning routine and only after you have perfected your exercise techniques. Work each set to near exhaustion. If you can perform more than 5 to 8 reps, you should increase your resistance 5 lbs and decrease your reps to 5.
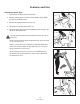
Exercises Keep your body weight centered on the machine, seat or base frame platform while exercising. When using the machine for standing leg exercises, always hold the Lat Tower of the machine for stability. All exercises in this manual are based on the calibrated resistance and capacity levels of this machine. Only exercises included in this manual or in written materials authorized and supplied by Bowflex ® are recommended for operation with this machine.
Exercises Chest Exercises Bench Press - Shoulder Horizontal Adduction (and elbow extension) Muscles Worked Pectoralis Major, Deltoids, Triceps Machine Set-Up • • • • Adjust the bench to a 45° incline. Chest Bar pulleys Handgrips Attach the clips to the Power Rod® resistance rods. Success Tips • Maintain a 90° angle between your upper arms and your torso throughout the motion. • Keep your chest muscles tight. • Limit and control your range of motion.
Exercises Chest Exercises Incline Bench Press - Shoulder Horizontal Adduction (and elbow extension) Muscles Worked Pectoralis Major, Deltoids, Triceps Machine Set-Up • • • • Adjust the bench to a 45° incline. Chest Bar pulleys Handgrips Attach the clips to the Power Rod® resistance rods. Success Tips • Maintain a 90° angle between your upper arms and torso at the start of the motion, and slightly less than 90° at the finish. • Keep your knees bent, feet flat on the floor, head back against the bench.
Exercises Shoulder Exercises Front Shoulder Raise - Shoulder Flexion (elbow stabilized) Muscles Worked Front and Middle Deltoids Machine Set-Up • • • • Adjust to Flat Bench position. Chest Bar pulleys Handgrips Attach the clips to the Power Rod® resistance rods. Success Tips • Keep your abdominals tight and maintain good spinal alignment with a slight arch in your lower back. • Keep your knees bent and your feet flat on the floor.
Exercises Shoulder Exercises Scapular Retraction Muscles Worked Middle Trapezius, Rhomboids Machine Set-Up • • • • Adjust to Flat Bench position. Chest Bar pulleys Handgrips Attach the clips to the Power Rod® resistance rods. Success Tips • Do not lose your spinal alignment. • Keep your chest lifted. • Keep your knees bent and your feet flat on the floor. • Keep your spine aligned and a slight arch in your lower back. • Do not use your arm muscles for this movement.
Exercises Back Exercises Stiff Arm Pulldowns Muscles Worked Latissimus Dorsi, Teres Major, Rear Deltoids, Biceps Machine Set-Up • • • • Adjust to Flat Bench position. Top Cross Bar pulleys Handgrips Attach the clips to the Power Rod® resistance rods. Success Tips • Keep your knees slightly bent and your feet flat on the floor. • Keep your spine aligned, abs tight and a slight arch in your lower back.
Exercises Back Exercises Reverse Grip Pulldown Muscles Worked Lower Trapezius Machine Set-Up • • • • Adjust to Flat Bench position. Chest Bar pulleys Handgrips Attach the clips to the Power Rod® resistance rods. Success Tips • Keep your knees bent and your feet flat on the floor. • Keep your spine aligned, abs tight and a slight arch in your lower back. • Keep your lats tightened through this exercise. • Release your shoulder blades at the top of each rep.
Exercises Arm Exercises Triceps Pushdown - Elbow Extension Muscles Worked Triceps Machine Set-Up • • • • Remove the bench. Top Cross Bar pulleys Handgrips Attach the clips to the Power Rod® resistance rods. Success Tips • Keep your upper arms motionless and your wrists straight. • Keep your chest lifted, abs tight and maintain a slight arch in your lower back. • Keep your knees slightly bent and your feet flat on the floor. • Use a controlled motion and tighten your triceps throughout the exercise.
Exercises Arm Exercises Standing Biceps Curl - Elbow Flexion (in supination) Muscles Worked Biceps Machine Set-Up • • • • Remove the bench. Chest Bar pulleys Handgrips Attach the clips to the Power Rod® resistance rods. Success Tips • Keep your chest lifted, abs tight and a very slight arch in your lower back. • Keep your knees slightly bent and your feet flat on the floor. • Keep your elbows at your sides and your wrists straight.
Exercises Abdominal Exercises Seated (Resisted) Abdominal Crunch - Spinal Flexion Muscles Worked Rectus Abdominus, Obliques Machine Set-Up • • • • Adjust the bench to a 45° incline. Chest Bar pulleys Handgrips Attach the clips to the Power Rod® resistance rods. Success Tips • Do not lift your head or chin. Your head should follow the rib motion rather than lead it. • Maintain normal neck posture. • Tighten your abs throughout the entire exercise and relax only at the end of each set.
Exercises Leg Exercises Leg Extension Muscles Worked Quadriceps Machine Set-Up • • • • Adjust to Flat Bench position. Use the Leg Extension Seat. Leg Extension pulleys Attach the clips to the Power Rod® resistance rods. Success Tips • Use slow, controlled motion. Do not kick into the extension. • Do not let your knees rotate outward during the exercise. Keep your kneecaps pointing up and straight forward.
Exercises Leg Exercises Seated Hip Adduction Muscles Worked Adductor Longus, Gluteus Medius Machine Set-Up • • • • Adjust to Flat Bench position Chest Bar pulleys Handgrips Attach the clips to the Power Rod® resistance rods Success Tips • Do not cross the attached leg in front of the stabilized leg. • Keep your abs tight and do not lift your hips or excessively arch your back. • Keep your spine straight and your hips level. Do not raise your hips during the motion. • Use only a small range of motion.
Exercises Leg Exercises Standing Leg Kickback - Hip and Knee Extension Muscles Worked Gluteus Maximus Machine Set-Up • • • • Adjust to Flat Bench position. Chest Bar pulleys Handgrips Attach the clips to the Power Rod® resistance rods. Success Tips • Keep your chest lifted, spine aligned, abs tight and a very slight arch in your lower back. • Do not bend from your waist or lower back. • Hold on to Lat Tower for stability. • Keep stabilizer foot on foot plate.
Owner’s Manual
Owner’s Manual
Owner’s Manual
EN Nautilus, Inc., (800) NAUTILUS / (800) 628-8458, www.NautilusInc.com - Customer Service: North America (800) 605-3369, customerservice@bowflex.com | outside U.S. +01-360-859-5180, technics-APLA@nautilus.com | Printed in China | © 2008 Nautilus, Inc.