
Owner's Manual

2
IMPORTANT INFORMATION
CONNECTING DIVERTER TO FAUCET
1. DO NOT RUN HOT WATER through unit. For COLD WATER USE ONLY. Turn on cold water faucet
(about one third of the way open). To receive ltered water, turn diverter valve handle on (Fig 6).
2. DO NOT run water through at maximum ow. Slow ow will extend contact time between the
ltration media and water, which results in better ltration. Keep ow below .30 GPM for ltration
to be effective.*
3. DO NOT use where water is microbiologically unsafe.
4. DO NOT cross-thread. If cross-threaded, do not put unit into service.
5. Make sure that installation of this system complies with all state and local laws and regulations.
6. Contaminate or other substances removed or reduced by this system are not necessarily in your
water.
7. If system is not used for an extended period of time, allow water to run for 5 minutes prior to use
re-ush the system.
8. If you need to connect a portable dishwasher to your faucet, unscrew the aerator from the lter
and attach according to the manufacturer’s recommendations.
9. A Reminder Decal is provided for your use to record the installation and lter replacement dates.
Peel off sticker and afx to the corner of a dry mirror or any glass service.
10. One-micron ltration will trap all invisible and undetected sediment, rust, and microorganisms. It is
recommended that you replace the pre-lter pad to avoid clogging. In certain geographical areas
the pre-lter pad may need to be replaced more often.
11. For more information refer to other labels and/or Installation and Operation Guide.
12. Do not use non-Crystal Quest
®
replacement cartridges.
13. Do not use non-Crystal Quest
®
parts or modify/tamper with unit.
*A lower ow will yield optimum ltration results.
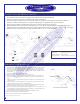
• Parts Included: Faucet mount system, cartridge, faucet adapters, lter change reminder label
1. Remove the aerator from the faucet on which the lter will be installed (Fig 1).
2. Determine the type of threads on your faucet and the need for an adapter. For faucets with outside threads, no adapter is
needed. For faucets with inside threads, an adapter is needed (Fig 2). Use appropriate size from parts included.
3. Select the proper adapter (if needed) and washers. Screw into faucet and tighten manually (Fig 3).
4. Attach the diverter to the faucet and turn until tight (Fig 4). To ensure snug t, grasp the diverter and the body and turn them
together clockwise. Then, holding the diverter still, turn the body clockwise until the unit is aligned to the left of your faucet (Fig 5).
5. Run water 5 minutes to ush the lter cartridge. Then before each use, run for 1-2 seconds to ush.
OPERATING SPECIFICATIONS:
Pressure Range: 20-60 psi (pounds per sq. in.)
Operating Temperature: 40-85°F (4.4-29.4°C)
Optimum Service Flow: 0.30 gpm at 60 psi (1.1 lpm at 4.1 bar)