
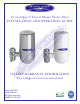
Owner's Manual

3
REPLACEMENT CARTRIDGE (CAPACITY: 2,000 GALLONS)* (6-12 MONTHS FILTRATION)*
CARE AND OPTIMUM USE
TROUBLESHOOTING
Your Faucet Mount Water Filter system contains a cartridge that must be replaced at regular intervals to maintain proper performance.
• The lter cartridge has a limited service life. use only factory approved cartridges.
• Changes in taste, odor, and ow of the water being ltered indicate that cartridge should be replaced. Failure to change the
cartridge routinely will result in reduced performance and void the warranty.
• Flush each new lter cartridge 5-10 minutes to remove all media nes. Media nes are not harmful but should be ushed out before
using the ltered water.
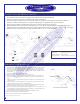
• Cartridge may need to be rotated quarterly to backwash and dechannelize the system (Fig 1, #4).
1. Disconnect lter housing unit by unscrewing diverter valve (Fig 7, #7) from faucet.
2. Separate the lter housing by turning upper lter housing (Fig 7, #1) counterclockwise to open.
3. Remove cartridge (#4) from lower lter housing along with the hard white disk and soft clear inner disk (Fig 7, #5).
4. Take cartridge out of wrapping, replace old cartridge with new one, and install cartridge with micron pad (Fig 7, #3) showing at the
top. Reassemble lter housing unit following installation instructions.
5. Run water through unit for 5-10 minutes prior to rst use and 2-3 seconds before each use thereafter.
*Cartridge life varies with water condition and consumption.
The replacement cartridge can be used inversely to extend lifetime. Flip the cartridge to the
opposite side of the housing unit to allow water to ow in opposite direction. This backwashes
the lter and prevents channeling.
1. Follow Steps 1-3 for replacing cartridge. (Removal of disks (Fig 7, #5) may take some
prying.)
2. Move micron pad (Fig 7, #3) to the other end of cartridge. (This end becomes the top end of
the cartridge.)
3. Insert disks into the bottom end of the cartridge.
4. Place cartridge into lower portion of housing unit and push rmly to secure.
5. Reattach upper lter housing (Fig 7, #1) and tighten clockwise.
6. Run water for 3-5 minutes.
7. Wash the lter housing unit monthly with mild detergent and rinse with hot water. If hard
water buildup is present on the diverter valve, soak valve in vinegar 5 to 15 minutes.
1. Water ow has drastically reduced. The unit may be clogged. Change micron pre-lter pad or replace the cartridge.
2. Water leak between the base and sump of the housing unit.
• The unit may be clogged
• The lter cartridge is not installed properly
• The O-ring on the top housing needs to be replaced
• Water pressure is too high. Reduce ow.
3. Water leaks around faucet and diverter area. Make sure the diverter is tight. Use the correct adapter or diverter O-ring included
with the lter housing unit. If necessary, replace the diverter.