
Use and Care Manual
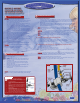


ACCESS TO
HEATING RESERVOIR
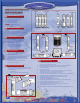
ACCESS TO
HEATING RESERVOIR
Turbo Water Cooler Heating Reservoir Replacement Guide Sharp Water Cooler Heating Reservoir Replacement Guide
NOTICE:
Ensurebothheatingandcoolingswitchesareturnedoff,powercordisunpluggedfromwalland
water supply is turned off before servicing the machine to avoid damage or injury.
Preparation
Turn off both the heating and cooling switches located on back of water cooler.•
Unplug power cord from electrical socket.•
Turn off water supply.•
Disconnect water supply line from back of cooler.•
Drain cooler completely of water using drain plug located on back of unit.•
Remove top from cooler, exposing the cooling reservoir; there are two screws on •
the back that secure the top to the machine.
Disassembly
Disconnect the water line from the cooling reservoir.•
Unplugwiringatplugforelectronicoat;thisisthesmallblackwirefeedingfrom•
the cooling reservoir lid.
Remove the cooling reservoir lid by pulling up on one edge of it.•
Remove the two metal ties that secure the foam sides of the cooling reservoir. •
Save these for reassembly.
Remove both foam sides that cover cooling reservoir.•
Remove six screws (two on inside near cooling reservoir and two behind drip tray •
on front) that secure face of machine to the body.
Disconnect cold water and hot water supply hoses from inside of face.•
Remove cooler front face. This allows easy removal of reservoir and better working •
room.
Remove the 4 screws that secure the condenser coils (black grate) to the back of •
the machine.
Gently pull out on one side of the coil to allow room to access heating reservoir. •
CAUTION:
Pulling out too much on coil will damage coil and cooling system.
Make labels or draw a diagram for wiring on heating reservoir; this will aid in •
reassembly.
Disconnect wiring from heating reservoir.•
Disconnect drain hose from reservoir.•
Disconnect supply hose from reservoir. This hose runs from bottom of cooling •
reservoir to side of heating reservoir.
Disconnect vent hose from top of heating reservoir.•
Locate the two screws that secure heating reservoir to body. These screws are •
underneath the foam base of the cooling reservoir. You may need to break off a
small piece of this base to locate the screws. Save this piece for reassembly.
Remove both screws which will allow you to remove the entire heating tank from •
the front of the machine.
Install new reservoir in reverse order of removal.
Once installed and cooler is reassembled completely, reattach water supply and plug unit
into electrical outlet.
NOTE:
Do not turn the cooling and heating switches on until at least two cups of water
can be retrieved from each spout. Damage to heating and cooling system can result.
Preparation
Turn off both the heating and cooling switches located on back of water cooler.•
Unplug power cord from electrical socket.•
Turn off water supply.•
Disconnect water supply line from back of cooler.•
Drain cooler completely of water using drain plug located on back of unit.•
Remove hot water spout from face of unit by turning spout counterclockwise.•
Remove cold water spout.•
Remove top from cooler exposing the cooling reservoir; there are two screws on the •
back that secure the top to the machine.
Disassembly
Disconnect the water line from the cooling reservoir.•
Unplugwiringatplugforelectronicoat;thisisthesmallblackwirefeedingfrom•
the cooling reservoir lid.
Remove the cooling reservoir lid by pulling up on one edge of it.•
Remove the two metal ties that secure the foam sides of the cooling reservoir. •
Save these for reassembly.
Remove both foam sides that cover cooling reservoir.•
Remove six screws (four on inside near cooling reservoir and two behind drip tray •
on front) that secure face of machine to the body.
Remove cooler front face. This allows easy removal of reservoir and better working •
room.
Remove the four screws that secure the condenser coils (black grate) to the back •
of the machine.
Gently pull out on one side of the coil to allow room to access heating reservoir •
CAUTION:
Pulling out too much on coil will damage coil and cooling system.
Make labels or draw a diagram for wiring on heating reservoir; this will aid in •
reassembly.
Disconnect wiring from heating reservoir.•
Disconnect drain hose from reservoir.•
Disconnect supply hose from reservoir. This hose runs from bottom of cooling •
reservoir to side of heating reservoir.
Disconnect vent hose from top of heating reservoir.•
Locate the two screws that secure the heating reservoir to body. These screws are •
underneath the foam base of the cooling reservoir. You may need to break off a
small piece of this base to locate the screws. Save this piece for reassembly.
Remove both screws; take off the entire heating tank from the front of the machine.•
Install new reservoir in reverse order of removal.
Once installed and cooler is reassembled completely, reattach water supply and plug unit
into electrical outlet.
NOTE:
Do not turn the cooling and heating switches on until at least 2 cups of water can
be retrieved from each spout. Damage to heating and cooling system can result.
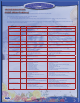
Please record the information below for your future reference
Plumber’s Name Plumber’s Address Plumber’s Telephone
13