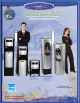
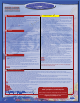
Crystal Quest® Point of Use Bottleless Water Coolers Installation and Operation Guide OPERATING SPECIFICATIONS Pressure Range: Temperature Range: Optimum Service Flow: 30-60 psi (2.1-4.1 bar) 40-100ºF (4.4-37.7ºC) 0.50 gpm at 60 psi (1.1 lpm at 4.1 bar) ISO 9001:2008 Certified Manufacturer Read this manual carefully before installing system. (All drawings, pictures, colors and sizes are approximate for illustrative purposes only and may not exactly resemble the end product.
Important Information • Do not lay the cooler on its side.The system must be in an upright position at all times. When carrying, do not lift the system by the faucets/ spouts. The system needs to be installed by a licensed plumber in any state or country; however, the following states specifically require a licensed plumber to install the system OR allow a state-registered installer or contractor: AR, CA, GA, KS, MA, MI, MN, OK, RI, SC, SD, TX, VT, and WI.
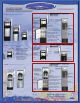
TURBO // SHARP TURBO SHARP SYSTEM SPECIFICATIONS Turbo CRYSTAL QUEST (Please note all drawings, pictures, colors, and sizes are approximate for illustrative purposes only and may not exactly resemble the end product.) CRYSTAL QUEST® Turbo Floor Water Cooler Turbo Floor Water Cooler ® “Cooling” Indicator Light “Heating” Indicator Light “Power” Indicator Light Hot Water Tap Cold Water Tap Premium Floor Turbo Floor Turbo Cup Holder Cold Water Switch Hot Water Switch Weight: 45 lbs.
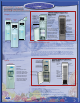
ELEGANT // HYBRID ELEGANT HYBRID SYSTEM SPECIFICATIONS Elegant CRYSTAL QUEST ® Elegant Floor with Wheels Elegant Floor Water Cooler Display Screen Hot Water Temperature Control Hot Water Safety Button Elegant Floor Hot Water Button Hot Water Faucet CRYSTAL QUEST® Elegant Floor Water Cooler Handle On/Off Switch Cold Water Temperature Control On/Off Switch Water Inlet Temperature Adjuster Cold Water Faucet Wire to Electrical Outlet Filtration Access Door Weight: 60 lbs. .
INSTALLATION INSTALLATION INSTRUCTIONS INSTRUCTIONS 1 • Arrival Inspection 4 Inspect the carton and water cooler for evidence of rough handling and concealed damage. If contents appear damaged, ask driver or contact carrier for a damage claim form to fill out. Shipper must be notified immediately. Remove the carton, top packaging tray, and shipping bag from the system. Remove system from the bottom Styrofoam® and carton tray.
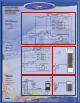
CIRCUIT AND CIRCUIT AND INSTALLATION INSTALLATION DIAGRAMS Turbo / Sharp Floor / Countertop Point of Use Water Coolers Circuit Diagram Turbo / Sharp Floor Point of Use Water Coolers Install to cold water supply line Turbo / Sharp Countertop Point of Use Water Coolers Install to cold water supply line 6
INSTALL WATER INSTALL WATER COOLER SYSTEM TO WATER TO WATER SUPPLY SUPPLY 6 CAUTION: Adjust the cold water supply line at the T-Valve (Fig 1) by slowly turning the handle to reduce flow to the system. • Connect the water supply line tubing to the system access board labeled “water inlet”. The system is shipped with a red cap; remove it before inserting the tube. • Turn on the cold water supply line again. Make sure there is no leak at the connections. Recheck for water leaks.
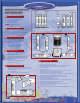
SERVICE INFORMATION AND GUIDELINES AND GUIDELINES 9 Feedwater Filtered Water Feedwater Filtered Water Servicing the Filter (Fig 3) 1. Shut off water at the water supply line. 2. Turn off hot and cold water switches. 3. Unplug the cord from outlet. 4. Drain tubing completely. 5. Disconnect tube from filter. CAUTION: HOT WATER WILL SCALD. Sediment GAC Ultrafiltration Multi Stage Cartridge Cartridge Cartridge Cartridge 10 Changing Filter Cartridges 1. 2. 3.
* The Reminder Decal is specially prepared as a reminder to change the cartridge routinely. Use a pen to fill out the installation and replacement dates. Peel off sticker and affix to the inside left or right panel of cartridge compartment.
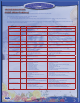
TROUBLESHOOTING TROUBLESHOOTING GUIDE (Water Problems) GUIDE Discovering the source of a problem is sometimes more difficult and time consuming than actually resolving the problem. There are two types of problems that call for correction: Parts or the system itself. 1. Parts need to be set up correctly, repaired, or replaced. 2. The system is not getting power, is receiving power at the wrong voltage, is being expected to perform beyond its capability, or simply needs to be cleaned.
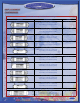
TROUBLE SHOOTING TROUBLE SHOOTING GUIDE (Unit Problems) GUIDE Problem 15 1. 2. 3. 4. 5. Solution Checklist No cold water and compressor rattling • • • • • • Check voltage received by cooler not running. Check cold control. Check wires. Check compressor relay. Check compressor overload. Check compressor. No cold water and compressor running • • • • Check voltage received by cooler. Check for a refrigerant leak. Check for a restriction in capillary line or strainer. Check compressor.
ACCESS TO ACCESS TO PARTS PARTS INSIDE THE SYSTEM 17 C. Accessing Switch Connectors Acessing the System Inside 1. 2. Before beginning the service inspection and/or repair, remove the cooler top and back covers from the cabinet. 3. 4. 5. 6. The steps below outline the procedure for all removable reservoir coolers. To replace parts inside the cabinet: 1. Shut off the water supply line to the system. 2. Drain water through the back of the system. 3. Unplug the power cord. 4.
ACCESS TO ACCESS TO HEATING RESERVOIR HEATING RESERVOIR Turbo Water Cooler Heating Reservoir Replacement Guide Sharp Water Cooler Heating Reservoir Replacement Guide NOTICE: Ensure both heating and cooling switches are turned off, power cord is unplugged from wall and water supply is turned off before servicing the machine to avoid damage or injury. Preparation • • • • • • Turn off both the heating and cooling switches located on back of water cooler. Unplug power cord from electrical socket.
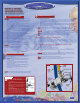
WATER COOLERS WATER COOLERS (OPTIONAL CARTRIDGES & ACCESSORIES) CQE-OZ-00101 Crystal Quest® Ozonator Sterilizer System Automatically sanitizes the cooler through a burst of ozone into the cooling tank and system. Ozonation kills any bacteria in a safe, odorless and taste free way. Ozone is a natural sterilization process that ensures your water is bacteria free. Once ozone has finished its sterilization job, it dissipates as oxygen and leaves your water oxygen enriched.
Crystal Quest® warrants your Crystal Quest® Point of Use Bottleless Water Coolers for one year from the date of purchase against all defects in materials and workmanship when used in compliance with the manual. This warranty does not include replacement ® cartridges unless defective upon receipt. Crystal Quest disclaims all implied warranties including, without limitation, warranties of merchantability and fitness for a particular purpose.
A TASTE OF NATURE ® To order replacement cartridges, contact your Crystal Quest® Dealer or visit us online at: http://www.crystalquest.com Installation and Maintenance Instructions Your Purchase Information KEEP THIS MANUAL FOR FUTURE REFERENCE AND UNIT MAINTENANCE To register your product warranty online visit www.crystalquest.com/warranty.htm To review the latest edition of the Installation and Operation Guide, visit www.crystalquest.com. 16 Product design is subject to change without notice.