
Use and Care Manual
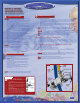


Before beginning the service inspection and/or repair, remove the cooler top and back
covers from the cabinet.
The steps below outline the procedure for all removable reservoir coolers. To replace
parts inside the cabinet:
Shut off the water supply line to the system.1.
Drain water through the back of the system.2.
Unplug the power cord.3.
Remove the two top screws on back to remove the cover of the system.4.
Remove the top of the reservoir.5.
Remove the reservoir.6.
Remove the six inside screws attaching the back of the system to the cabinet.7.
Remove the two screws holding the fuse box cover in place.8.
Pull fuses to remove and replace.9.
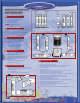
ACCESS TO PARTS
INSIDE THE SYSTEM
ACCESS TO PARTS
INSIDE THE SYSTEM
B. Accessing Fill Floater
Shut off the water at 1.
supply line.
Drain water from the 2.
cooler completely.
Remove the cabinet lid.3.
Pull the reservoir lid up.4.
Removing Cabinet Lid
A. Removing Cabinet Lid
Remove two screws from the back.1.
Pull the lid up.2.
C. Accessing Switch Connectors
Unplug the system.1.
Remove two screws and remove the 2.
cabinet lid.
Turn switches off.3.
Unplug the connector and replug.4.
Plug the cord back into wall socket.5.
Turn the switch back on.6.
Switch Connectors
D. Accessing Fuse Box
Unplug the system.1.
Remove screws and remove back 2.
panel.
Remove the fuse box cover.3.
Remove fuse and replace.4.
Fuse Box
Fuse Box
Back Panel
Fuse Box
Back Panel
Fuse Box
Acessing the System Inside
17
Spouts/Faucets
Drip Tray
E.ReplacingSpouts/Faucets(Sharponly)
Turn the knob counterclockwise to unscrew. Pull up and
remove.
F. Removing Drip Tray
Pull up and remove.
G. Draining the System
Unscrew the drain cap and remove the drain plug.1.
Place a pan, bucket, etc. beneath to catch water.2.
Cold Water Switch
Hot Water Switch
System Drain
System Drain
Cold Water Switch
Hot Water Switch
12