
Use and Care Manual

Inspect the carton and water cooler for evidence of rough handling and concealed •
damage. If contents appear damaged, ask driver or contact carrier for a damage claim
formtollout.Shippermustbenotiedimmediately.
Remove the carton, top packaging tray, and shipping bag from the system. Remove •
system from the bottom Styrofoam
®
and carton tray.
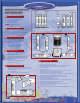
Inspect the system further, ensuring that:•
- there is no
physical damage
to the system.
- all
accessories
are present.
- the
hot tank switch
is in the “OFF” position.
- the
cooler is clean
and dust free.
Select the location for the system with care. Various conditions which contribute to proper
location are as follows:
Locate as close as possible to water supply source.•
Locate as close as possible to a three-prong grounding receptacle.•
Locatethesystemonasmoothandleveloor.•
Allowsufcientspacearoundthesystemforeasyservicing.•
Provide a non-switched 110/120V, 60Hz power source for the system.•
Make sure the system is not moved, tilted, OR shaken. Any of these will result in water •
spillageandmaycausepropertydamage.CRYSTALQUEST
®
accepts no liability for
damage.
Make sure the system is not within reach of children. The system does not have a child •
safety device.
Do not locate the system where the environment would offer any risk of water •
contamination.
Do not locate the system within or directly adjacent to toilet facilities.•
Donotputanyliquidotherthanwaterintothesystem.•
Do not lay the system on its side.•
Do not leave the system on without water supply line running.•
Installwatercoolerinanareaprotectedfromooding,rain,directsunlight,dust,snow•
and freezing. The warranty does not cover damage incurred as a result of exposure to
the weather.
Allow two inch clearance on sides, top, and back for ease of installation, proper air •
circulation and plumbing and electrical connections.
Do not install the water cooler where the temperature will go below 60ºF (16ºC) •
because it will not run often enough to maintain proper temperature.
Do not install the water cooler where the temperature will go above 100ºF (37ºC) •
because it will not perform properly.
Installwatercooleronaoorstrongenoughtosupportitwhenfullyloadedwithwater.•
If the water cooler is against a wall on either side, allow a 1/8” (3 mm) door clearance.•
IMPORTANT
– Observe all governing codes and ordinances.
Readtheinstructionscarefullyandlearnthespecicdetailsregardinginstallation•
and use. Failure to follow them could cause serious property damage. CRYSTAL
QUEST
®
accepts no liability for property damage.
The system should be installed to meet local, state and federal plumbing codes •
and health department rules and regulations. You must follow these guidelines
as you install the water cooler system.
Allequipmentshouldbeplumbedintothewatersystembyalicensed,qualied•
plumber.
Check with your local public works department for plumbing codes.•
The system is for indoor use only.•
Thesystemwillstandupto60poundspersquareinch(psi)waterpressure.•
We recommend installing a pressure reducing valve before the system. This will
reducethewaterpressureowtothesystemandwillpreventpressurebuild-up
on the system when not in use. The most common operating water pressure
range is 35-65 psi.
Turn the cold water line off while installing the system.•
Ahardimpactorjarringofthesystemwillcauselloattofailandmaycause•
major property damage. CRYSTAL QUEST
®
accepts no liability for
property damage.
Water will discharge if the top of the reservoir is not placed properly or seated •
securely (the reservoir top needs to be placed fully onto the reservoir tower), or
theunithasbeenshakenortilted,causingtheoatertogetstuck.
Make certain the electrical outlet is grounded by having it checked by an •
electrician or by using a UL listed circuit analyzer. Units are furnished with
3-prong grounded plugs to protect you against the possibility of electrical shock.
Do not under any circumstances remove the ground prong and never splice or
cut the electrical cord.
The outlet must be within reach of the power cord. Do not use an extension cord. •
Extensioncordsthataretoolongortoolightdonotdeliversufcientvoltageto
the unit and could present a safety hazard.
Disconnect power before installing or servicing the unit. Do not plug unit in or •
change fuses while standing on wet or damp surfaces and do not touch any
other metal surfaces while plugging in product or changing fuses.
All water treatment installations must conform to local plumbing, electrical and •
sanitation codes. These codes are established for your protection.
When installation is complete, dispense water from the hot and cold water •
spouts and run water until there is no more air in the lines.
When installation is complete, re-check the system to make sure there are no •
leaks or drips.
CAUTION
: Fill the unit with water; dispense a cup of water through each spout before
turning on the heating switch.
WARNING
:Apressureregulator,suchasaslow-owregulator,mustbeinstalledin
frontofthesystem’swaterinletifthewaterpressureisabove60psi(includingany
possible pressure spikes). Failure to comply will void warranty. Crystal Quest
®
accepts
no liability for damage caused by excessive water pressure or improper installation.
Do not use this drinking water system where the source water is microbiologically
unsafeorwithwaterofunknownquality.
Before you begin, read these instructions completely and carefully.
This water line installation is not warranted by the water cooler manufacturer. Follow these instructions carefully to minimize the risk of expensive water damage.•
Waterhammering(waterbanginginthepipes)inhouseplumbingcancausedamagetowatercoolerpartsandleadtowaterleakageorooding.Callaqualiedplumberto•
correct water hammering before installing the water supply line to the water cooler.
To prevent burns and product damage, do not hook up the water cooler to the hot water line.•
Do not install the water cooler and/or water cooler tubing in areas where temperatures fall below 60ºF. When using any electrical device (such as a power drill) during •
installation, be sure the device is double insulated or grounded in a manner to prevent the hazard of electric shock, or is battery powered.
Allinstallationsmustbeinaccordancewithlocalplumbingcoderequirements.•
Use copper or a Crystal Quest•
®
tubingkit(1/4”outsidediameter)toconnectthewatercoolertothewatersupply.Ifusingcopper,bothendsofthetubingmustbecutsquare.
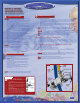
To determine how much tubing you need, measure the distance from the water valve on the back of the water cooler to the water supply pipe then add about 10” (25 cm) to allow •
the water cooler to move out from the wall after installation.
NOTE:
The only Crystal Quest
®
approved polytubing is that which is supplied in the Crystal Quest
®
water cooler tubing kit. Do not use any other plastic water supply line because the
line is under pressure at all times. Certain types of plastic will crack or rupture with age and cause water damage to your location. Crystal Quest
®
accepts no liability for property
damage.
NOTE:
The hot tank switch should be in the “OFF” position before and during installation.
IMPORTANT
–Savetheseinstructionsforlocalinspector’suse.
IMPORTANT
– Observe all governing codes and ordinances.
Note to Installer
– Be sure to leave these instructions with the Consumer.
Note to Consumer
– Keep these instructions for future reference.
Skill Level
–Installationofthiswatercoolerrequiresbasicmechanicalskills.
Proper installation is the responsibility of the installer.
Product failure due to improper installation is not covered under the warranty.
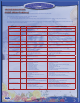
INSTALLATION
INSTRUCTIONS
INSTALLATION
INSTRUCTIONS
To register your product warranty online visit
www.crystalquest.com/warranty.htm.
Product design is subject to change without notice. For further
assistance contact your Crystal Quest
®
Dealer or E-mail us at
support@crystalquest.com.
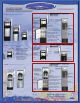
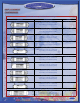
Arrival Inspection
1
Location
2
Clearances
3
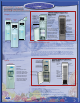
Pre-Installation Instructions
5
Safety Information
4
!
5