
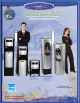
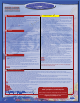
Use and Care Manual

Turn off hot and cold switches, then turn off water supply.1.
Disconnect the power supply from the cooler.2.
Drain hot-cold water tank and water from the reservoir by opening the system drain.3.
Drainwaterfromthereservoirandhottank(iftted)throughthefaucets.4.
Wash hands thoroughly.5.
Put on disposable gloves.6.
Wash the faucets and reservoir using mild cleaning agent. Parts MUST be completely 7.
submerged in the solution. Rinse with clean water immediately.
Reassemble the water cooler using the sanitized components.8.
Sanitizehotandcoldtank(iftted)andentirecoolerwithanewbatchofsanitizingsolution.9.
Completelyllthecoolerwithsanitizingsolutionandletstandfor5minutes.10.
Drainsolutionthroughhotandcoldtankdrain(iftted)orthroughfaucets.11.
Rinse with clean water immediately.12.
Reconnectthecoldsupplylinetocooler’sinlettube.13.
Flush the reservoir at least three times to remove any traces of the sanitizing solution.14.
Use chlorine test kit to identify the presence of any contaminants.15.
If contamination still exists, repeat steps 13 and 14.16.
Clean the outside of the cabinet and the drip tray, using a mild cleaning agent.17.
Reconnect the power supply to the cooler.18.
CAUTION:
FAILURETOTURNOFFHOTTANKCOULDCAUSEPHYSICALDAMAGETOTHIS
UNIT.
SERVICE INFORMATION
AND GUIDELINES
SERVICE INFORMATION
AND GUIDELINES
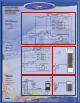
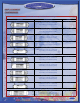
Fig 10
Fig 11
Fig 13
Fig 12
Shut off water at the water supply line.1.
Turn off hot and cold water switches. 2.
Unplug the cord from outlet.3.
Drain tubing completely.4.
Disconnecttubefromlter.5.
CAUTION:
HOTWATERWILLSCALD.
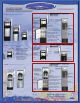
Servicing the Filter (Fig 3)
9
Loosentheconnectorttingcounterclockwise(Fig4).1.
Pull the cartridge out of the main fold.2.
WraptheconnectorttingwithTeon3.
®
tape and connect
it to a new cartridge (Fig 5).
Changing Filter Cartridges
10
Remove two screws from the back (Fig 6).1.
Pull the lid up to locate the cartridge (Fig 7).2.
Loosentheconnectorttingsbyturningthem3.
counterclockwise (Fig 8).
Pull the cartridge out of the main fold.4.
WraptheconnectorttingwithTeon5.
®
tape and
connect it to a new cartridge (Fig 9).
Changing Cartridges in System
11
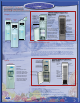
Loosentheconnectorttingcounterclockwise(Fig10).1.
Remove the membrane housing cap by turning 2.
counterclockwise.
Remove the membrane with a pincer (Fig 11).3.
Insert the membrane by carefully pushing the spigot 4.
end into the socket at the far end of the housing until
completely in (Fig 12).
WraptheconnectorttingwithTeon5.
®
tape and
connect it to the tubing (Fig 13).
Changing Membranes
12
The back static condenser on the rear of the unit must be kept 1.
clean of dirt and lint. Visually inspect every 3 months. To clean
it, follow these steps:
a. Unplug the cooler.
b. Clean condenser with a small, stiff, non-wire brush.
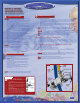
Sanitizing / Cleansing the System
13
Sanitization Procedure
14
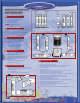
Fig 5
Fig 3
Fig 4
Fig 7
Fig 6
Fig 9
Fig 8
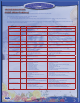
Feedwater
Sediment
Cartridge
GAC
Cartridge
Ultraltration
Cartridge
Multi Stage
Cartridge
Filtered Water Feedwater
GAC
Cartridge
Reverse Osmosis
Cartridge
Ultraltration
Cartridge
Multi Stage
Cartridge
Filtered Water
8