GaugeCalHP Bolt Down Kit Instructions
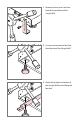
1 Remove the two screws and two brackets from the front of the GaugeCalHP. 2 Unscrew and remove the four feet from the base of the GaugeCalHP. 3 Attach the brackets to the base of the GaugeCalHP by reinstalling the four feet.
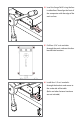
4 Level the GaugeCalHP using the four installed feet. Then align the front of the comparator with the edge of the work surface. 5 Drill four 5/16" or 8 mm holes through the work surface at the four bracket hole locations. 6 Install four 1/4" or 6 mm bolts through the brackets and secure to the underside of the table. (Bolts and other fastener hardware are not included.
© 2013 Crystal Engineering Corporation 708 Fiero Lane, Suite 9, San Luis Obispo, California 93401-8701 5199.