
Manual


Page 4 • GaugeCalXP Service Instruction Sheet
C R Y S T A L
engineering corporation
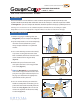
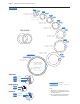
16 Remove the MPF-1/4FPT and MPM-MPM t-
tings from the Rear Gauge Base. Use a 5mm
Allen key to remove the four (4) cap screws
holding the Rear Gauge Base and its o-ring
(PN 4114 or 3130) from the top of the Mani-
fold Block. Remove the o-rings (PN 3981)
from the MPF tting on both the Gauge Base
and the MPF-1/4FPT. Repeat for Front Gauge
Base.
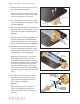
17 If the comparator is tted with an optional
Fine Adjust Kit, continue to step 18. If not,
you may skip ahead to step 24.
Note: A comparator without the Fine Adjust
option is instead tted with an Accessory
Cap, plus an o-ring that should be replaced.
The screws for the plate will require a 4mm
Allen key to remove. Screws included with
older Fine Adjust Kits will require a 5mm key,
while those included with recent, redesigned
kits will require a 4mm key.
18 Use either a 4- or 5mm Allen key to remove
the four (4) cap screws holding the Fine Ad-
just to the side of the Manifold Block, then
pull the Fine Adjust and its o-ring (PN 2018
or PN 3130) away from the Manifold Block
(gure 13).
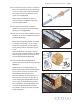
19 Use a 3mm Allen key to loosen the set screw
inside the Fine Adjust knob, then slide the
knob o of the piston (gure 14).
20 Use a 15mm box wrench to remove the Fine
Adjust bushing from the body, then slide the
bushing and its o-ring (PN 2018) o of the
piston (gure 15).
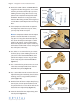
21 With the front of the Fine Adjust body facing
toward you, turn the piston clockwise until
the piston threads are clear of the hole in the
back of the Fine Adjust body (gure 16).
22 From the back of the Fine Adjust body, slide
out the piston (gure 17).
Figure 12
Figure 13
Figure 14
Figure 15
MPF-GC
Internal O-rings
(PN 3981)
(1)
(1)
MPF-1/4FNPT
O-ring
(PN 4114 or 3130)
MPM-MPM
O-ring
(PN 2018 or
PN 3130)
Fine Adjust
Fine Adjust
Knob
Fine Adjust
Bushing
*
O-ring
(PN 2018)
*
When reassembling, apply
Dow Corning 111 or a similar
silicone-based lubricant .