
Installation Sheet


ASSEMBLYINSTRUCTIONMODEL#PKR-B8501-BF
CRYST
RAMA
C
U
WARNING:
ElectricalDanger
TurnPoweroff
WARNING: ThisproductcanexposeyoutoLead
whichisknowntothestateofCaliforniatocausecancer
and/orbirthdefectsorreproductiveharm.Formore
informationgotowww.P65Warnings.ca.gov
L I G H T I N GT H EW A YF O RS I X T YY E A R S
installedbyalicensedelectrician
inaccordancewiththeNational
Allelectricalcomponentsmustbe
ElectricCodeandtheappropriate
localelectricalcodes.
Youwillneed -MediumBaseBulb1
TypeB1060WattsMax.
USELEDBULBSFOREXTENDEDUSE
7 . Slipcanopyupalongrodsandovermountingstrap
withswivelandholdinitposition.Slipcollarring
uptocanopyandthreaditontoscrewcollar,to
securecanopy.
Howtoinstall
4 . Slipcollarringandcanopyovertherodassembly.
6 . Raisefixtureupandattachmountingstraptothe
outletboxusingtwooutletboxscrews.
2 . Determinethepreferredhangingheightandadjust
totherequiredrods.
5 . Slipmountingstrapwithswivelalongwireand
threaditintothetopoftherodassembly.
3 . threadthenippleintothecoupling2.
3 . Feedthewiresthroughtherodsandconnect
themtogether.
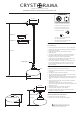
6”
12”
1Pc
3Pcs
ROD2=
ROD1=
54-3/8’’
5-7/8’’
7/8’’
9’’
5-7/8’’
7/8’’
10-1/4’’
GLASSSHADE
9’’
5’’
Forhanging:
1 . .Slipcupovertheloopkit onto the top of theglass
COUPLING1
CUP
COUPLING2
Forceiling:
1 . Removecoupling1fromtopofloopkit.
2 . Screwthecoupling2ontotheloopkitandslipthe
cupoverit.
6 . Securethemountingbartotheoutletboxwiththe
outletboxscrews.
4 . Slipthecanopyandthelockwasheroverthenipple,
thensecurewiththebighexnut.
5 . Threadthemountingscrewsintothematchingholes
ofthemountingbar,andtightenwiththesmallhex
nut.
7 . Raisecanopyallowingthemountingscrewsto
protrudethroughtheholesinthecanopy,andsecure
withthefinials.
9 . Toinstallglass,movethecupupward.
1 0 . Raisetheglassshadeintotheglassholderand
tightenitusingthescrews.
8 . Installthebulb(notincluded)intosocket.
HOWTOREPLACETHEBULB
1 . Raisethecupontopofglassup.
2 . Removethe3screwsonthesideofglass.
ThisfixtureisDamprated