
Installation Sheet

36"
14"
10"
K
J
I
H
G
F
E
D
C
B
A
Z
Y
X
W
V
U
T
S
R
Q
P
O
N
M
L
J
I
H
G
F
E
D
C
B
A
J
I
H
G
F
E
D
C
B
K
J
I
H
G
F
E
D
C
B
Z
L
Y
X
W
V
U
T
S
R
Q
P
O
N
M
Y
X
W
V
U
T
S
R
Q
P
O
N
M
Y
X
W
V
U
T
S
R
Q
P
O
N
M
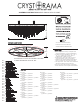
SUGGESTED CRYSTAL PLACEMENT TOP VIEW
PLEASE REFERENCE CRYSTAL KEY
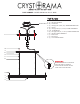
ASSEMBLY INSTRUCTION MODEL #WIN-619-GA-CL-MWP
You will need 8 -Candelabra Base Bulb
40 Watts Recommended 60 Watts Max.
USE LED BULBS FOR EXTENDED USE
DETAILED ILLUSTRATION
1.Do a complete inventory of all parts and
components before you start installation.
2.Create two stem assemblies (12” + 12” +
12” + 6”), making sure the 6” stem is
installed and located at the top.
3.Feed fixtures wiring through one of the
stem assemblies, prior to connecting.
4.Take the two stem assemblies and attach
the 12” bottom side to the fixture frame.
5.The opposite 6” side of the stem assemblies
will then be attached to the swivels.
6.Insert recommended bulb (not included).
7.Dress the fixture with crystal as illustrated.
A=
B=
C=
D=
E=
F=
G=
H=
I=
J=
K=
L=
M=
N=
O=
P=
Q=
R=
S=
T=
U=
V=
W=
X=
Y=
Z=
Crystal Key
A.2 Sets.
(4)14mm + (2)20mm
B.4 Sets.
(3)14mm + (4)20mm
C.4 Sets.
(2)14mm + (5)20mm + (1)30mm
D.4 Sets.
(2)14mm + (4)20mm
E.4 Sets.
(5)14mm + (5)20mm
F.4 Sets.
(4)14mm + (4)20mm
G.4 Sets.
(3)14mm + (6)20mm + (1)30mm
H.4 Sets.
(3)14mm + (5)20mm
I.4 Sets.
(6)14mm + (6)20mm
J.4 Sets.
(4)14mm + (6)20mm
K.2 Sets.
(4)14mm + (7)20mm + (1)30mm
L.2 Sets.
(2)20mm + (1)30mm
M.4 Sets.
(2)14mm + (2)20mm
N.4 Sets.
(3)20mm + (1)30mm
O.4 Sets.
(2)14mm + (3)20mm
P.4 Sets.
(2)14mm + (4)20mm
Q.4 Sets.
(2)14mm + (2)20mm
R.4 Sets.
(2)14mm + (2)20mm + (1)30mm
S.4 Sets.
(3)14mm + (4)20mm
T.4 Sets.
(5)14mm + (4)20mm + (1)30mm
U.4 Sets.
(1)14mm + (3)20mm
V.4 Sets.
(5)14mm + (3)20mm
W.4 Sets.
(1)14mm + (3)20mm + (1)30mm
X.4 Sets.
(4)14mm + (5)20mm
Y.4 Sets.
(3)14mm + (5)20mm
Z.2 Sets.
(5)14mm + (4)20mm + (1)30mm