
User`s guide


Table Of Contents
- Copyrights and Trademarks
- Disclaimer
- Welcome to NetVision
- Common / Daily Tasks
- 5 Starting your Software and Logging In
- 6 Alarm / Reporting Features and 'Chatting'
- 7 Playing or Downloading Video Recordings
- 7.1 Overview--Types of Playback
- 7.2 Playback--Technical Details
- 7.3 Synchronized Playback (v2.3 SP2)
- 7.4 Video Search (v2.3 SP2)
- 7.5 Searching for Motion
- 7.6 Working with the Playback Screen
- 7.7 Viewing and Printing 'Snapshots'
- 7.8 Working with the File List
- 7.9 Quad Playback
- 7.10 Server Management--Identifying Remote Servers for Playback
- 8 Viewing Live Cameras
- 9 Recording Camera-Views
- System Administration and Maintenance
- 10 Tasks Applicable to Remote Stations and the Video Server
- 10.1 PC Date and Time
- 10.2 Checking your Software Version
- 10.3 Introduction to Video File Management (Filekeeping and Housekeeping)
- 10.4 To Allow Using a Blank CD (Roxio - Easy CD Creator 5 basic with DirectCD)
- 10.5 Filekeeping (v2.3 SP2)
- 10.6 Housekeeping
- 10.7 Automatic Video File Management (Self Housekeeping)
- 11 Tasks Performed at the Video Server Only
- 10 Tasks Applicable to Remote Stations and the Video Server
- System Configuration
- Software Installation and Network Set Up
- 19 PC Requirements
- 20 Software Installation or Upgrade
- 21 Network and Connectivity Issues
- 21.1 General Network Requirements
- 21.2 IP Addressing on the Network
- 21.3 Network Services
- 21.4 Network Ports
- 21.5 To Connect via the Internet
- 21.6 Remote User Permissions
- 21.7 For Remote Viewing, Recording, Playback, and/or Audio Monitoring
- 21.8 For Alarm Alerts
- 21.9 For E-Mail Alerts
- 21.10 Windows Dial-Up Networking Connection (i.e., not via the Internet)
- 21.11 Network Usage
- Reference Topics
- 22 Using the Small Remote Module
- 23 Remote Configuration
- 24 The WatchDog Feature
- 25 Hardware Reference
- 26 Troubleshooting
- 27 Using the ATM Interface Option
- 28 Working with the Older Playback Engines
- 28.1 The Video Playback Feature (Micro DVR)
- 28.2 Step 1: Open the Video Player
- 28.3 Step 2: Local / Remote, and Connection Screen
- 28.4 Step 3: Searching for Video/Alarm Files
- 28.5 Smart Motion Search (Micro DVR)
- 28.6 Step 4: Playing a Video
- 28.7 Window Options and File Properties (Micro DVR, Quad Player)
- 28.8 Viewing and Printing 'Snapshots' (Micro DVR)
- 29 Viewing Cameras through a Web Browser
- 30 Setting up an IP Camera or Video Server module (v2.3 SP2)
- 31 Panoramic Video Surveillance--PVS (v2.3 SP2)
21-0400E v2.3.3
Welcome Common Admin Config Install
Tech-Ref
111
25.1.4
TV-Out (Composite Video)
Current video cards include a composite-video
output allowing individual cameras to be
displayed on television monitor(s) manually, in
sequence, or when an alarm occurs (external
input or video motion-detection). Depending
on your product version, the video connection
will be internally or externally connected to a
multiplexer (mux) card which has one external
composite video output for connecting to the
monitor(s). Units are shipped with an RCA to
BNC adapter allowing easy hook-up with
coaxial cable. If desired, additional monitors
can be connected in parallel via ‘loop-through’
connections.
Related Topics:
8.4 Monitoring Cameras via TV (Spot Monitor)
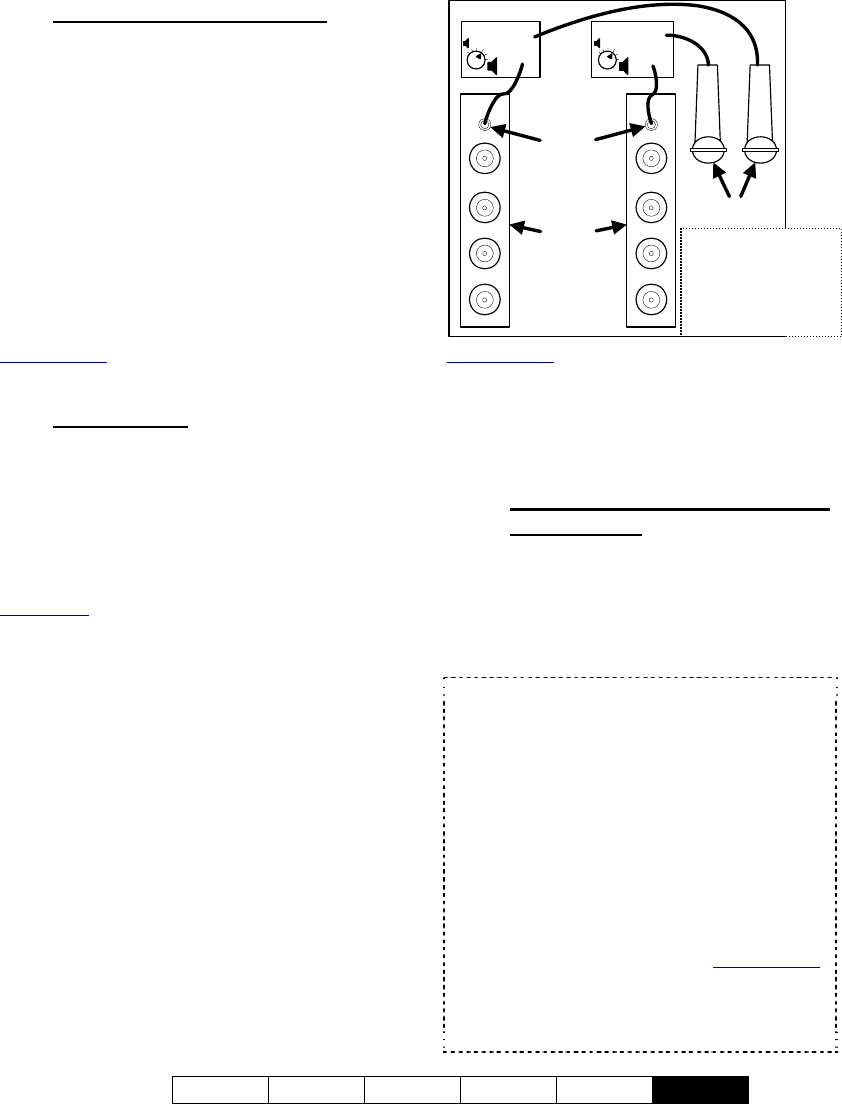
25.1.5
Audio Inputs
Current NetVision Plus and Elite systems
include a built-in sound card with microphone
jack, plus up to 4 line-level audio inputs (on
video capture boards, or an optional 4-input
audio board). Once configured, audio will be
included in associated video files, and can also
be monitored at authorized remote stations.
Legal Notice: The recording of live audio is subject to
local bylaws. Be sure to find out if audio recording is
restricted in your area before proceeding.
Audio inputs on video capture (or separate
audio) boards are standard mono 1/8” mini-
jacks supporting a line-level audio source.
Bare microphones will each require a suitable
pre-amp (sourced locally).
Capture
boards
Audio Input (mono
1/8" mini jack)
Microphones
Microphone
pre-amp
Microphone
pre-amp
Note: Elite systems
use an optional audio
input board instead.
Related Topics:
16.5 Enable Audio for Specific Cameras
16.6 Setting the Sound Level
16.7 Remote Audio Monitoring
25.2
Camera and PTZ Reference
25.2.1
Cameras Supported (including
PTZ models)
Most common NTSC and Pal cameras are
supported, including a good selection of
PTZ models. For details on supported
PTZ models, refer to the PTZ model
reference (to follow/below).
TechTips: Beginning with V2.2, eight different PTZ
protocols are supported through COM ports 1 - 8
(different protocol for each port). For more than one
PTZ camera, the cameras must be (one of): •
Different types (protocol), and connected through a
different port (with RS232 – RS422/485 converter
as needed); • Connected in parallel (individual
control can be provided though OSRD / receiver-
driver IDs); • Use a supported 'cascade' protocol
(such as Canon VC-C4); • Connected through a
switcher.
Cameras Identified through a Hardware ID: Be
sure to jot down the OSRD / receiver-driver ID for
each camera, as this will be needed when you
enable and set up the PTZ feature. Related Topics:
16.3 Pan/Tilt/Zoom Activation and Set Up
Tip: Many non-PTZ cameras can be zoomed in
and out manually during installation (using buttons
on the camera body).
Note: Monitoring
audio requires PC
speakers (plugged
into the green line-
out jack on the PC).