
User`s guide


Table Of Contents
- Copyrights and Trademarks
- Disclaimer
- Welcome to NetVision
- Common / Daily Tasks
- 5 Starting your Software and Logging In
- 6 Alarm / Reporting Features and 'Chatting'
- 7 Playing or Downloading Video Recordings
- 7.1 Overview--Types of Playback
- 7.2 Playback--Technical Details
- 7.3 Synchronized Playback (v2.3 SP2)
- 7.4 Video Search (v2.3 SP2)
- 7.5 Searching for Motion
- 7.6 Working with the Playback Screen
- 7.7 Viewing and Printing 'Snapshots'
- 7.8 Working with the File List
- 7.9 Quad Playback
- 7.10 Server Management--Identifying Remote Servers for Playback
- 8 Viewing Live Cameras
- 9 Recording Camera-Views
- System Administration and Maintenance
- 10 Tasks Applicable to Remote Stations and the Video Server
- 10.1 PC Date and Time
- 10.2 Checking your Software Version
- 10.3 Introduction to Video File Management (Filekeeping and Housekeeping)
- 10.4 To Allow Using a Blank CD (Roxio - Easy CD Creator 5 basic with DirectCD)
- 10.5 Filekeeping (v2.3 SP2)
- 10.6 Housekeeping
- 10.7 Automatic Video File Management (Self Housekeeping)
- 11 Tasks Performed at the Video Server Only
- 10 Tasks Applicable to Remote Stations and the Video Server
- System Configuration
- Software Installation and Network Set Up
- 19 PC Requirements
- 20 Software Installation or Upgrade
- 21 Network and Connectivity Issues
- 21.1 General Network Requirements
- 21.2 IP Addressing on the Network
- 21.3 Network Services
- 21.4 Network Ports
- 21.5 To Connect via the Internet
- 21.6 Remote User Permissions
- 21.7 For Remote Viewing, Recording, Playback, and/or Audio Monitoring
- 21.8 For Alarm Alerts
- 21.9 For E-Mail Alerts
- 21.10 Windows Dial-Up Networking Connection (i.e., not via the Internet)
- 21.11 Network Usage
- Reference Topics
- 22 Using the Small Remote Module
- 23 Remote Configuration
- 24 The WatchDog Feature
- 25 Hardware Reference
- 26 Troubleshooting
- 27 Using the ATM Interface Option
- 28 Working with the Older Playback Engines
- 28.1 The Video Playback Feature (Micro DVR)
- 28.2 Step 1: Open the Video Player
- 28.3 Step 2: Local / Remote, and Connection Screen
- 28.4 Step 3: Searching for Video/Alarm Files
- 28.5 Smart Motion Search (Micro DVR)
- 28.6 Step 4: Playing a Video
- 28.7 Window Options and File Properties (Micro DVR, Quad Player)
- 28.8 Viewing and Printing 'Snapshots' (Micro DVR)
- 29 Viewing Cameras through a Web Browser
- 30 Setting up an IP Camera or Video Server module (v2.3 SP2)
- 31 Panoramic Video Surveillance--PVS (v2.3 SP2)
21-0400E v2.3.3
Welcome Common Admin Config Install
Tech-Ref
123
27.6
Additional Options
(the right-click menu)
Some additional commands can be accessed
by right-clicking the transaction number for a
file/event:
• Protect/Unprotect This Tran.: This allows
blocking or allowing transaction files to be
deleted by the ATM auto-housekeeping
feature. Protected files/transactions are
flagged with an asterisk ( ∗ ).
Tip: If you wish to access the auto-housekeeping
feature for ATM recordings: • Go to the specific
Video Server; • Right-click the Event-Server module
on the task bar; • Select Set Up from the
pop-up menu; • Log in as a "Supervisor";
• Click [Housekeeping Setup].
• Authenticate: This checks the
file's built-in watermark to ensure
the file has not been tampered
with.
• Download: This copies a remote
file onto your PC's hard-drive.
Thereafter, the video will be
available under "Local" on your PC.
27.7
Viewing and Printing
'Snapshots'
You can take 'snap shots' of desired images
from a video file, and print or save them as
desired.
File-Format: Snapshots saved through ATM Playback
are saved as BMP files.
First, open/play the desired video, and use the
'position' slider, or the pause and play buttons
to locate the desired image. Then, use the
buttons next to the top half of the speed slider
as desired:
------
To close the playback windows when finished,
click the [X] in the top right corner of each
playback screen.
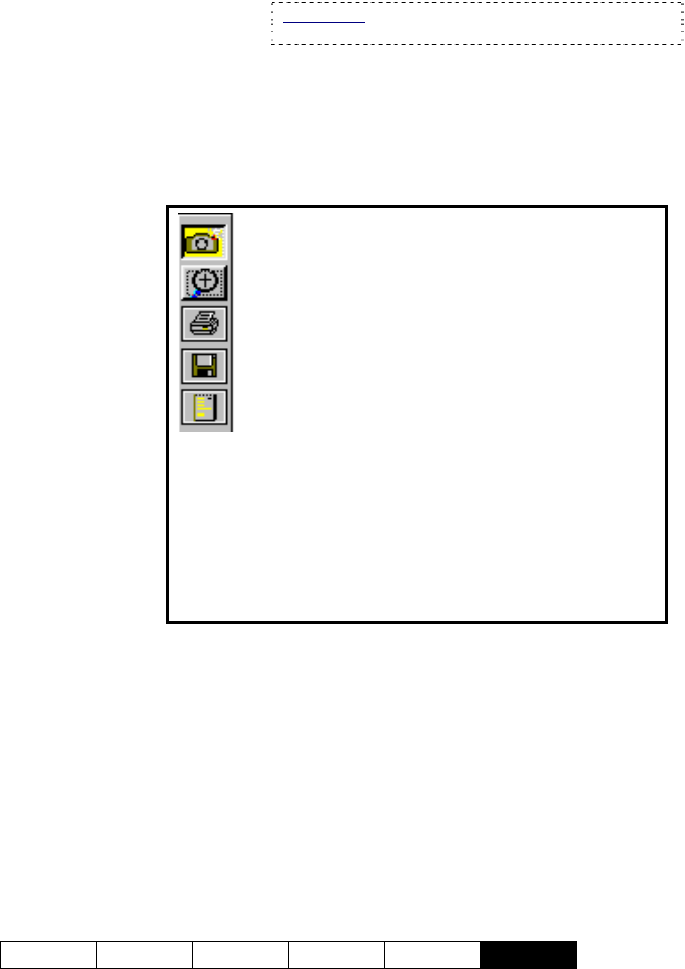
Snapshot Buttons (top-right)
Camera (snap shot): This toggles between video
playback mode and snapshot mode (snapshot buttons
appear yellow when available);
Magnifying glass (zoom): To enlarge (zoom into) a
portion of the video frame, click-and-drag a box around the
desired area, and then click this button;
To Zoom Back Out: Click the Zoom button again.
Printer symbol (Print): This allows printing your snap shot
in a single-page 'report'.
(Click the 'printer' button, and then use the command
buttons at the top of the print-preview screen.);
Diskette symbol (Save): This allows saving your snap
shot as a "BMP" file. (Browse for the desired folder, and
click [OK].)
Page symbol (Printer Setup): This allows setting up
header, disclaimer, and comment text to appear on printed
snapshot 'reports'. Enter your desired text. Click
[Header/Disclaimer] to access those items. When
finished, click [OK] to close each screen as needed.