
User`s guide


Table Of Contents
- Copyrights and Trademarks
- Disclaimer
- Welcome to NetVision
- Common / Daily Tasks
- 5 Starting your Software and Logging In
- 6 Alarm / Reporting Features and 'Chatting'
- 7 Playing or Downloading Video Recordings
- 7.1 Overview--Types of Playback
- 7.2 Playback--Technical Details
- 7.3 Synchronized Playback (v2.3 SP2)
- 7.4 Video Search (v2.3 SP2)
- 7.5 Searching for Motion
- 7.6 Working with the Playback Screen
- 7.7 Viewing and Printing 'Snapshots'
- 7.8 Working with the File List
- 7.9 Quad Playback
- 7.10 Server Management--Identifying Remote Servers for Playback
- 8 Viewing Live Cameras
- 9 Recording Camera-Views
- System Administration and Maintenance
- 10 Tasks Applicable to Remote Stations and the Video Server
- 10.1 PC Date and Time
- 10.2 Checking your Software Version
- 10.3 Introduction to Video File Management (Filekeeping and Housekeeping)
- 10.4 To Allow Using a Blank CD (Roxio - Easy CD Creator 5 basic with DirectCD)
- 10.5 Filekeeping (v2.3 SP2)
- 10.6 Housekeeping
- 10.7 Automatic Video File Management (Self Housekeeping)
- 11 Tasks Performed at the Video Server Only
- 10 Tasks Applicable to Remote Stations and the Video Server
- System Configuration
- Software Installation and Network Set Up
- 19 PC Requirements
- 20 Software Installation or Upgrade
- 21 Network and Connectivity Issues
- 21.1 General Network Requirements
- 21.2 IP Addressing on the Network
- 21.3 Network Services
- 21.4 Network Ports
- 21.5 To Connect via the Internet
- 21.6 Remote User Permissions
- 21.7 For Remote Viewing, Recording, Playback, and/or Audio Monitoring
- 21.8 For Alarm Alerts
- 21.9 For E-Mail Alerts
- 21.10 Windows Dial-Up Networking Connection (i.e., not via the Internet)
- 21.11 Network Usage
- Reference Topics
- 22 Using the Small Remote Module
- 23 Remote Configuration
- 24 The WatchDog Feature
- 25 Hardware Reference
- 26 Troubleshooting
- 27 Using the ATM Interface Option
- 28 Working with the Older Playback Engines
- 28.1 The Video Playback Feature (Micro DVR)
- 28.2 Step 1: Open the Video Player
- 28.3 Step 2: Local / Remote, and Connection Screen
- 28.4 Step 3: Searching for Video/Alarm Files
- 28.5 Smart Motion Search (Micro DVR)
- 28.6 Step 4: Playing a Video
- 28.7 Window Options and File Properties (Micro DVR, Quad Player)
- 28.8 Viewing and Printing 'Snapshots' (Micro DVR)
- 29 Viewing Cameras through a Web Browser
- 30 Setting up an IP Camera or Video Server module (v2.3 SP2)
- 31 Panoramic Video Surveillance--PVS (v2.3 SP2)
134 NetVision Plus/Elite and Micro DVR v2.3 SP2 User's Guide 21-0400E v2.3.3
Click [OK] if prompted with “User name or
password is wrong”. Then enter a valid
username (e.g., demo), and password (e.g.,
demo), and click [Connect]. (pressing the
Enter key will not work here).
Then, select your desired cameras, and other
items on-screen.
Tip: As of this writing (2005.09), cameras 1, 3, 5, and 7
are available under netvisiondemo.
Items On-Screen
- Camera: Select the camera number here.
- Server: Enter the name or IP address of the
NetVision Video Server here.
Tip: Remember to include the “:Port#” after the
server name or IP address if the port is not 80.
- User Name: Enter the name of a valid user with
permission to access the WebCam server at the
specific NetVision Video Server PC (e.g., demo).
- Password: Enter the password associated with
the user name that you entered--if required (e.g.,
demo).
- [Connect]: Click this button to connect with the
server and view the selected cameras.
Note: Pressing the Enter key will not work here.
- [Snapshot]: Click this button to open a second
window containing a snapshot from the camera
image.
Tip: To save a copy of the snapshot (as a .BMP file):
• Right-click the snapshot image; • Select “Save
Picture As”; • Enter or select your desired location
and filename; • Click [OK].
- NTSC or PAL: Select the type of cameras
here (or try both settings to see which one
provides better results.
- Frame Rate (Low / Medium / High): This sets
the relative maximum number of frames per
second that you will see. Select a frame rate
suitable for your connection speed/bandwidth.
28.4
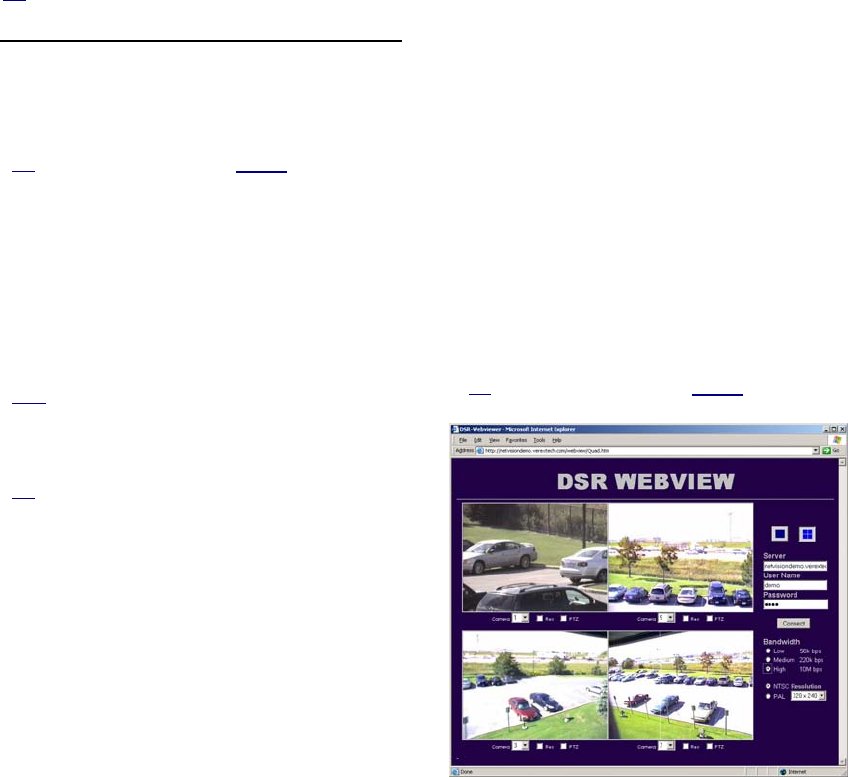
Using
WebView
WebView allows viewing live surveillance
camera images from a NetVision Video Server
through a Web Browser.
WebView allows: • Viewing NTSC and PAL
cameras;
• Viewing 1, or up to 4 cameras at a time;
• Controlling PTZ cameras (if you have
permission for this);
• Recording cameras remotely.
WebView will prompt you to download
additional software if needed.
To access the WebCam feature, you can:
• Select one of the WebCam options from the
demo site (http://netvisiondemo.verextech
.com/links.htm), or;
• Access the WebCam feature for another
server as follows:
Simple/html version:
http://ServerIPorName/webview/ index.htm
Java applet version:
http://ServerIPorName/java/webview/
index.htm
Tip: Remember to include the “:Port#” after the
server name or IP address if the port is not 80.
Click [OK] if prompted with “User name or
password is wrong”. Then enter a valid
username (e.g., demo), and password (e.g.,