
User`s guide


Table Of Contents
- Copyrights and Trademarks
- Disclaimer
- Welcome to NetVision
- Common / Daily Tasks
- 5 Starting your Software and Logging In
- 6 Alarm / Reporting Features and 'Chatting'
- 7 Playing or Downloading Video Recordings
- 7.1 Overview--Types of Playback
- 7.2 Playback--Technical Details
- 7.3 Synchronized Playback (v2.3 SP2)
- 7.4 Video Search (v2.3 SP2)
- 7.5 Searching for Motion
- 7.6 Working with the Playback Screen
- 7.7 Viewing and Printing 'Snapshots'
- 7.8 Working with the File List
- 7.9 Quad Playback
- 7.10 Server Management--Identifying Remote Servers for Playback
- 8 Viewing Live Cameras
- 9 Recording Camera-Views
- System Administration and Maintenance
- 10 Tasks Applicable to Remote Stations and the Video Server
- 10.1 PC Date and Time
- 10.2 Checking your Software Version
- 10.3 Introduction to Video File Management (Filekeeping and Housekeeping)
- 10.4 To Allow Using a Blank CD (Roxio - Easy CD Creator 5 basic with DirectCD)
- 10.5 Filekeeping (v2.3 SP2)
- 10.6 Housekeeping
- 10.7 Automatic Video File Management (Self Housekeeping)
- 11 Tasks Performed at the Video Server Only
- 10 Tasks Applicable to Remote Stations and the Video Server
- System Configuration
- Software Installation and Network Set Up
- 19 PC Requirements
- 20 Software Installation or Upgrade
- 21 Network and Connectivity Issues
- 21.1 General Network Requirements
- 21.2 IP Addressing on the Network
- 21.3 Network Services
- 21.4 Network Ports
- 21.5 To Connect via the Internet
- 21.6 Remote User Permissions
- 21.7 For Remote Viewing, Recording, Playback, and/or Audio Monitoring
- 21.8 For Alarm Alerts
- 21.9 For E-Mail Alerts
- 21.10 Windows Dial-Up Networking Connection (i.e., not via the Internet)
- 21.11 Network Usage
- Reference Topics
- 22 Using the Small Remote Module
- 23 Remote Configuration
- 24 The WatchDog Feature
- 25 Hardware Reference
- 26 Troubleshooting
- 27 Using the ATM Interface Option
- 28 Working with the Older Playback Engines
- 28.1 The Video Playback Feature (Micro DVR)
- 28.2 Step 1: Open the Video Player
- 28.3 Step 2: Local / Remote, and Connection Screen
- 28.4 Step 3: Searching for Video/Alarm Files
- 28.5 Smart Motion Search (Micro DVR)
- 28.6 Step 4: Playing a Video
- 28.7 Window Options and File Properties (Micro DVR, Quad Player)
- 28.8 Viewing and Printing 'Snapshots' (Micro DVR)
- 29 Viewing Cameras through a Web Browser
- 30 Setting up an IP Camera or Video Server module (v2.3 SP2)
- 31 Panoramic Video Surveillance--PVS (v2.3 SP2)
21-0400E v2.3.3
Welcome
Common Admin Config Install Tech-Ref
7
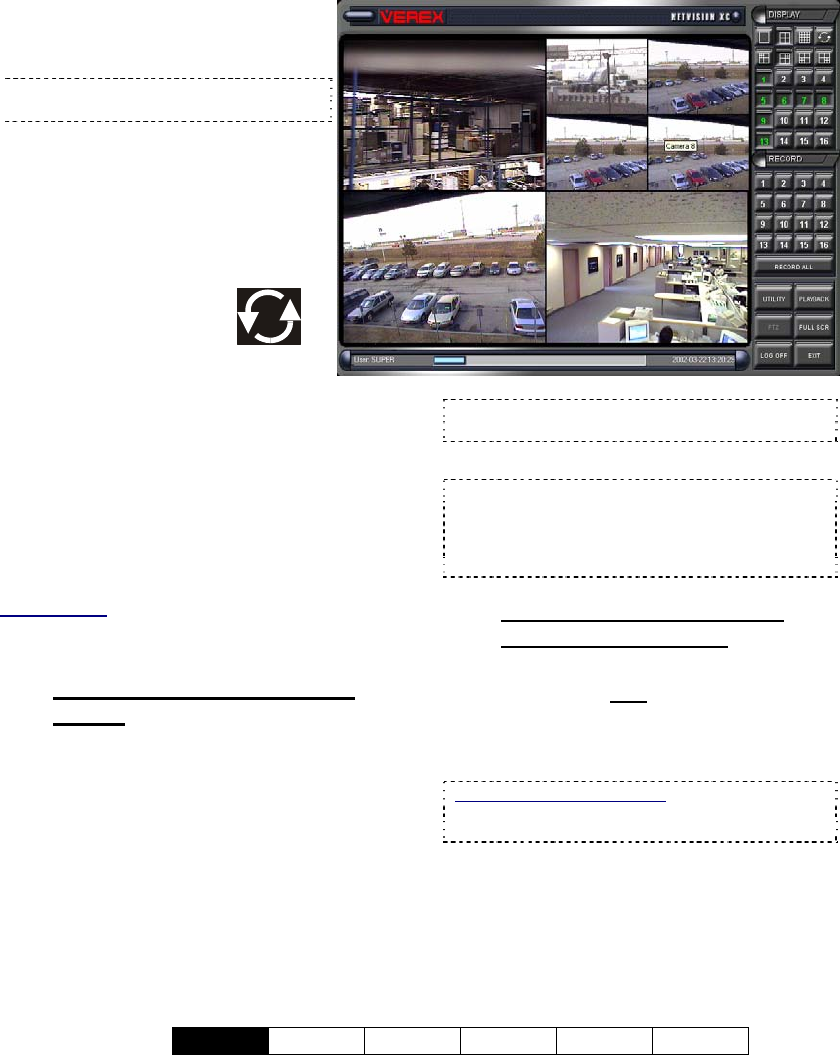
The Main Window: Displays
selected camera-views (from 1 to all
16 at-a-time);
Tip: A hard-disk usage indicator appears
at the bottom of the screen.
"Display" Selections: The upper-
right portion of the screen allows you
to:
• Select the number of camera/views
(or 'groups' of cameras) to be
visible at one time. (Try it!);
• Set the screen to seq-
uentially step through
the cameras / views;
• Select individual cameras to view
on-screen (1 - 16).
"Recorder" Selections: The middle right-
hand portion of the screen allows you to:
• Manually start / stop recording desired
camera view(s).
(individual camera(s), or all at once with
[ Record All ] ). With instant-recording,
double-clicking a camera-view starts the
recording.
Related Topics: 6.4 Alarm / Recording Status
Indications (Camera Number Colours);
17.2.5 Misc. (see "Instant Recording")
4.2.1
Large Buttons, Bottom-Right
Corner:
• [Logon] / [Logoff]: Allows an operator to
log in (to gain access to the system), or log
off when they are finished;
• [Utility]: Provides access to a number of
system settings, and maintenance/file-
management tasks;
• [Playback]: Allows playing previously
captured videos, and capturing / printing
individual frames.
• [Full Scr]: Expands the active
camera/view(s) to fill the entire screen.
Tip: Right-click the screen once to return to normal
viewing.
• [Exit]: Allows shutting down the system.
Note: as this will stop all camera monitoring and
recording for this Video Server, you will be
prompted to confirm your intentions. You must be
logged in to use this (may require a "Supervisor"
login).
4.2.2
If you Need to Minimize the
Video Server Desktop
While logged in, you can minimize the Video
Server software by right
-clicking any fixed
portion of the desktop (i.e., outside of any
buttons or display areas), and selecting
"Minimize".
If this feature is not available: This feature can be
turned on and off.
See: 14.2 Miscellaneous Settings
4.2
Video Server Desktop