
User`s guide


Table Of Contents
- Copyrights and Trademarks
- Disclaimer
- Welcome to NetVision
- Common / Daily Tasks
- 5 Starting your Software and Logging In
- 6 Alarm / Reporting Features and 'Chatting'
- 7 Playing or Downloading Video Recordings
- 7.1 Overview--Types of Playback
- 7.2 Playback--Technical Details
- 7.3 Synchronized Playback (v2.3 SP2)
- 7.4 Video Search (v2.3 SP2)
- 7.5 Searching for Motion
- 7.6 Working with the Playback Screen
- 7.7 Viewing and Printing 'Snapshots'
- 7.8 Working with the File List
- 7.9 Quad Playback
- 7.10 Server Management--Identifying Remote Servers for Playback
- 8 Viewing Live Cameras
- 9 Recording Camera-Views
- System Administration and Maintenance
- 10 Tasks Applicable to Remote Stations and the Video Server
- 10.1 PC Date and Time
- 10.2 Checking your Software Version
- 10.3 Introduction to Video File Management (Filekeeping and Housekeeping)
- 10.4 To Allow Using a Blank CD (Roxio - Easy CD Creator 5 basic with DirectCD)
- 10.5 Filekeeping (v2.3 SP2)
- 10.6 Housekeeping
- 10.7 Automatic Video File Management (Self Housekeeping)
- 11 Tasks Performed at the Video Server Only
- 10 Tasks Applicable to Remote Stations and the Video Server
- System Configuration
- Software Installation and Network Set Up
- 19 PC Requirements
- 20 Software Installation or Upgrade
- 21 Network and Connectivity Issues
- 21.1 General Network Requirements
- 21.2 IP Addressing on the Network
- 21.3 Network Services
- 21.4 Network Ports
- 21.5 To Connect via the Internet
- 21.6 Remote User Permissions
- 21.7 For Remote Viewing, Recording, Playback, and/or Audio Monitoring
- 21.8 For Alarm Alerts
- 21.9 For E-Mail Alerts
- 21.10 Windows Dial-Up Networking Connection (i.e., not via the Internet)
- 21.11 Network Usage
- Reference Topics
- 22 Using the Small Remote Module
- 23 Remote Configuration
- 24 The WatchDog Feature
- 25 Hardware Reference
- 26 Troubleshooting
- 27 Using the ATM Interface Option
- 28 Working with the Older Playback Engines
- 28.1 The Video Playback Feature (Micro DVR)
- 28.2 Step 1: Open the Video Player
- 28.3 Step 2: Local / Remote, and Connection Screen
- 28.4 Step 3: Searching for Video/Alarm Files
- 28.5 Smart Motion Search (Micro DVR)
- 28.6 Step 4: Playing a Video
- 28.7 Window Options and File Properties (Micro DVR, Quad Player)
- 28.8 Viewing and Printing 'Snapshots' (Micro DVR)
- 29 Viewing Cameras through a Web Browser
- 30 Setting up an IP Camera or Video Server module (v2.3 SP2)
- 31 Panoramic Video Surveillance--PVS (v2.3 SP2)
21-0400E v2.3.3
Welcome
Common
Admin Config Install Tech-Ref
23
Remote Software: Click the coloured 'Play'
button, then select [Video Search] (or [360
Playback] ).
2) Select from ALL search parameters
shown, and click [Start Search]. When
it finishes, the number of found files will
be shown on-screen (and be available
to the [File List] and [Play] functions at
the bottom of the search screen).
If Searching for Remote Files: You must first
select a server, and enter a username &
password that is valid for that server. Then,
click [Sign In] to connect.
Remote Servers: These are initially set up
under [Server Management].
Related Topic:
7.10 Server Management--Identifying Remote
Servers for Playback (v2.3 SP2)
3) Click [Motion Search]. A small screen
will appear to allow setting up motion
parameters.
4) When you click [OK], the search will
execute. When it finishes, you can go
into the [File List], or click [Play] to start
playing the files.
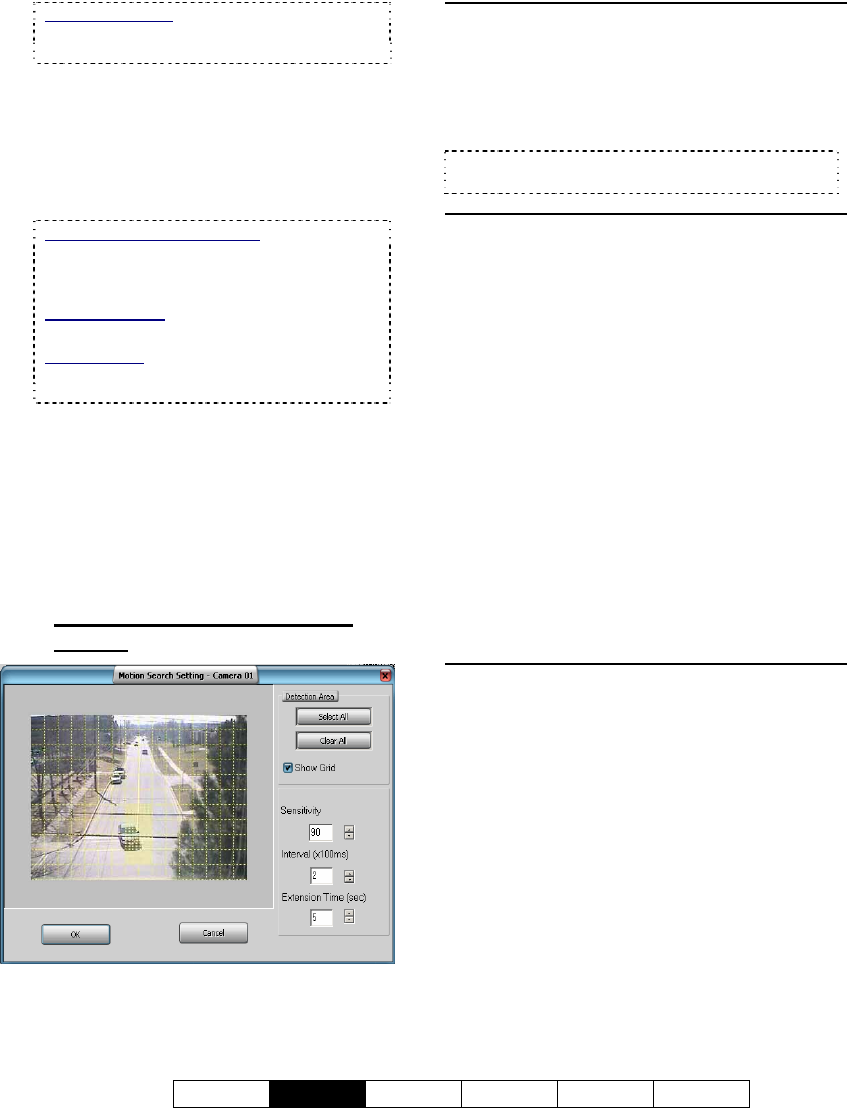
7.5.4
The "Motion Search Setting"
Screen
Main Portion of the Screen
- With "Show Grid" selected, this area shows a
camera image with a grid of selectable squares
(motion-detection zones). Click the desired
areas of the frame that are to be checked for
motion.
Tip: You can also select or clear all portions of the
screen using [Select All] or [Clear All].
Right-Hand Side of the Screen
Detection Area
-
[Select All]: Selects all detection squares on the left;
- [Clear All]: Clears all detection squares on the left;
- Show Grid: This shows/hides a 'grid' to
indicate the selected 'motion-detection zones'.
- Sensitivity: This sets a relative threshold for
motion detection. Leave this as-is unless motion
is being detected falsely (or if it is not being
detected when it should).
- Interval (x100 ms): This sets how often the
camera-view will be checked for motion (i.e.,
every xx tenths of a second).
- Extension Time (sec): This sets how long the
resulting files will be—beyond the motion-
detected portion (up to 30 seconds). With
intermittent motion, a smaller value can result in
a larger number of smaller files being produced.
Bottom of the Screen
- [OK]: Starts the motion search using your
selected parameters.
- [Cancel]: Cancels the motion search, and
ignores any changes you made in this screen.