
User`s guide


Table Of Contents
- Copyrights and Trademarks
- Disclaimer
- Welcome to NetVision
- Common / Daily Tasks
- 5 Starting your Software and Logging In
- 6 Alarm / Reporting Features and 'Chatting'
- 7 Playing or Downloading Video Recordings
- 7.1 Overview--Types of Playback
- 7.2 Playback--Technical Details
- 7.3 Synchronized Playback (v2.3 SP2)
- 7.4 Video Search (v2.3 SP2)
- 7.5 Searching for Motion
- 7.6 Working with the Playback Screen
- 7.7 Viewing and Printing 'Snapshots'
- 7.8 Working with the File List
- 7.9 Quad Playback
- 7.10 Server Management--Identifying Remote Servers for Playback
- 8 Viewing Live Cameras
- 9 Recording Camera-Views
- System Administration and Maintenance
- 10 Tasks Applicable to Remote Stations and the Video Server
- 10.1 PC Date and Time
- 10.2 Checking your Software Version
- 10.3 Introduction to Video File Management (Filekeeping and Housekeeping)
- 10.4 To Allow Using a Blank CD (Roxio - Easy CD Creator 5 basic with DirectCD)
- 10.5 Filekeeping (v2.3 SP2)
- 10.6 Housekeeping
- 10.7 Automatic Video File Management (Self Housekeeping)
- 11 Tasks Performed at the Video Server Only
- 10 Tasks Applicable to Remote Stations and the Video Server
- System Configuration
- Software Installation and Network Set Up
- 19 PC Requirements
- 20 Software Installation or Upgrade
- 21 Network and Connectivity Issues
- 21.1 General Network Requirements
- 21.2 IP Addressing on the Network
- 21.3 Network Services
- 21.4 Network Ports
- 21.5 To Connect via the Internet
- 21.6 Remote User Permissions
- 21.7 For Remote Viewing, Recording, Playback, and/or Audio Monitoring
- 21.8 For Alarm Alerts
- 21.9 For E-Mail Alerts
- 21.10 Windows Dial-Up Networking Connection (i.e., not via the Internet)
- 21.11 Network Usage
- Reference Topics
- 22 Using the Small Remote Module
- 23 Remote Configuration
- 24 The WatchDog Feature
- 25 Hardware Reference
- 26 Troubleshooting
- 27 Using the ATM Interface Option
- 28 Working with the Older Playback Engines
- 28.1 The Video Playback Feature (Micro DVR)
- 28.2 Step 1: Open the Video Player
- 28.3 Step 2: Local / Remote, and Connection Screen
- 28.4 Step 3: Searching for Video/Alarm Files
- 28.5 Smart Motion Search (Micro DVR)
- 28.6 Step 4: Playing a Video
- 28.7 Window Options and File Properties (Micro DVR, Quad Player)
- 28.8 Viewing and Printing 'Snapshots' (Micro DVR)
- 29 Viewing Cameras through a Web Browser
- 30 Setting up an IP Camera or Video Server module (v2.3 SP2)
- 31 Panoramic Video Surveillance--PVS (v2.3 SP2)
36 NetVision Plus/Elite and Micro DVR v2.3 SP2 User's Guide 21-0400E v2.3.3
7.10.4
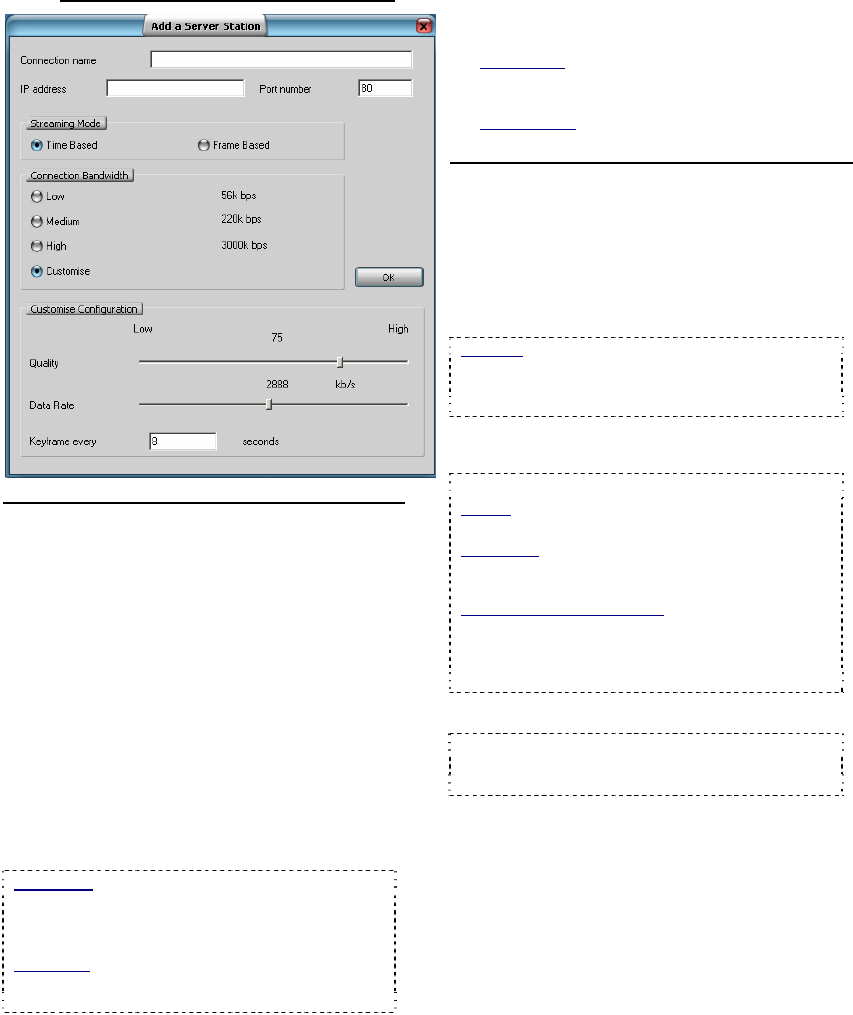
Add (or Modify) a Server Station
Top of the Screen
- [X] (top-right corner): Click this to cancel this
operation, and discard any changes.
- Connection Name: Enter a suitable
name/identifier for this site/server. (This is
'read-only' once set.)
- IP Address: Enter the actual IP address for this
remote server. Format: "###.###.###.###".
- Port Number: Enter the actual IP address for
this server.
- New IP Address: To change an existing IP
address, enter the new one here. Format:
###.###.###.###.
- New Port Number: To change an existing Port
Number, enter the new one here.
Port Detail: This must match the "HTTP Server
Port" for this remote server. Typically "80".
Locator: (At that PC), ÖWindows Control Panel,
ÖDSR Configuration, ÖRemote Service Manager.
Read-Only: The Connection Name cannot be
changed. If you wish to change this, [Add] it as a
new server, and then delete the old one.
- Streaming Mode: This determines how
streaming playback will operate when playing a
remote file.
• Time Based: File playback duration maintained
(regardless of your connection speed). Individual
frames may be dropped.
• Frame Based: Every frame will be shown no matter
how long it takes.
Middle of the Screen
- Connection Bandwidth: This sets the
streaming playback image quality and frame rate
as suitable for your type of connection. Indicate
your connection speed (Low for dial-up; Medium
for cable/DSL; High for a network (LAN)
connection).
Modems: Due to speed and reliability
considerations, dial-up connections are NOT
recommended. Use a faster connection if you
have a choice.
- (•) Customize: This expands the bottom of the
screen to access custom bandwidth parameters
Customize Configuration
Quality: Sets the relative amount of video detail to
be included in non-key frames;
Data Rate: This sets the maximum video data
transmission rate to be used by the connections
with this specific NetVision video server;
Keyframe every (x) seconds: This determines how
often a complete frame is sent compared to only
changes from the previous frame. Lower values
provide better image quality and require more
bandwidth.
- [OK]: Select this to save your settings.
Tip: You can change most settings later by
selecting [Modify] in the Server Management
screen (or delete a Video Server via [Remove] ).