User`s guide
Table Of Contents
- Copyrights and Trademarks
- Disclaimer
- Welcome to NetVision
- Common / Daily Tasks
- 5 Starting your Software and Logging In
- 6 Alarm / Reporting Features and 'Chatting'
- 7 Playing or Downloading Video Recordings
- 7.1 Overview--Types of Playback
- 7.2 Playback--Technical Details
- 7.3 Synchronized Playback (v2.3 SP2)
- 7.4 Video Search (v2.3 SP2)
- 7.5 Searching for Motion
- 7.6 Working with the Playback Screen
- 7.7 Viewing and Printing 'Snapshots'
- 7.8 Working with the File List
- 7.9 Quad Playback
- 7.10 Server Management--Identifying Remote Servers for Playback
- 8 Viewing Live Cameras
- 9 Recording Camera-Views
- System Administration and Maintenance
- 10 Tasks Applicable to Remote Stations and the Video Server
- 10.1 PC Date and Time
- 10.2 Checking your Software Version
- 10.3 Introduction to Video File Management (Filekeeping and Housekeeping)
- 10.4 To Allow Using a Blank CD (Roxio - Easy CD Creator 5 basic with DirectCD)
- 10.5 Filekeeping (v2.3 SP2)
- 10.6 Housekeeping
- 10.7 Automatic Video File Management (Self Housekeeping)
- 11 Tasks Performed at the Video Server Only
- 10 Tasks Applicable to Remote Stations and the Video Server
- System Configuration
- Software Installation and Network Set Up
- 19 PC Requirements
- 20 Software Installation or Upgrade
- 21 Network and Connectivity Issues
- 21.1 General Network Requirements
- 21.2 IP Addressing on the Network
- 21.3 Network Services
- 21.4 Network Ports
- 21.5 To Connect via the Internet
- 21.6 Remote User Permissions
- 21.7 For Remote Viewing, Recording, Playback, and/or Audio Monitoring
- 21.8 For Alarm Alerts
- 21.9 For E-Mail Alerts
- 21.10 Windows Dial-Up Networking Connection (i.e., not via the Internet)
- 21.11 Network Usage
- Reference Topics
- 22 Using the Small Remote Module
- 23 Remote Configuration
- 24 The WatchDog Feature
- 25 Hardware Reference
- 26 Troubleshooting
- 27 Using the ATM Interface Option
- 28 Working with the Older Playback Engines
- 28.1 The Video Playback Feature (Micro DVR)
- 28.2 Step 1: Open the Video Player
- 28.3 Step 2: Local / Remote, and Connection Screen
- 28.4 Step 3: Searching for Video/Alarm Files
- 28.5 Smart Motion Search (Micro DVR)
- 28.6 Step 4: Playing a Video
- 28.7 Window Options and File Properties (Micro DVR, Quad Player)
- 28.8 Viewing and Printing 'Snapshots' (Micro DVR)
- 29 Viewing Cameras through a Web Browser
- 30 Setting up an IP Camera or Video Server module (v2.3 SP2)
- 31 Panoramic Video Surveillance--PVS (v2.3 SP2)

72 NetVision Plus/Elite and Micro DVR v2.3 SP2 User's Guide 21-0400E v2.3.3
15.2
Set Up the
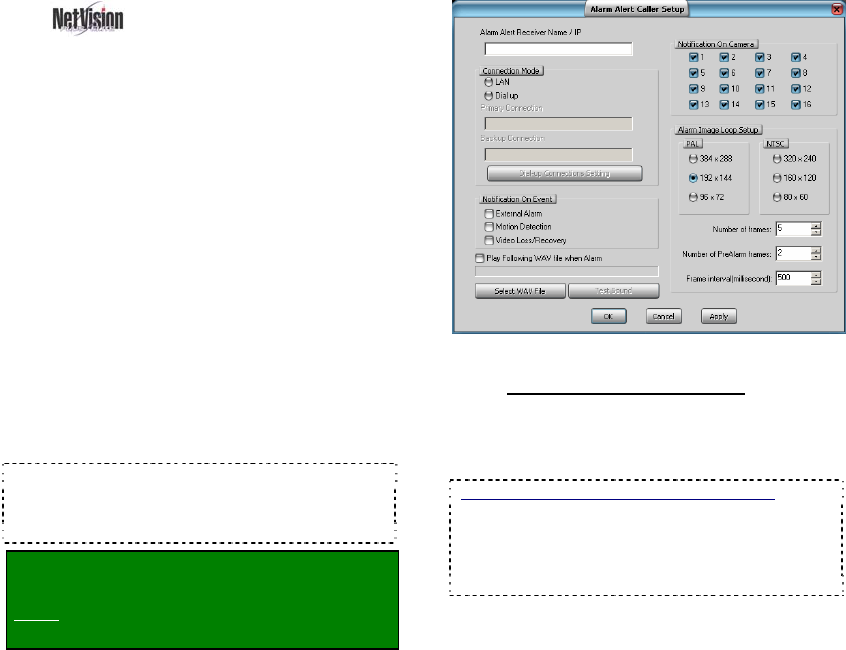
Alarm Alert Caller
The alarm alert feature lets a remote
surveillance station know any time an alarm
occurs (external sensor tripped, video motion
sense, and/or video signal lost).
A recording of the scene will also be available
at the Video Server PC.
This feature can be set regarding:
• The cameras to be monitored for this
(v2.3 SP2);
• The number of 'pre-alarm' frames to
keep/show
(v2.3 SP2);
• The type of connection;
• The type of events to trigger alarm alerts;
• An optional sound (WAV file) to include.
• Image size and other video parameters
(v2.3 SP2).
TechTip: The "Alarm Alert" feature must also be
enabled, and the Video Server must be able to
communicate with the remote station (via IP). (see
"Related Topics").
Locator: (Video Server running, Windows
'Task Bar' in view).
Right-click Alarm Alert Caller on the
taskbar, and select Setup.
Tips: If you cannot access the Windows task bar,
press Ctrl-Esc (or your 'Windows' key). To view the
names for items on the task bar, click a blank area on
the bar, and then 'hover' your mouse pointer over each
item.
When the screen appears, make your desired
selection(s).
15.2.1
Left Side of the Screen
Alarm Alert Receiver Name / IP: This is the
name or IP address of the remote station PC
which is to receive the alarm alerts.
To obtain the Remote station's IP address: Have
someone go to THAT computer, open a DOS /
Command window, type ipconfig, and press
Enter. (To close the window, type exit, and press
Enter). Note: For this feature, the remote station
must have a fixed/static IP address.
Connection Mode: Select LAN if the Video
Server and remote station are on the same
network (LAN/WAN), or to have "alarm alerts"
sent through a permanent internet connection.
Select Dial-up if the Video Server will have to
initiate a dial-up networking connection.
Primary Connection: For a dial-up
connection. Type the exact name of the MS
Windows ‘dial-up connection’ to be used by the
Alarm Alert Caller. This must either be set up
previously, or type the name here, and then
ensure an MS Windows dial-up connection is
set up using the same name.
Tip: To check the spelling for existing dial-up
connections, click [Dial-up Connections Setting] (to
follow / below).
Backup Connection: (Optional). For a dial-
up connection. Type the exact name of a
second dial-up connection to be used if a


