
User`s guide


Table Of Contents
- Copyrights and Trademarks
- Disclaimer
- Welcome to NetVision
- Common / Daily Tasks
- 5 Starting your Software and Logging In
- 6 Alarm / Reporting Features and 'Chatting'
- 7 Playing or Downloading Video Recordings
- 7.1 Overview--Types of Playback
- 7.2 Playback--Technical Details
- 7.3 Synchronized Playback (v2.3 SP2)
- 7.4 Video Search (v2.3 SP2)
- 7.5 Searching for Motion
- 7.6 Working with the Playback Screen
- 7.7 Viewing and Printing 'Snapshots'
- 7.8 Working with the File List
- 7.9 Quad Playback
- 7.10 Server Management--Identifying Remote Servers for Playback
- 8 Viewing Live Cameras
- 9 Recording Camera-Views
- System Administration and Maintenance
- 10 Tasks Applicable to Remote Stations and the Video Server
- 10.1 PC Date and Time
- 10.2 Checking your Software Version
- 10.3 Introduction to Video File Management (Filekeeping and Housekeeping)
- 10.4 To Allow Using a Blank CD (Roxio - Easy CD Creator 5 basic with DirectCD)
- 10.5 Filekeeping (v2.3 SP2)
- 10.6 Housekeeping
- 10.7 Automatic Video File Management (Self Housekeeping)
- 11 Tasks Performed at the Video Server Only
- 10 Tasks Applicable to Remote Stations and the Video Server
- System Configuration
- Software Installation and Network Set Up
- 19 PC Requirements
- 20 Software Installation or Upgrade
- 21 Network and Connectivity Issues
- 21.1 General Network Requirements
- 21.2 IP Addressing on the Network
- 21.3 Network Services
- 21.4 Network Ports
- 21.5 To Connect via the Internet
- 21.6 Remote User Permissions
- 21.7 For Remote Viewing, Recording, Playback, and/or Audio Monitoring
- 21.8 For Alarm Alerts
- 21.9 For E-Mail Alerts
- 21.10 Windows Dial-Up Networking Connection (i.e., not via the Internet)
- 21.11 Network Usage
- Reference Topics
- 22 Using the Small Remote Module
- 23 Remote Configuration
- 24 The WatchDog Feature
- 25 Hardware Reference
- 26 Troubleshooting
- 27 Using the ATM Interface Option
- 28 Working with the Older Playback Engines
- 28.1 The Video Playback Feature (Micro DVR)
- 28.2 Step 1: Open the Video Player
- 28.3 Step 2: Local / Remote, and Connection Screen
- 28.4 Step 3: Searching for Video/Alarm Files
- 28.5 Smart Motion Search (Micro DVR)
- 28.6 Step 4: Playing a Video
- 28.7 Window Options and File Properties (Micro DVR, Quad Player)
- 28.8 Viewing and Printing 'Snapshots' (Micro DVR)
- 29 Viewing Cameras through a Web Browser
- 30 Setting up an IP Camera or Video Server module (v2.3 SP2)
- 31 Panoramic Video Surveillance--PVS (v2.3 SP2)
21-0400E v2.3.3
Welcome Common Admin
Config
Install Tech-Ref
77
16.1
Set up Cameras and Titles
You can set the name to be associated with
each camera. Cameras that are physically
connected to a Video Server also need to be
activated, and all other camera numbers
MUST be de-activated.
Locator: (Logged in at the Video Server as
a "Supervisor"),
Select: [Utility], then [Camera Setting].
When the screen appears, make your desired
selection(s).
--------------------------------------------------
16.1.1
(List of Cameras)
Cam ID: This is each camera number/ID
pertaining to the physical connections to the
Video Server
(see "Related Topics").
Camera Title: Enter a suitable description for
the camera location/view.
Active: Select this (only) for each camera
that is connected to your Video Server.
Tip: Be sure to de-select all cameras that are not
present.
16.1.2
[Video Control]
This allows controlling the brightness, and
colour balance for each camera to adjust for
different lighting conditions, etc. The
selections include Camera, Brightness,
Contrast, Saturation U, Saturation V, and
Hue.
[Default]: This returns to the default colour parameters
for the selected camera.
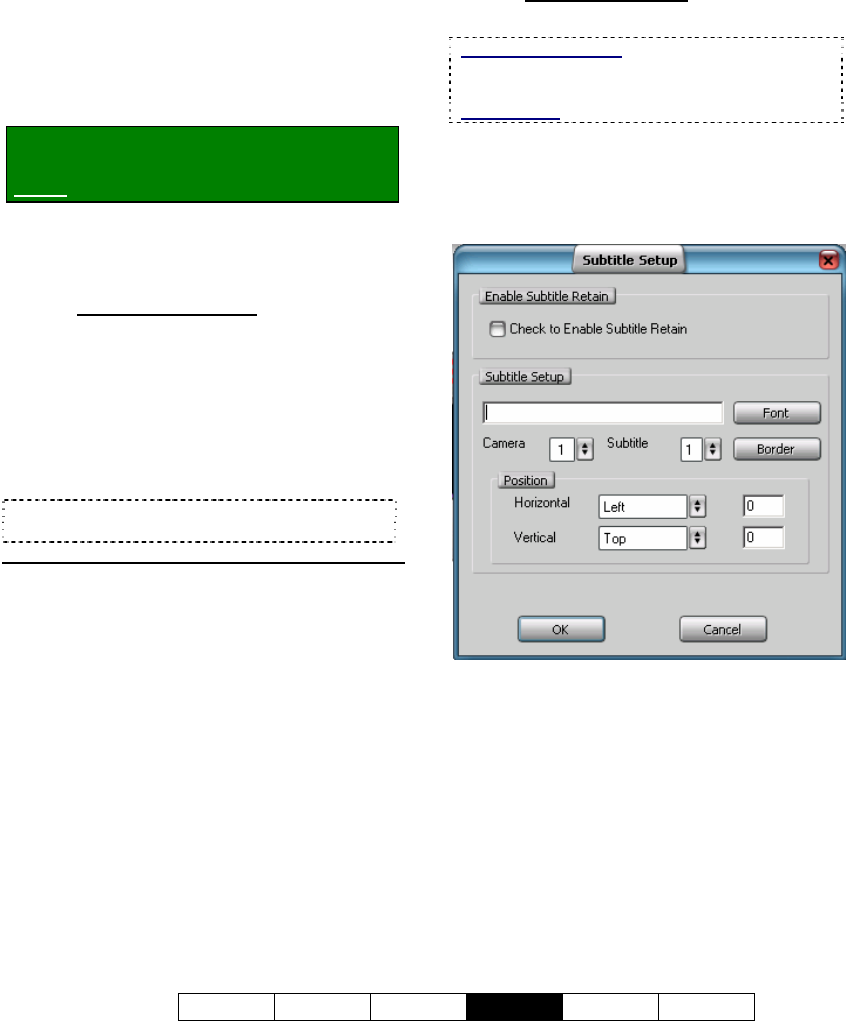
16.1.3
[Subtitle Setter]
(Custom Titles for Cameras)
ATM Interface Option: Subtitles should NOT be
used with the ATM Interface option as they may
interfere with ATM overlays.
Related Topic: 27 Using the ATM Interface Option
Each camera can have up to 3 custom titles
associated with it. These titles can be
positioned anywhere in the camera-view, and
are visible at the Video Server and remote
stations.
Enable Subtitle Retain
Check to Enable Subtitle Retain: Select this
to have the titles retained whenever the
NetVision software (and/or Video Server) is
restarted.
Subtitle Setup
1
st
Field (Title Text): Select a camera and
subtitle number, and then enter the text for
your camera title here;
[Font]: This allows selecting different styles of
letters;
16
Camera, Audio, and PTZ Settings