
User`s guide


21-0381E v4.7.3
Welcome
Report Control Admin Sys Config Tech-Ref
25
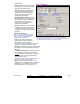
Event Period
- From and To (date and time): The
beginning and end date from the event
log to be checked for guard-tour
events.
Tip: You can change the dates manually,
or click the arrow to access a pop-up
calendar. To set the times, click within the
'hours' or 'minutes', and use the up/down
arrow keys.
Event Type
- The various guard tour events to be
included in the report (the guard
arriving late, etc.). Select the ones
that you want included).
Note: You must select at least one event-
type. "Toggle All" allows selecting or de-
selecting all event-types.
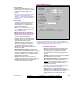
Report Destination / Output To
- Screen: This has the report sent to the
'Report Viewer' window for viewing
and/or printing desired pages;
- Printer: This allows selecting a printer
and page-range, etc., and printing the
report (without viewing it first);
- Text File: This has the report saved
as a 'comma-delimited' text file for
manipulation with another program.
Allows you to change the location and/or
filename if desired.
- Report Emulation Text File: This has the
report saved as a formatted text file for viewing,
printing, or editing with a text editor or word
processor. Allows you to change the location
and/or filename if desired.
- Archive: This has the report saved as a
viewable archived report for viewing or printing
at a later time. Allows you to change the
location and/or filename if desired.
(Remaining Buttons)
- [File...]: This allows changing the location and
file-name for a report being saved for future
viewing, printing, etc. Tip: Use a different
name each time to avoid overwriting previous
reports.
- [Reset]: This provides a quick way to reset/clear
all selected items on the screen.
- [Load Archived Report]: This allows browsing
for, and opening a previously saved report-
archive
(not for use with text files). The report
will appear in the report-viewer window for
viewing and/or printing.
For details on viewing and printing displayed reports,
refer to "Working with the Report Viewer".
- [Run]: This runs the report based on your
selected criteria. Additional screens will appear
depending on your selections (such as the
printer selection form, report viewer, etc.).
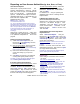
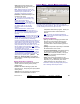
Reports ÖGuard Tour
(Multi-Account Systems: Account Selection 'Tree')
- This area (near the centre of the screen) is where you select the
account that your report pertains to. Tip: This option appears only if
you didn't already have an account 'open' in the tree.