
User guide


7
EN
If the battery leads are incorrectly connected, the reverse polarity protection will
ensure that the battery and charger are not damaged.
Start charging
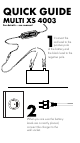
1. When you are sure the battery leads are correctly placed, connect the charger
to the wall socket. The charger will indicate that the mains voltage is connected.
If the battery leads are incorrectly connected, the reverse polarity protection will
ensure that the battery and charger are not damaged. The fault indicator lamp will
be lit. If this is the case start from section 1 again “Connection of charger...”.
2. In order to start charging the correct current and voltage must be set by pressing
the “MODE” button until the proper setting is lit. Selecting the setting for your
battery is described in “BATTERY TYPES AND SETTINGS”.
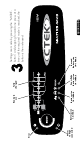
3. The lamp for deeply discharged battery will indicate if the battery voltage is low
(seeMinbatteryvoltagein“TECHNICALSPECIFICATIONS”).
4. Normalchargingwillbeindicatedbythelampsforsoftstart(deeplydischarged
battery) bulk charge, absorption charge or maintenance charge. When the
lamp for maintenance charge is lit this means that the battery is fully charged.
The charge will restart again if the voltage drops. Indications for Recond and
Snowakemodesaredescribedin“BATTERYTYPESANDSETTINGS”.
5. If the lamp that indicates settings and the power lamp remains lit but no other lamp
is lit, there could be a bad connection to the battery or chassis or the battery could
be defect or have a terminal voltage that is too low. The charger requires that the
battery voltage is above a certain level, see “TECHNICAL SPECIFICATIONS”
to start the charging cycle. This means that if the battery is in a state of deep
discharge the charger will be unable to charge the battery in question. Another
reason could be lack of power from the wall socket. Start by improving the
connection between the battery and the charger.
6. Charging can be stopped at any time by disconnecting the mains cable from
the wall socket. Always disconnect the mains cable from the wall socket before
disconnecting the battery leads. When you interrupt charging of a battery installed
in a vehicle, you must always disconnect the battery lead from the chassis before
disconnecting the other battery lead.
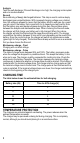
CHARGING STEPS
All battery chargers charge and analyse in eight fully-automatic steps.
The MULTI XS 4003 model has many different settings, see “BATTERY TYPES AND
SETTINGS”.
The battery chargers have an 8 step fully-automatic charging
cycle:
Desulphation
Desulphationwithpulsesrestoressulphatedbatteries.Thisisindicatedwithaxed
beam during this step.
Soft start
Starting mode for charging cycle. The start step continues until the battery terminal
voltage has risen above the set value, at which time the charging switches to bulk
charge. If the terminal voltage has not reached the set level within a set time, the
charge is stopped and the charger indicates error mode. The battery is then probably
defective or too large.
Bulk
Main charge until 80% of the charge is complete. The charge is carried out at
maximum current charge until the terminal voltage reaches the set level. Bulk
charging has a maximum time. The charging then switches to Absorption.
Absorption
Final part of the charge up to 100%. During this step the charge current falls
gradually to ensure the terminal voltage does not get too high. If the maximum time
for Absorption is exceeded, the charger switches automatically to maintenance.