
Manual


CTI Products, Inc. NCB-EL/FL User Guide
2. Installation 13
•
For all remote NCB units that need to exchange
L
ON
W
ORKS
packets with only the
Central Site NCB, set its
Targets
selection to
Central Site
.
•
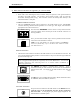
MAC Refresh:
If the Ethernet port of an NCB is connected to an IP MAC layer switch, specify a
MAC Refresh
value other than Disabled for that member to cause the NCB to periodically notify
that switch of the existence of this NCB. This useful following a reset of the MAC layer switch, as
the forwarding table of MAC addresses in the switch is emptied and may not know to forward an
incoming message to an NCB. When the notification is sent from the NCB, the MAC layer switch
forwarding table is updated, allowing the successful forwarding of an incoming message. A
MAC
Refresh
can be enabled by specifying a value from 1 to 255 seconds The
MAC Refresh
can be
disabled by specifying a value of 0. Edit this field by double-clicking it.
Use the
File – Save As
or the
File – Save
(same as the
Save Channel
button on the main screen) to save the
channel information entered. In LNS Plugin mode,
File –Save As
is not valid and the IP information is saved in
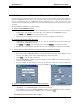
the LNS database directly. In Standalone mode, the path to the file is specified by the Project Directory setting.
Status of commissioning (in Plug-in mode) and synchronization of IP Address parameters between the database
and each physical NCB unit are indicated with color coding of the
Member Name
fields and the
IP Sync
(individual members) and
IP Channel Sync
(all NCB members in the channel collectively) “dots”. Use the
Help
– Display Status Legend
function for color definitions.
A red ‘X’ in the “
Sync
” field indicates the IP address parameters on-screen are not the same as stored in the
device. A green ‘
9
’ indicates the IP address parameters on-screen are the same as stored in the device. A
yellow ‘F’ indicates that factory default parameters are stored in the device.
When in LNS Plug-in mode, adding an NCB member to the “
Channel Member List
” requires the user to exit
the EtherPlug plug-in, add the NCB router and Control Neuron Processor to the LonMaker drawing as in
Steps
2B
and
2C
, then reopen the EtherPlug plug-in as in
Step 3
.
S
TEP
5. D
OWNLOAD
IP A
DDRESS
P
ARAMETERS TO
NCB
S
V
IA
S
ERIAL
P
ORT
Note : If installing NCB-Fiberlons on dedicated fiber segments, skip to Step 6.
When first installing a set of NCB units to a network, the IP Address parameters entered into EtherPlug in step
4 must be downloaded to each NCB unit via a serial COM port on the PC. After all NCB units are configured
and properly installed on the IP and
L
ON
W
ORKS
networks as detailed in Step 6 below, changes in IP Address
Parameters can be made via the
L
ON
W
ORKS
and Wide Area Ethernet networks without the need to access each
NCB unit directly for a serial port connection.
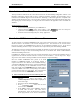
A) Select the serial communications port that will be used for downloading IP address parameters:
•
Click the “
COM Port”
menu item, and the “
Com Select
” window will be displayed.
•
Choose an available serial port on the PC from the drop-down list, then click
Select
.
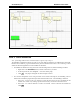
B) Download IP address parameters to NCB:
•
Double-click on the first “Member” name in the Channel Member List. The “
Download
” window
will be displayed.
•
Select :
•
Database
from the
Download
drop-down list
•
Channel
from the
To … Members
drop-down list
•
Serial
from the
Via the … Port
drop-down list
•
Click
Load .
•
The “
Instructions
” window will prompt to connect the selected COM port to the indicated NCB
Member. A 9 pin to 9 pin “null modem” cable (supplied with NCB unit) is required. Click
OK