
Manual


CTI Products, Inc. NCB-EL/FL User Guide
2. Installation 16
S
TEP
7. C
OMMISSION THE
R
OUTERS AND
C
ONTROL
N
EURON
P
ROCESSORS
Once the NCB unit IP Address Parameters are set (steps 4 and 5) and the NCB units are physically installed in
the IP and
L
ON
W
ORKS
networks (step 6), the router and control neuron processor portions of each NCB unit
must be commissioned with the
L
ON
W
ORKS
network management tool. Once all units have been
commissioned, the Channel Delay parameter of the custom Ethernet channel should be adjusted to match actual
conditions.
If using LonMaker for Windows, proceed as follows:
A) Commission the
L
ON
W
ORKS
routers:
•
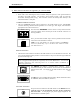
Commission the router of the NCB whose NETWORK port is attached to the PC used for network
management by right-clicking on the router shape
,
then clicking on the “
Commission
” function.
•
click
NEXT
, then
FINISH
to commission the first router.
•
Repeat the above to commission the router portion of all other NCB units on the channel.
B)
Commission the Control Neuron Processors:
•
Commission a Control Neuron Processor (in any order) by right-clicking on the device shape
,
then
clicking on the “
Commission
” function.
•
click
NEXT
, then
NEXT
again, then select
Online
and click
FINISH
to commission the device.
•
Repeat the above to commission the Control Neuron Processors of all other NCB units on the channel.
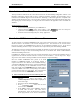
C) Use the “Ping” function to determine message transit time over Ethernet IP channel:
•
Launch EtherPlug. (See
Step 3
)
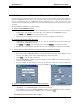
•
Right-click on the first
Member Name
in the Channel Member List, then choose “
Ping
” from the
selection. The “
Ping
” request window will be displayed as shown below (left).
•
Click
Ping
to cause the ping to be initiated.
•
From the “
Ping Results
” window (shown below right), record the “
Max:
” time (maximum round-trip
message time) for this member.
•
Ping the remainder of NCB members (except for the NCB unit connected to the PC on which the
network management tool is being run), recording the “
Max:
” time for each
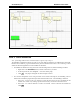
D) Update “CUSTOM Channel Delay” in LonMaker for Windows:
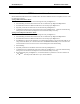
•
Right-click on the
CUSTOM
(Ethernet) channel created in
Step 2A
above. In the drop-down list, click
“
Properties
”. The “
Channel Properties
” window will be displayed.
•
In the “
Delay
” section of the “
Channel Properties
” window, choose “
Specify”
, and enter a value that
is twice that of the largest “Max:” time found in
Step 7C
. Then Click
OK
.
The installation of the NCB units is now complete.