TurboVUi™ Dispatch Software Installation and Configuration Guide For Version 6 Software Document # S2-61535-607 Please check the accompanying CD for a newer version of this document
TurboVUi Dispatch Software Installation and Configuration Guide Contact Information Support, replacement part ordering, and service may be arranged by contacting our Cincinnati office. Parts for service can be returned following request of a Return Material Authorization. CTI Products, Inc. 1211 W Sharon Rd Cincinnati, OH 45240 513-595-5900 support@ctiproducts.com Disclaimer Information in this document is provided with best efforts for completeness and accuracy.
TurboVUi Dispatch Software Installation and Configuration Guide Contents TURBOVUI SYSTEM OVERVIEW ..................................................................................................................................... 5 TURBOVUI COMPONENTS ....................................................................................................................................................... 5 ARCHITECTURE .........................................................................................
TurboVUi Dispatch Software Installation and Configuration Guide CONFIGURATION FILES ................................................................................................................................................... 35 DUPLICATING A CONFIGURATION ON MULTIPLE PCS ........................................................................................................... 35 Layout Configuration Files .............................................................................................
TurboVUi Dispatch Software Installation and Configuration Guide TURBOVUI SYSTEM OVERVIEW TurboVUi™ provides remote access to MOTOTRBO radios via IP Networks. PC-based software allows voice communications between PC users and 2-way radio subscribers. Communications with radio subscribers is also possible for mobile users using Android or iOS devices.
TurboVUi Dispatch Software Installation and Configuration Guide TurboVUi Pocket™ App for Android™ and iPhone™/iPad™ mobile devices A mobile app that is used for voice dispatching to a single radio channel or talk group. The virtual radio head duplicates the full functionality of a control station, including channel steering. Other features include Text Messaging and GPS Mapping of radio subscribers.
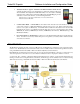
TurboVUi Dispatch Software Installation and Configuration Guide System Maximum Build-out A TurboVUi system may have maximum components listed below. System Component Maximum Dispatch Clients 12 Simultaneous Solo Client and Pocket mobile app connections per IP Gateway 41 IP Gateways 36 Reference Documents The first three documents in the following table (shaded in green) should be read in order to understand the TurboVUi Dispatch client.
TurboVUi Dispatch Software Installation and Configuration Guide WHAT YOU WILL NEED PCs for TurboVUi Dispatch Client PCs that will be used to run the TurboVUi Dispatch Client Software must have the following: Platform: Dell Optiplex 7010 (or Vostro, Inspiron, or Precision) or HP Compaq Pro or Compaq Elite. Processor: Intel Core i3, or better Operating System: Windows 8 Pro or 7 Pro recommended (XP Pro minimum).
TurboVUi Dispatch Software Installation and Configuration Guide SYSTEM CONSIDERATIONS TurboVUi System Planner Template Use the System Planner Template at the end of this document to record device names, passwords, and IP addresses. TurboVUi IP Gateway and MOTOTRBO XPR4550 Configuration Before installing the TurboVUi Dispatch Client, the TurboVUi IP Gateway(s) must be configured using the ICU.exe utility (IP Configuration Utility) and installed on an IP network.
TurboVUi Dispatch Software Installation and Configuration Guide DISPATCH CLIENT INSTALLATION Prior to installing the TurboVUi Dispatch Client software, any required TurboVUi IP Gateways should be installed. See TurboVUi IP Gateway Installation Guide S2-61534 for additional details. INSTALL AUDIO AND PTT ACCESSORIES Install any required microphones, speakers, headsets, and push-to-talk devices.
TurboVUi Dispatch Software Installation and Configuration Guide INSTALL TIME SERVER (IF NEEDED) During installation of the TurboVUi IP Gateways, the IP address of a “NTP Server” may have been specified using the ICU (IP Configuration Utility). In order for all TurboVUi IP Gateways to report the same time, and logging at the Dispatch Console to have accurate times, the IP Gateways must all reference the same Time Server.
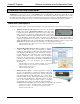
TurboVUi Dispatch Software Installation and Configuration Guide DISPATCH CLIENT STARTUP START THE TURBOVUI DISPATCH CLIENT SOFTWARE Double-click the TurboVUi Dispatch icon on the PC desktop to start the program. Following the Login window, the initial (unconfigured) screen may appear similar to the following: The grid of dots in the above window indicates the program is in Edit mode. The mode can be switched between Edit and Lock from the File menu.
TurboVUi Dispatch Software Installation and Configuration Guide DISPATCH CLIENT CONFIGURATION Configuring the TurboVUi Dispatch client software involves the following: Administrator Password Create a password that administrators will use to configure the system. Import the License File The License File and the USB Hardware Key must have the same Serial Number. Manage Devices Setup connections to various TurboVUi IP Gateways.
TurboVUi Dispatch Software Installation and Configuration Guide IMPORT THE LICENSE FILE While in Edit mode, click the Options menu item, then click Update License to display the following Update License window: Install the Software Key CD (CTI # S2-61529) into the CD-ROM drive. (The Software Key CD must have the same serial number as the USB Hardware Key.) Click the Import button to copy License Key information to the configuration file, and then close the Update License window.
TurboVUi Dispatch 6.
TurboVUi Dispatch Software Installation and Configuration Guide PAGE LAYOUT Add Radio Controllers While in Edit mode, add radio controllers to a tabbed page using the following steps: tool to display the Select Radios window shown: 1. Click the 2. Place a check mark next to all devices that should be displayed on the active Radio Controllers Tab, then click the OK button. The selected Radio Controllers will be displayed on the active Radio Controllers Tab.
TurboVUi Dispatch Software Installation and Configuration Guide Adding, Removing, Ordering, and Renaming Tabbed Pages Click on the following buttons to adjust the layout of the tabbed pages: Add a new Tabbed Page Remove a Tabbed Page Shift a Tabbed Page to the left Shift a Tabbed Page to the right Rename a Tabbed Page To ensure that configuration settings cannot be inadvertently changed, place the software in Lock mode as follows: Click on the File menu, and then click Lock.
TurboVUi Dispatch Software Installation and Configuration Guide Arrange Panels While in Edit mode, each panel may be located to another position by using the following steps: 1. Click and drag a panel using its header. While the panel is being moved, Panel Anchor Points will be displayed as shown below. 2. To dock the panel at a pre-defined position, drop the panel onto any of the Panel Anchor Points displayed.
TurboVUi Dispatch Software Installation and Configuration Guide DISPATCH SETTINGS While in Edit mode, options are available to customize the way in which TurboVUi Dispatch operates. Click on the Options menu, and then click Dispatch Settings to display the window shown. Configuration options are organized into various folders.
TurboVUi Dispatch Software Installation and Configuration Guide Dispatch Users Sub-folder When the Dispatch Users sub-folder is selected, the following window will be displayed. New, Delete, and Rename User Buttons Use these buttons to add Dispatch User Names, Delete Users, or Rename Users. These names will be used to identify the “Src User” listed in the Recent History window. Click the button to save all Dispatch Settings.
TurboVUi Dispatch Software Installation and Configuration Guide Audio Queue Sub-folder When the Audio Queue sub-folder is selected, the following window will be displayed. Max Simultaneous Transmitting Queues This will limit the number of outgoing audio queues from this TurboVUi Dispatch Client. Max Queued Audio Streams per Radio This will limit the number of outgoing audio queues from each Control Station Radio.
TurboVUi Dispatch Software Installation and Configuration Guide After clicking the button, a test will be performed on the target storage location to determine if the device access speed is sufficient. If the drive speed is too low, the following warning will be displayed. Available Disk Space If Logging is enabled above, the available disk space is listed. Estimated Storage Remaining If Logging is enabled above, the estimated time for storing files is listed.
TurboVUi Dispatch Software Installation and Configuration Guide Select Audio Call, Text Message, or Transmit Emergency, and then click the prompts to create the new Action. button. Complete the Wizard Following the creation of an Action, associate the Action with an action initiator such as a Toolbar Button or USB PTT device. See the Example - Action and Toolbar Button section below for more details on creating Actions and custom Toolbar Buttons. Click the button to save all Dispatch Settings.
TurboVUi Dispatch Software Installation and Configuration Guide Example - Action and Toolbar Button Add a Call Selected button to the Toolbar on the Main Window 1. Use the following steps to add an Action to make an Audio Call to the Selected Talk Groups. a. From the Actions folder in the Dispatch Settings window, click the button to display the Wizard’s Select a feature window. 2. 3. b.
TurboVUi Dispatch Software Installation and Configuration Guide USB Devices Folder USB devices with Push-to-Talk buttons such as microphones and footswitches can be used with TurboVUi. When the Toolbar Buttons folder is selected, the following window will be displayed. Click on a USB device to view the currently programmed Action for that device. Choose an Action from the dropdown list, and then click the button. Click the button to save all Dispatch Settings.
TurboVUi Dispatch Software Installation and Configuration Guide Keep . . . minutes of location history When ProVUi GPS option is purchased, specify the length of time that Trail Crumbs should be displayed on the map. Subscriber Visibility Select any combination of Available, Unavailable, or Selected subscribers to make those radio subscribers visible on the map. Map Mode Choose Online Mode if this Dispatch client PC has access to the Internet.
TurboVUi Dispatch Click the Software Installation and Configuration Guide button to save all Dispatch Settings. Overlays Sub-folder When the Overlays sub-folder is selected, the following window will be displayed. Click the a new Image Overlay option to the Toolbar of the GPS Window. button to add When an existing Image Overlay is selected, a map will be displayed along with tool buttons for Browsing for an Image, Image Transparency, Choosing a Map Type, and Zooming the View Preset.
TurboVUi Dispatch Software Installation and Configuration Guide Geo-fences Sub-folder One or more Geo-fences may exist in order to check various conditions of radio subscribers. One or more conditions may exist for each geo-fence. The conditions can apply to “All Subscribers” or “Specific Subscribers”. When a Geo-fence condition is met for a radio subscriber, an event is logged in the database. In addition, Geo-fence conditions that are true are listed in the Geo-Fence Alerts panel.
TurboVUi Dispatch Software Installation and Configuration Guide Color Use the tool to choose a color and transparency for this geo-fence. Map Type Use the tool to choose a Map Type. View Preset Use the tool to choose a View Preset. Use the tool to remove the last added point of this Polygon geo-fence. Use the tool to redo the last removed point of this Polygon geo-fence. Undo Redo Remove all Points Use the tool to remove all points of this Polygon geo-fence.
TurboVUi Dispatch Software Installation and Configuration Guide Map Type Use the tool to choose a Map Type. View Preset Use the tool to choose a View Preset. Remove all Points Use the Click the tool to remove all points of this Route geo-fence. button to save all Dispatch Settings. Geo-fence Conditions One or more Conditions may be created for any Geo-fence.
TurboVUi Dispatch Software Installation and Configuration Guide AUDIO PRESETS While in Edit mode, options are available that will customize the way in which audio will be transmitted and received. Click on the Options menu, click Audio Presets, and then click Config to display the following window. Note: The configuration file for Audio Settings can be located and viewed by clicking on the file name “AudioSettings.cfg” Click the button to save all Audio Configuration settings.
TurboVUi Dispatch Software Installation and Configuration Guide Neither of the conditions listed above for “Compressed Mode” exist, and The additional 10% improvement in audio quality is needed. Click the button to save all Audio Configuration settings. Devices tab Use this tab to add Audio Presets to the Options menu. Multiple Audio Presets can be entered to accommodate several different audio configurations using different microphones, headsets, and desk speakers.
TurboVUi Dispatch Software Installation and Configuration Guide Levels tab Use this tab to set the initial audio volume levels at program start-up. Mic Volume Select the initial microphone volume level. The initial setting for this parameter should be 100%. If audio heard on portable and mobile radios is not loud enough, adjust the Rear Mic Gain settings in CPS for the Control Station radios (XPR4550s) connected to TurboVUi IP Gateways.
TurboVUi Dispatch Software Installation and Configuration Guide SAVING THE PAGE LAYOUT To save the Page Layout discussed in the previous sections, use the following steps: 1. From the File menu, click on Edit. 2. Also from the File menu, click on Save As. Enter a file location and file name, then click the Save button.
TurboVUi Dispatch Software Installation and Configuration Guide CONFIGURATION FILES DUPLICATING A CONFIGURATION ON MULTIPLE PCS The following table lists folder locations for configuration files. These files can be copied to multiple PCs to duplicate a configuration. Descriptions of the configuration files follow the table. File Name Windows 7 and 8 folder Windows XP folder yourLayoutName.xml c:\ProgramData\TurboVUi User selectable User selectable yourLayoutName.
TurboVUi Dispatch Software Installation and Configuration Guide Although the default location for these files are as listed in the above table, the actual location can be found by using the following steps: 1. When in the Edit mode, click on the Options menu, and then choose Dispatch Settings. 2. In the lower left-hand corner of the Dispatch Settings window, click on the file name listed that ends with “tdcfg”. A Windows file folder will be opened with the configuration file selected.
TurboVUi Dispatch Software Installation and Configuration Guide Type This column contains the type of subscriber contact from the following choices IDs. (Leading spaces are not allowed.): DIG PRI (Digital Private Subscriber) (Must be all CAPS) DIG GRP (Digital Group) (Must be all CAPS) MDC PRI (MDC Analog Private Subscriber) (Must be all CAPS) MCD GRP (MDC Analog Group) (Must be all CAPS) ID Radio ID of Private Subscriber or Group. (Leading spaces are not allowed.
TurboVUi Dispatch Software Installation and Configuration Guide CONVERTING A TIMED-LICENSE TO A NON-EXPIRING LICENSE The TurboVUi IP Gateways that were shipped with this order may have a timed-license duration of 120 days. (The Packing List will indicate Part # S2-61612 if the timed-license is active.) If the Timed-License is active, and following the 120 day period, the TurboVUi IP Gateways will not connect to a TurboVUi Dispatch or Solo client for longer than five minutes.
TurboVUi Dispatch Software Installation and Configuration Guide FEATURE AVAILABILITY Depending on MOTOTRBO System Type or TurboVUi Dispatch edition, some features may not be available. Use the following tables to determine if a feature discussed in this document is not available. FEATURES BASED ON MOTOTRBO SYSTEM TYPE Use the following table to determine if a feature is not available for a MOTOTRBO System Type. System Type Analog Conv.
TurboVUi Dispatch Software Installation and Configuration Guide TROUBLESHOOTING CONNECTIONS TO IP GATEWAYS TurboVUi Dispatch Client cannot connect to Control Station Radio Possible Cause IP connection is not possible between Dispatch Client PC and TurboVUi IP Gateway. To verify, view the status of connections using the Manage Devices window, found under the Options menu. Corrective Actions If “Gateway not found” is indicated in the Manage Devices window, verify the following: 1.
TurboVUi Dispatch Software Installation and Configuration Guide Possible Cause Desk speakers are not turned on or the volume level is set too low. Corrective Action Turn on desk speakers and set volume level to 50%. Possible Cause Audio playback device such as speakers or headset is not configured and listed in the Audio Presets of the Options menu. Corrective Action From the Edit mode, configure Audio Presets for speakers or headset.
TurboVUi Dispatch Software Installation and Configuration Guide Possible Cause Control Station radio is not configured for “Rear PC and Audio”. Corrective Action Ensure that Control Station CPS setting for Cable Type in the “Accessories” folder is set for “Rear PC and Audio”. Possible Cause Control Station radio has Analog Mic AGC or Digital Mic AGC enabled.
TurboVUi Dispatch Software Installation and Configuration Guide Possible Cause Audio playback device such as speakers or headset is not configured and listed in the Audio Presets of the Options menu. Corrective Action From the Edit mode, configure Audio Presets for speakers or headset. MANAGE DEVICES WINDOW Times reported by IP Gateways are not synchronized Possible Cause A time server has not been configured correctly. Corrective Action See Install Time Server (if needed) on Page 11 of this document.
TurboVUi Dispatch Software Installation and Configuration Guide INDEX A I Actions Folder, 22 Add Note Button, 19, 35 Admin, 46 Alias Name, 36 Android, 5 Architecture, 6 Audio Preset, 13, 31, 32, 41, 42, 43 Audio Queue Sub-folder, 19, 21 ICU, 46 Image Overlays, 27 Installation Guide, 7, 46, 47 Intercom, 31, 32, 33 IP Address, 46 IP Gateway, 5, 6, 7, 8, 9, 10, 11, 13, 14, 15, 33, 37, 38, 40, 41, 43, 46, 47 K C Key License, 14, 38 USB Hardware, 8, 10, 13, 14 Call Select Tool Button, 24 Channel-Busy To
TurboVUi Dispatch Software Installation and Configuration Guide Toolbar Buttons, custom, 22, 23, 24, 25 Trail Crumbs, 25, 26 Transparency, 27 Troubleshooting, 40 Q Quick-Start Guide, 7, 47 R U Radio Controller Panel, 16, 19, 31, 41 Radio ID, 36, 37 Recent History Panel, 17, 19, 20, 42 Reference Documents, 7 Route Geo-fence, 29 USB Devices Folder, 25 USB Key, 47 USB Sound, 32 User Guide, 7 S V Snap-to-Road Route, 25 Solo Client, 5, 6, 7, 38, 47 Subnet Mask, 46 Subscriber List Sub-folder, 19, 20 Subs
TurboVUi Dispatch Software Installation and Configuration Guide SYSTEM PLANNER TEMPLATE PAGE 1 OF 2 TurboVUi IP Gateways See TurboVUi IP Gateway Installation Guide, document # S2-61534 for more information. Parameters Common to all IP Gateways ICU.exe Admin Password Dispatch Client Password NTP Server IP Address for ICU.exe, default is “admin” for Dispatch client connections default is “user” Network Time Protocol Parameters Unique to Each IP Gateway GPS = GPS Data Revert.
TurboVUi Dispatch Software Installation and Configuration Guide SYSTEM PLANNER TEMPLATE PAGE 2 OF 2 TurboVUi Dispatch Clients See TurboVUi Dispatch Software Installation Guide, document # S2-61535 for more information.
TurboVUi Dispatch Software Installation and Configuration Guide 48