INSTANT NOTIFY User Manual ™ Rev 1.0.
Table of Contents Introduction................................................................................................... 1 Overview......................................................................................................................... 1 Administrators and Users................................................................................................ 1 Creating a Notification List ......................................................................... 2 User Account Login.
THIS PAGE INTENTIONALLY LEFT BLANK ii
Introduction Introduction Overview Instant Notify automatically sends customizable voice or text messages to recipients immediately or based on a scheduled date and time. Each user can create and manage their notification callout lists. The user specifies information about each list and its members that will receive the notification message. They also determine the start and stop dates and times for the notification message delivery.
Creating a Notification Callout List Creating a Notification List You may create notification lists with voice and Email /Text messages by using a designated Windows 2000 or higher PC(s) containing the Instant Notify client software. A sound card, speakers and a high quality analog or USB microphone are required for recording new audio messages that the list members will hear when they are called.
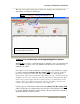
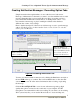
Creating a Notification Callout List The next screen offers logical option choices for creating a new notification list and editing or deleting an existing list. TABS For selecting List or Message Recording Options Create Edit Delete The details of the notification lists you create will be shown here. Figure 2 List and Message Recording Management Options Which TAB you select to start with depends on whether or not a recorded message already exists to assign to a list.
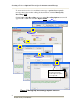
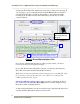
Creating a Voice or Optional Text to Speech Announcement Message To create and record a voice notification message or optional text to speech message that is played when calling the list members, click the Manage My Recordings TAB. Click Create a New Recording and a secondary Recording Options screen will appear with 3 additional selectable Option TABS. 1 Create Edit Delete 2 3 4 5 NOTE: This TAB will be grayed out if the Text to Speech option is not present.
Creating a Voice or Optional Text to Speech Announcement Message Creating Notification Messages / Recording Option Tabs Simple instructions that explain what to do are at the bottom of each screen. Enter up to 20 characters for the name you want to associate with the new recorded message. Remember that you can assign this recording to more than one list so pick a name that identifies the content, such as “football practice cancel”.
Creating a Voice or Optional Text to Speech Announcement Message A temporary WAV File name must first be entered if recording a new message. If you are going to use an existing WAV file, click the Browse button to find and select the WAV file that you want the list members to hear when called. The recording controls will be inactive until a file name is present and you click a control bar button. Shows status: Idle, Recording, Playing, Stopped.
Creating a Voice or Optional Text to Speech Announcement Message Text to Speech (TTS) is an optional feature and may or may not be present on your system. If the Text to Speech option was purchased, you may type the message you want the list members to hear when called. The text will be spoken with a synthesized voice instead of a recorded message. Creating a Text to Speech (TTS) message is similar to the requirements described for a voice recording.
Creating a Notification List Creating and Managing Notification Lists Now that a notification message has been created, a notification list of the people who are to receive that message must be created. Select the Manage My Lists TAB and then click the Create a New List button. ~~~~~~~~~~~~~~~~~~~~~~~~~~~~~~~~~~~~~~~~~~~~~~~~~~~~~~~~~~~ Figure 8 Manage My Lists TAB Call Priority is set by your system administrator. Senior Class Football Message Notice to senior class football players.
Creating a Notification List There are two methods of inserting or adding call list members into your new or existing notification list. To enter member information manually, type the information and then click the ADD button. The member information will grow as each member is added. The Total number of members in this list is shown in the lower right corner. To find a member in the list, click the Clear Entry button type in some known information in one or more of the fields and click the Search button.
Creating a Notification List To set the callout options for this members list, select the Notification Options TAB. Figure 12 List Notification Options TAB Selections Voice Message Reply – If installed on a VSLX / DFX VM platform called party can dial # to leave reply. Transfer Feature / Transfer Number – Allows called party to dial “0” for hook-flash transfer. Email Report– Sends an Email report to list owner per call or a summary when finished callouts.
Creating a Notification List To set the allowed and denied dates and times for this callout list, select the Callout Exceptions TAB. Figure 13 Callout Exceptions TAB The client software comes with the examples for reference as shown in Figure 13. There are two distinct sections labeled Calls Allowed and Calls Disallowed. These settings pertain to the notification list that you are currently creating or modifying. Each notification list can have different allowed and disallowed callout settings.
Creating a Notification List The next TAB determines when the notification callouts will begin and end. Select the List Start/Stop TAB and the following screen will appear: ` Figure 14 List Start/Stop Callout TAB The Current Status field indicates the current callout activity for this notification list. It changes based on what was selected in the Select Action field.
Reports, Options and Help Reports, Options and Help File Menu Clicking on File in the upper left control bar area, a pull down menu will appear. Figure 16 Pull Down File Menu Confirmation Report A confirmation report showing notification activity for a selected date and time period can be viewed and printed. Additional filtering is provided to show all, failed, completed or only retries in the report view. If the Polling feature is being used, (See Figure 12) the Dgt column shows which digit was dialed.
Reports, Options and Help Options Menu Your User Profile Selecting the Your User Profile from the pull down Options menu will open the following screen: Figure 18 Your User Profile The General TAB shows the information relating to your User log-in account. You are able to change any values with the exception of Class which is set by the system administrator. The Email Account TAB allows each user to specify an alternate mail account instead of using the common account set up by the system administrator.
Reports, Options and Help Help User Guide Clicking on Help will present a pull-down menu for access to this User Guide. A hyperlink searchable and printable PDF version of this User Manual is always available as a quick reference for the Instant Notify User. Figure 19 Help List Options About Instant Notify Selecting About Instant Notify from the list will present an information window showing the software revision numbers of the Client and Server software.
Using the TUI Using the Telephone User Interface (TUI) Menu Options The Telephone User Interface is used for the following purposes: o o o o To listen to the actual message that will be heard by list members To re record the callout message for a selected list To start or stop a notification callout list from a remote location To remotely change the date/time schedule to start the callout The TUI menu options are presented in an audible fashion and selected by pressing the appropriate digits on a tone di