Smart innovation! User’s Manual CAUTION Changes or modifications not expressly approved by the party responsible for compliance could void the user’s authority to operate the equipment. This User's Manual includes detailed usage instructions for your product. Please read this manual thoroughly. Figures and illustrations in this User Manual are provided for reference only and may differ from actual equipment appearance. Equipment design and specifications may be changed without notice.
Important Safety Instructions Always comply with the following precautions and usage tips to avoid dangerous situations and ensure peak performance of your product. CAUTION RISK OF ELECTRIC SHOCK DO NOT OPEN CAUTION: TO REDUCE THE RISK OF ELECTRIC SHOCK, DO NOT REMOVE COVER (OR BACK). THERE ARE NO USER SERVICEABLE PARTS INSIDE. REFER ALL SERVICING TO QUALIFIED PERSONNEL. WARNING CAUTION This symbol indicates that high voltage is present inside.
Important Safety Instructions Do not exceed the standard capacity of a multi-plug or power outlet extension when using it for the product. There is a danger of electric shock of fire hazard. To protect this apparatus from a lightning storm, or when it is left unattended and unused for long periods of time, unplug it from the wall outlet and disconnect the antenna or cable system. This will prevent damage to the set due to lightning and power line surges.
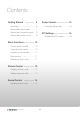
Contents Getting Started …………… 6 Setup Control………………… 15 Unpacking……………………… 6 Using the Setup menu………… 15 Viewing the control panel……… 7 Viewing the connection panel…… 8 PC Settings…………………… 16 Viewing the remote control……… 9 Adjusting the PC screen………… 16 Basic Functions……………… 10 Turning on/off your IEB………… 10 Using the touch sensor………… 10 Adjusting a volume level………… 11 Mute function…………………… 11 Selecting a input mode………… 11 Picture Control……………… 12 Adjusting picture mode………… 12 Setting advanced vi
Contents Touch Sensor Introduction………………… 19 Softkey (Optional)…………… 45 Softkey Settings………………… 46 Gesture……………………… 22 Troubleshooting…………… 48 Touch Gesture………………… 22 Device Not Connected………… 48 Calibration…………………… 33 Firmware Download…………… 48 Calibration……………………… 33 This program does not support vx.
Getting Started Unpacking The following items are included in your product box. IEB AC Power Code Remote Control with Battery USB Cable HDMI Cable Audio Cable User's Manual 1.5mm Hex Key Driver Activation Code (Interactive Electronic Board) The illustrations may differ slightly from the items shipped with your product.
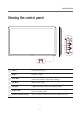
Getting Started Viewing the control panel 1 INPUT Display all the inputs. 2 MENU Displays a menu. 3 VOL ▲/▼ Adjust the volume. In the menu screen, adjust menu settings. 4 CH ▲/▼ Select a menu item. 5 Standby Toggles between normal and standby modes. 6 Power LED Blue: In power on mode. Red: In standby mode. 7 Remote control sensor Aims the remote control towards this spot on the IEB.
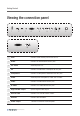
Getting Started Viewing the connection panel 1 2 3 ! 4 5 6 7 8 9 @ 1 USB Connect USB memory for MP3 or JPEG. 2 HDMI Connect an HDMI device to this jack. 3 PC Audio Audio input for PC. 4 PC Connect a video from a computer to this jack. 5 Component Connect a component video device to this jack. 6 Audio Audio input for component, video and S-Video. 7 Video Connect a video device to this jack. 8 S-Video Connect a S-Video device this jack.
Getting Started Viewing the remote control 1 2 3 4 6 7 5 8 9 1 POWER Press to turn the IEB on and off. 2 OK Press to accept your selection or display the current mode. ▲/▼/◄/► Press to select on-screen menu items or change menu values. 3 MENU Press to display the on-screen menu. 4 INPUT Press to display a menu of all available input sources. 9 5 VOL Press to increase or decrease the volume. 6 EXIT Press to exit the current menu. 7 ARC Press to adjust the screen size.
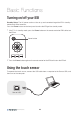
Basic Functions Turning on/off your IEB Standby Setup: The AC power cord must be set up and connected to get the IEB in standby mode ready to be turned on. Press the Power button on the front panel to make the IEB go into standby mode. 1 If the TV is in standby mode, press the Power button on the remote control or IEB itself to turn the IEB on. Power button 2 Press the Power button again on the remote control or the IEB itself to turn the IEB off.
Basic Functions Adjusting a volume level Press the VOL +/- button to adjust a sound level. Volume level: 0 ~ 100 Volume 20 VOL +/- button Mute function You can mute the audio sound. MUTE button 1 Press the MUTE button on the remote control to temporarily cut off the sound. 2 When mute is on, press the MUTE button again on the remote control to play the audio. Selecting a input mode You can change the input mode. 1 Press the INPUT button to display inputs.
Picture Control Adjusting picture mode Picture menus adjust the IEB for the best picture appearance. 1 Press the MENU button to display the main menu. 2 Press the ◄/► button to select the Picture menu, and then press the OK button. 3 Press the ▲/▼ button to select the desired picture option.
Picture Control Setting advanced video 1 Press the MENU button to display the main menu. 2 Press the ◄/► button to select the Picture menu, and then press the OK button. 3 Press the ▲/▼ button to select Advanced Video, and then press the OK button. Color Temperature Normal Zoom Mode Wide Noise Reduction Auto Adaptive Contrast On Select Move Exit 4 Press the ▲/▼ button to select menu items.
Sound Control Adjusting sound mode Sound menus adjust the IEB for the best sound appearance. 1 Press the MENU button to display the main menu. 2 Press ◄/► button to select the Sound menu, and then press OK button 3 Press the ▲/▼ button to select menu items.
Setup Control Using the Setup menu 1 Press the MENU button to display the main menu. 2 Press ◄/► button to select the Setup menu, and then press OK button 3 Press the ▲/▼ button to select menu items. Time Menu Settings PC Settings Restore Default Select Move Exit 4 Press the EXIT button to return to IEB viewing or press the MENU button to return to the previous menu.
PC Settings Adjusting the PC screen 1 Select the input for PC. 2 Press the MENU button to display the main menu. 3 Press the ◄/►button to select the Setup menu, and then press the OK button 4 Press the ▲/▼ button to select PC Settings, and then press the OK button. 5 Press the ▲/▼ button to select the items.
Notes 17
Touch Sensor Smart innovation! 18
Introduction This document1 is the user’s manual of the settings software for T3500 touch sensors. Program T3kCfg.exe Operating System Microsoft Windows XP (32 & 64 bit), Vista (32 & 64 bit), and 7 (32 & 64 bit), Mac OSX, Linux Minimum Requirements Intel Celeron 333 MHz Processor Resolution of 1024 x 768 Prerequisites for Running T3kCfg Prerequisites for Running T3kCfg The following is the window that comes up when one launches the T3kCfg.exe program.
Introduction The following is the user interface for Ubuntu, a Linux distribution by Canonical. The following is some of the features of the T3kCfg program.
Introduction Tabbed Menu When one goes into one of the Mouse, Calibration, Sensor Settings, or General Settings menus, one is provided with five different buttons (six if one has Softkey installed) on the top right whereby the selection of which will give the user access to its specific settings. 1 Home Access to the menus in a wider named format. One can also see the firmware version of the device. 2 Gesture Setting the Touch Gesture Profiles.
Gesture Touch Gesture Selecting “Gesture” from the above list provides one with the following screen. Here, one can make a connection between a certain touch gesture, an action performed with a finger, multiple fingers, or a palm, or to a certain mouse button, a keyboard button, or a combination of a mouse and keyboard buttons. The T3k Touch Sensor classifies gestures into a bundle and this bundle is what we call a Profile.
Gesture On the bottom, there are additional features such as Inertial Wheel, Individual Put & Tap, Put & Double Tap, Hybrid Multi-Touch, Mac OS X Margin, and Invert Wheel. Touch Types that T3k Touch Sensor Recognizes Touch the screen via a single finger. Single Touch Touch the screen with multiple fingers. Fingers Touch Palm Touch Touch the screen with the palm of one’s hand. Place one finger on the screen and tap with another finger.
Gesture Selecting Profiles The selection of profiles can be accomplished by choosing the appropriate Profile from the top of the Touch Gestrure menu. There are two modes of selecting a profile. One is by the Mouse and the other is by the Hand. One selects the Mouse when one is in the Mouse input mode and the Hand when one is in the Multi-touch input mode. The input mode can be selected in General Settings. Refer to 5.3 Touch Input Mode. is for the Mouse mode of input. is for the Multi-touch mode of input.
Gesture Editing Profiles After selecting a profile, one can go and edit parts of the profile by clicking a type and an action. There are four different editable types in each profile and each item has a different set of changes one can make. Each is explained below. A B C D A. Editing the Single > Drag, Tap, and Double Tap type There are limited actions that one can select from each Profile. The following is the detailed editable actions present for the Single > Drag, Tap, and Double Tap type.
Gesture B. Editing the Fingers, and Palm > Drag Functionality Can edit each or all the directional keys of forward, back, right, and left. The following is the detailed editable actions for the Fingers and Palm > Drag type.
Gesture C. Editable Actions for Fingers > Tap. Double Tap, and Long Tap The following is the editable actions for the Fingers > Tap, Double Tap, and Long Tap type.
Gesture D. Editing the Zoom functionality One can edit each or both the zoom-in and zoom-out functionality. Below are the detailed editable actions for the Zoom type. Actions Explanation (Disabled) - (User Defined) User defined keys (Function Key) Any function keys from F1 to F24 Wheel Mouse wheel Ctrl+Wheel Pressing of the Ctrl key and turning the mouse wheel.
Gesture Entering User Defined Keys User Defined Keys and Function Keys are reoccurring actions from the above four examples. Below are ways to configure these two items. Editing a User Defined key is as follows. Choose the Ctrl/Alt/Shift/Win buttons and type in the character that one wants to select a combination of. (The key is the Clear key.) Example: Ctrl + C Example: Window key Example: Ctrl + Shift + Esc One can simply type in the sequence or select from above.
Gesture Entering Function Keys Entering the function keys to edit a profile is as follows. One can key in the sequence on the keyboard or select from the Ctrl/Alt/Shift/Win keys and press the function key on the keyboard. ( is the Clear key) Example: Ctrl + F1 Example: Ctrl + Alt + F3 Example: F20 Expanding the Profiles On the bottom of the Mouse menu, is four features that are related to each Profile. They go on and off as one goes from General to Windows 7 to Games, etc.
Gesture Inertial Wheel: On top of the mouse wheel gesture, this feature adds inertia to it. For example, when one presses multiple fingers onto the screen of a document or a Web page, and move up or down in a quick fashion, consecutive pages keep turning as if the wheel had inertia. Individual Put & Tap, Put & Double Tap: This setting is to set Put & Tap and Put & Double Tap as mutually exclusive features, i.e. when Put & Tap is working, Put & Double Tap cannot work and vice versa.
Gesture Shown above is the same Multi-Touch Mode but with Hybrid Multi-Touch turned on. As one can see, the user can drag, tap, double-tap, and long-tap with the palm in addition to the Windows 7’s multi-touch features.
Calibration Calibration is where one goes if the screen size has changed due to a change in resolution of the computer screen or when something happens to the sensors and they are not aligned properly. Usually, when this happens, the position of the mouse and the pointer do not coincide. To remedy this, one needs to calibrate the touch coordinates. There are two ways of calibrating the touch coordinates. One is thru the use of the Calibrate key in the Calibrate window.
Calibration Screen Margin = Ox / Sx * 100 = Oy / Sy * 100 Area Settings This is to place a limit on the area for a single click, double click, Put & Tap, and the palm. Changing values in the Area Settings may cause the Tap, Double Tap, Put & Tap, or the Palm functionalities to malfunction. Use it at one’s own discretion. When a person taps on a surface, there are two things that she does. One is that she touches the surface or simply Touch, and the other is she lifts the finger from the surface or Lift.
Calibration Double Click Area: This is the area where the user Touches, Lifts, and Touches again. If the area where the user Touches, Lifts, and Touches is not within the bounds set, the double click is not recognized. A. Valid Double Click B. Invalid Double Click First Touch Lift Second Touch Put & Tap Area: This is the minimum percent area within which the Put & Tap action should be performed.
Calibration Touch Settings When one goes down to the bottom of the Calibration settings, one will see Touch Settings. Click on it and one should have the following window. Time Settings This is how fast or how slow one touches the screen with one’s fingers. The top is for the Tap and the bottom is for the Long Tap. The units for both are in milliseconds. Wheel / Zoom Sensitivity Settings Mouse Wheel: This is the sensitivity setting for the wheel.
Sensor Settings The Settings window is divided into Enable/Disable Touch Screen, Buzzer and Shortcut Keys. Enable/Disable Touch Screen The purpose for this is to enable/disable the touch screen. When enabled, the device responds to touch. When disabled, the device does not respond to touch. One would need a mouse/ keyboard to interact when disabled. When one presses the Disable button, the following pop-up appears. Press the Timer Button to disable touch. Otherwise, it reverts back to Enabled.
Sensor Settings Buzzer This is where one can turn on and off the sound when there is an error with the installation, or when a click is made. It is also the place to go if one would like to listen to the sound when a click is made. Click: For turning on and off the beep when a mouse is clicked or a touch occurs. Error: For turning on and off the beep when an error has occurred. An example would be disconnection of the camera sensor.
Sensor Settings Sensor Diagnostics This is where the user goes if the sensor does not work properly. When one selects this item, a pop-up window warning of the danger of changing data on the following screen comes up. Please use the default settings and follow the technician’s instructions. The following two figures are the Detection Graph and the Sideview tabs that appears when one presses the Continue button above. The Default key changes the settings to the manufacturer’s defaults.
Sensor Settings Open the Sideview screen of the Sensor Diagnostics window by clicking on the Sideview tab. One will be provided with a snapshot of the Sideview. One can press the Snapshot button on the lower left to refresh these images.
General Settings This is the where one can set the language, tray icon settings, and the touch input mode. Language This is for selecting the language. One can select from English, Korean, Traditional / Simplified Chinese, French, Spanish, Portuguese and Japanese. Tray Icon This is the setting to use the tray icon to store profile mappings. If selected, one can change from General, Windows 7, Mac OS X, Linux (Gnome), or User Defined from the tray icon rather than opening T3kCfg.exe.
General Settings Select Use Tray Icon on the General Settings menu and the following appears on the Taskbar of Microsoft Windows 7. When the user selects Use Tray Icon, the program does not terminate when one presses Exit but stays on until she selects Exit from the Taskbar. The following is what appears on Mac OS X. Here is how it appears on Ubuntu 10.10 (Maverick Meerkat).
General Settings Features of the Tray Icon a. Quick Change Between Profiles One can change between Profiles from the Tray Icon. From the Tray Icon, one can easily change from the five Profiles as well as open up or terminate the T3kCfg program. b. T3k Touch Sensor Status By using the Tray Icon, one can also check the status of the T3k Touch Sensor. The sensor is disconnected. The sensor is connected and using the number 2 Windows 7 Profile.
General Settings If one selects Auto Select, the operating system selects the input mode depending on the OS.
Softkey (Optional) This is an optional feature present in some T3k wide screen versions. It is basically a set of virtual buttons that one can set to open an annotation program, start browsing the Internet, or disable touch. Initially, they are set by the manufacturer. When the Softkey functionality is present, the user can manipulate some features to one’s own liking. For users that have this option, they will see an icon to the lower right of the Main screen of T3kCfg.
Softkey (Optional) Softkey Settings The following is a list of user settable items. Item Explanation (Disabled) - (User Defined) User Defined key (Function Key) Function keys from F1 to F24 (Mouse) Mouse input Escape key Esc key Task Switching Switch from the many tasks present on one’s desktop. Task Switching (Aero Mode) Switch from the many tasks present on one’s desktop but with Aero functionality turned on.
Softkey (Optional) Mouse Input From the Softkey Settings menu, select the number one would like to use and choose (Mouse). One can choose from the Ctrl/Alt/Shift/Win buttons and/or select from Left, Right, or Middle button from the Combo Box. Mouse Combo Box: Mouse Action Explanation Left Down Press the left mouse button Right Down Press the right mouse button Middle Down Press the middle mouse button One can select from a combination of key sequences or choose from two different states.
Troubleshooting Device Not Connected When the device is not connected to the computer in question, the following screen comes up. Check if the USB connector from the T3k Touch Sensor is properly connected to the computer. Firmware Download During a firmware download, one cannot set the sensor.
Troubleshooting This program does not support vx.xx firmware When the version of the software does not correspond to the version of the firmware, the following Dialog opens. It is specifying the versions of the firmware that it supports and the current version of the touch sensor’s firmware. One can change the software program and run it again, or upgrade the firmware of the touch sensors.
Specification Display Glass LCD Type CCFL/LED Windows Ratio 16:9 Resolution Full HD (1920*1080) Frequency 60 / 120 Hz Glass Material AG (Anti Glare) Touch Technology Optical Touch Accuracy ±3 mm (for 70” screen) Resolution 32767 X 32767 Response Time Less than 8 ms Response Rate More than 125 responses per second Operating Temperature 0 °C to 70 °C IR Wavelength 850 nm Current Consumption (w/o IR Bar) Typically 233 mA at 5V Touch I/O Port Electrical IR Bar 200 mA per meter at 5
Notes 51
Smart innovation! www.ctouch.