
Instructions / Assembly
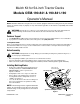

Mulch Kit for 54-inch Tractor Decks
Models OEM-190-841 & 190-841-190
Operator’s Manual
NOTE: Model 841 Mulch Kit is designed for use on tractors equipped with 54-inch cutting deck only.This will NOT
mount, nor operate safely or properly on any other tractor regardless of the tractor’s compatibility with similar
accessories.
Customer Support
1. Visit mtdproducts.com for many useful suggestions; click on Customer Support button to access database.
2. If you prefer to reach the Customer Service Line, please call 1(800) 800-7310.
Locating Model Number
Before you install this kit, please locate the model plate on the mulch plug and note the model and serial numbers.
This information will be necessary to use the manufacturer’s web site and/or seek help from Customer Support
Department or White Outdoor dealer.
Before Assembly
• Before beginning installation, place the tractor on a firm and level surface.
• Place the PTO in the disengaged (OFF) position, stop the tractor engine and set the parking brake.
• Make sure the kit contains a mulch plug (part # 731-04651) and three mulching blades (part # 742-0678).
Installing Mulching Blades
• Remove the cutting deck from beneath the tractor
following instructions on DECK REMOVAL in the
MAINTENANCE section of your tractor’s
Operator’s Manual.
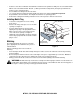
• Gently flip the deck over to expose its underside.
• Place a block of wood between the center deck
housing baffle and the cutting blade to act as a
stabilizer. See Figure 1.
• Use a 15/16" wrench to remove the hex flange nut
that secures the blade to the spindle assembly.
Save the hardware.
NOTE: The hex flange nut has a right-handed thread
pattern. Do not attempt to force the nut in the wrong
direction. Doing so may damage the nut and create a
safety hazard.
WARNING: Restrict the use of this accessory and the tractor to persons who read, understand and
follow the warnings and instructions in this manual, the tractor manual and on the machine.
WARNING: Cutting blades are sharp. Always protect hands by wearing heavy leather work gloves or
use heavy rags to handle blades.
Hex Flange Nut
Place wood
Spindle Assembly
Figure 1
block this way
PRINTED IN U.S.A.
FORM NO.
770-10591A.fm
(3/2004)