
Use and Care Manual
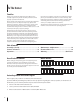


Section 2— ASSembly & Set-Up6
12. For 2014 and newer tractors, the lift handle will need to be
replaced. Proceed with step 13 for 2014 and newer tractors,
for 2012/13 tractors skip ahead to step 15.
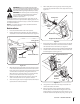
13. Remove the hex screw and flange lock nut securing the
handle to the deck lift shaft assembly and remove the
handle. See Figure 2-4.
Figure 2-4
14. Install the new deck lift handle (#40) using the hex screw
and flange lock nut removed in step 13. See Figure 2-4.
15. Slide the new grip (#24) onto the handle.
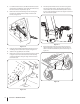
16. Remove the screw on each side of the floor board as shown
in Figure 2-5, the four screws at the base of the steering
column and the three along the edge of the floor board
towards the seat.
Screw
Figure 2-5
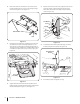
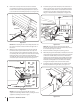
17. The three pedals will also have to be removed to get the
floor board off the tractor. The drive/reverse pedals are
secured with a hex screw and the brake pedal is secured
by a hex screw and flange lock nut. See Figure 2-6. Remove
the screws and the pedals.
Figure 2-6
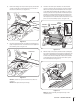
18. Remove the flange lock nuts on the two hex screws on
the front bumper. To access the hex screws, the front of
the floor board must be lifted up and out of the way. See
Figure 2-7.
Flange Lock Nuts
Hex Screws
Figure 2-7