
Use and Care Manual


22
OPERATION
Replacing Shear Pins
CAUTION
NEVER replace the auger or central accelerator shear
pins with anything other than OEM Part No. 738-04124A
(round head replacement shear pins), 738-05273 (black
colored, round head replacement shear pins) or 738-
06654 (hex head replacement shear pins). Any damage
to the auger gearbox or other components as a result of
failing to do so will NOT be covered by your snow blower’s
warranty.
WARNING
Shut OFF engine, remove safety key or disconnect spark
plug wire prior to replacing shear pins.
The augers are secured to the spiral shaft with shear pins (a, b or
c) and cotter pins (d). If the auger should strike a foreign object or
ice jam, the snow blower is designed so that the pins may shear.
If the augers will not turn, check to see if the pins have sheared
IMPORTANT: ALWAYS use the correct OEM replacement shear
pin.
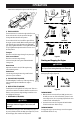
2STAGE SNOW BLOWER REPLACEMENT
SHEAR PINS
• The auger is secured to the spiral shaft using round
head shear pins (a) - OEM Part No. 738-04124A.
3STAGE SNOW BLOWER REPLACEMENT
SHEAR PINS
• The side augers are secured to the spiral shaft using
black colored, round head shear pins (b) - OEM part
number 738-05273.
• The central accelerator augers are secured to the spiral
shaft using hex head shear pins (c) - OEM part number
738-06654.
d
a
2-Stage Snow
Blowers
3-Stage Snow
Blowers
d
d
d
c
b
b
Figure 66
TO STEER IF EQUIPPED
With the drive control lever engaged, squeeze the right steering
trigger control to turn right, or squeeze the left steering trigger
control to turn left.
CAUTION
Operate the snow blower in open areas and at slow
speeds until you are familiar with the drive control and
comfortable operating the steering controls.
Clearing a Clogged Chute Assembly
WARNING
Never use your hands to clear a clogged chute assembly.
Shut OFF engine, remove safety key, disconnect spark
plug wire and remain behind handles until all moving
parts have stopped before unclogging.
The chute clean-out tool is conveniently fastened to the rear of
the auger housing with a mounting clip. Should snow and ice
become lodged in the chute assembly during operation, proceed
as follows to safely clear the chute assembly and chute opening:
1. Release both the auger control lever and the drive control
lever and rotate the chute assembly to the left.
2. SHUT THE ENGINE OFF! Refer to the Engine Operator’s Manual.
Remove the safety key.
3. Remove clean-out tool from the clip which secures it to the
rear of the auger housing.
4. Use the shovel-shaped end of the clean-out tool to dislodge
and scoop any snow and ice which has formed in and near
the chute assembly. Always use the clean-out tool (Part #
931-2643), not your hands. Refer to the separate supplement
for clean-out tool ordering information, if lost or damaged
(Figure 65).
5. Re-fasten the clean-out tool to the mounting clip on the rear
of the auger housing, reinsert the safety key and start the
engine.
6. While standing in the operator’s position (behind the snow
blower), engage the auger control lever for a few seconds to
clear any remaining snow and ice from the chute assembly.
Figure 65