Safe Operation Practices • Set-Up • Operation • Maintenance • Service • Troubleshooting • Warranty Operator’s Manual Three Stage Snow Thrower — 3X 24, 3X 26, 3X 28, 3X 24 HD, 3X 26 HD, 3X 28 HD, & 3X 30 HD WARNING READ AND FOLLOW ALL SAFETY RULES AND INSTRUCTIONS IN THIS MANUAL BEFORE ATTEMPTING TO OPERATE THIS MACHINE. FAILURE TO COMPLY WITH THESE INSTRUCTIONS MAY RESULT IN PERSONAL INJURY. CUB CADET LLC, P.O. BOX 361131 CLEVELAND, OHIO 44136-0019 Printed In USA Form No.
1 To The Owner Thank You Thank you for purchasing a Cub Cadet Snow Thrower. It was carefully engineered to provide excellent performance when properly operated and maintained. If applicable, the power testing information used to establish the power rating of the engine equipped on this machine can be found at www.opei.org or the engine manufacturer’s web site. Please read this entire manual prior to operating the equipment.
Important Safe Operation Practices 2 WARNING! This symbol points out important safety instructions which, if not followed, could endanger the personal safety and/or property of yourself and others. Read and follow all instructions in this manual before attempting to operate this machine. Failure to comply with these instructions may result in personal injury. When you see this symbol.
Safe Handling of Gasoline 5. To avoid personal injury or property damage use extreme care in handling gasoline. Gasoline is extremely flammable and the vapors are explosive. Serious personal injury can occur when gasoline is spilled on yourself or your clothes which can ignite. Wash your skin and change clothes immediately. Never run an engine indoors or in a poorly ventilated area. Engine exhaust contains carbon monoxide, an odorless and deadly gas. 6.
Clearing a Clogged Discharge Chute Hand contact with the rotating impeller inside the discharge chute is the most common cause of injury associated with snow throwers. Never use your hand to clean out the discharge chute. To clear the chute: 1. SHUT THE ENGINE OFF! 2. Wait 10 seconds to be sure the impeller blades have stopped rotating. 3. Always use a clean-out tool, not your hands. Maintenance & Storage 1. Never tamper with safety devices. Check their proper operation regularly.
Safety Symbols This page depicts and describes safety symbols that may appear on this product. Read, understand, and follow all instructions on the machine before attempting to assemble and operate. Symbol Description READ THE OPERATOR’S MANUAL(S) Read, understand, and follow all instructions in the manual(s) before attempting to assemble and operate WARNING— ROTATING BLADES Keep hands out of inlet and discharge openings while machine is running.
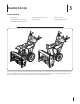
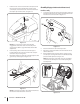
3 Assembly & Set-Up Contents of Carton • Snow Thrower • Replacement Auger Shear Pins • Chute Assembly • Chute Control Rod or Flex Shaft • Engine Manual • Product Registration Card • Snow Thrower Operator’s Manual There are two chute control styles available that determine your method of assembly. Refer to the image above to determine which chute control style you have. If your product resembles the image on the left (above), see page 8 for assembly instructions.
Assembly (If Equipped with 4-Way Chute Control) 4. Remove all loose parts before assembling. Handle Assembly 1. Place the shift lever in the Forward-6 position as shown in Figure 3-1 inset. 2. Cut zip ties securing chute control rod to the lower handle and set it aside. 3. Observe the lower rear area of the snow thrower to be sure both cables are aligned with roller guides before pivoting the handle upward. Pivot the handle upward.
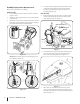
5. Rotate the joystick to the one o’clock position so that the silver indicator arrow on the pinion gear below the control panel faces upward. See Figure 3-7. Figure 3-5 4. Squeeze the trigger on the joystick and rotate the chute by hand to face forward. The holes in the chute control input will be facing up. See Figure 3-6. Chute Control Input Top View Figure 3-7 NOTE: The joystick will be angled slightly to the right at the one o’clock position. See “Top View” in Figure 3-6. 6.
7. Push the chute control rod toward the control panel until the hole in the rod lines up with the hole in the chute control input closest to the chute control head and insert the hairpin clip removed earlier. See Figure 3-9. Assembly (If Equipped with Overhead Chute Control) Handle Assembly 1. Loosen the top two lock nuts securing the upper and lower handle and remove the two carriage screws from the lower handle and set aside as shown in Figure 3-11. Figure 3-9 8. 9.
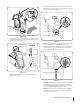
NOTE: Make certain the cables are seated properly in the roller guides. See Figure 3-13. Chute Assembly 1. Remove the lock nuts and hex screws from chute support bracket. Position the chute assembly over the chute base. See Figure 3-15. Chute Control Head 1 2 Chute Assembly 1 2 Chute Base Figure 3-13 5. Chute Support Bracket Reattach the two carriage screws and lock nuts removed earlier as shown in Figure 3-14. Figure 3-15 2. Place chute assembly onto chute base. 3.
4. Remove the hairpin clip from the rear of the chute control assembly. 5. Insert flex shaft removed earlier from the lower handle into rear of the chute directional control head. Secure the flex shaft to the chute control head with the hairpin clip removed earlier. See Figure 3-17 . 7. Remove the cotter pin and washer from the ferrule on the end of the shift rod. See Figure 3-19 inset. 8.
Chute Clean-Out Tool Tire Pressure WARNING! Under any circumstance do not exceed manufacturer’s recommended psi. Equal tire pressure should be maintained at all times. Excessive pressure when seating beads may cause tire/rim assembly to burst with force sufficient to cause serious injury. Refer to sidewall of tire for recommended pressure. The chute clean-out tool is fastened to the top of the auger housing with a mounting clip and a cable tie at the factory.
To adjust the skid shoes: 1. Loosen the four hex nuts (two on each side) and carriage bolts. Move skid shoes to desired position. See Figure 3-23. 4. Allow the auger to remain engaged for approximately ten (10) seconds before releasing the auger control. Repeat this several times. 5. With the auger control in the disengaged “up” position, walk to the front of the machine. 6. Confirm that the auger has completely stopped rotating and shows NO signs of motion.
4 Controls and Features Shift Lever 4-Way Chute Directional Control/ Two-Way Chute-Pitch Control † Drive Control Auger Control Headlight Heated Grips † Chute Assembly Steering Trigger Control Drift Cutter † Clean Out Tool Overhead Chute Directional Control † Augers Skid Shoe † If Equipped Figure 4-1 Snow thrower controls and features are described below and illustrated in Figure 4-1.
Auger Control Heated Grips (If so Equipped) CAUTION: It is recommended that you wear gloves when using the heated grip. If the heated grip become too hot, turn it off. The auger control is located on the left handle. Squeeze the control grip against the handle to engage the augers and start snow throwing action. Release to stop. To activate the heated grips, move the switch found on the rear of the dash panel into the ON position.
4-Way Chute Directional Control (If so Equipped) Drift Cutters (If so Equipped) The drift cutters are designed for use in deep snow. Their use is optional for normal snow conditions. Maneuver the snow thrower so that the cutters penetrate a high standing snow drift to assist snow falling into the augers for throwing. Chute Clean-Out Tool WARNING! Never use your hands to clear a clogged chute assembly. Shut off engine and remain behind handles until all moving parts have stopped before unclogging.
5 Operation Starting and Stopping the Engine Replacing Shear Pins Refer to the Engine Operator’s Manual packed with your snow thrower for instructions on starting and stopping the engine. The augers are secured to the spiral shaft with shear pins and cotter pins. If the auger should strike a foreign object or ice jam, the snow thrower is designed so that the pins may shear. If the augers will not turn, check to see if the pins have sheared. See Figure 5-2. To Engage Drive 1.
6 Maintenance & Adjustments Maintenance 3. Loosen the rear skid shoe bolts on both sides of the snow thrower housing and remove the carriage bolts and hex nuts which attach shave plate to the auger housing. 4. Slide the shave plate downward into the second position. Reinstall and tighten all bolts securely. See Figure 6-2. Engine Refer to the Engine Operator’s Manual. Tire Pressure Refer to Assembly and Set-up section for information regarding tire pressure.
Lubrication Wheels At least once a season, remove both wheels. Clean and coat the axles with a multipurpose automotive grease before reinstalling wheels. Auger Shaft At least once a season, remove the shear pins from the auger shafts. Spray lubricant inside the shafts and around the spacers and the flange bearings/bushings found at either end of the shafts. See Figure 6-4. Figure 6-5 4. Apply a light coating of Bostik Regular Grade Never-Seez® to the hex shaft. See Figure 6-6.
2. Loosen the hex nut on the shift cable index bracket. See Figure 6-9. 3. Pivot the bracket downward to take up slack in the cable. 4. Retighten the hex nut. Figure 6-7 3. Pivot the shift bracket downward as far as it will go. See Figure 6-8. Figure 6-9 Auger Control Refer to the Assembly and Set-up section for instructions on adjusting the auger control cable. Skid Shoes Refer to the Assembly and Set-up section for instructions on adjusting the skid shoes.
2. Pull out the chute control rod until the hole in it lines up with the second hole in the chute rotation assembly. 3. Reinsert the hairpin clip through this hole and the chute control rod. See Figure 6-11. Chute Assembly (Overhead Chute Control) (If so Equipped) If the chute fails to remain stationary during operation, the pre-load of the chute can be adjusted by tightening the hex nut found on the front of the chute control assembly.
7 Service Belt Replacement 3. Auger Belt Loosen and remove the two bolts and flat washers securing the belt guide. See Figure 7-2. Remove belt guide. To remove and replace your snow thrower’s auger belt, proceed as follows: 1. Allow the engine to run until it is out of fuel. Do not attempt to pour fuel from the engine. 2. Remove the plastic belt cover on the front of the engine by removing the two self-tapping screws. See Figure 7-1. Figure 7-2 4. Roll the auger belt off the engine pulley.
5. Carefully pivot the snow thrower up and forward so that it rests on the auger housing. 6. Remove the frame cover from the underside of the snow thrower by removing the self-tapping screws which secure it. See Figure 7-4. NOTE: Engaging the auger control will ease removal and reinstallation of the belt. Figure 7-6 9. Figure 7-4 7. Replace the auger belt by following instructions in reverse order.
8 Troubleshooting Problem Engine fails to start Cause Remedy 1. Choke not in CHOKE position. 1. Move choke to CHOKE position. 2. Spark plug wire disconnected. 2. Connect wire to spark plug. 3. Fuel tank empty or stale fuel. 3. Fill tank with clean, fresh gasoline. 4. Engine not primed. 4. Prime engine as instructed in the Engine Operator’s Manual. 5. Faulty spark plug. 5. Clean, adjust gap, or replace. 6. Key not in ignition on engine. 6. Insert key fully into the switch. 7.
9 Replacement Parts Component Part Number and Description 954-04195A 954-04201A Auger Drive Belt Wheel Drive Belt 684-04153C 935-04054 Friction Wheel Assembly Friction Wheel Rubber 925-1629 Lamp, 12V 738-04124A 714-04040 Shear Pin, 1.
10 Attachments & Accessories The following attachments and accessories are available for your Cub Cadet snow thrower. See your Cub Cadet dealer or the retailer from which you purchased your snow thrower for information regarding price and availability.
CUB CADET LLC MANUFACTURER’S LIMITED WARRANTY FOR SNOW THROWERS, LOG SPLITTERS CHIPPER-SHREDDERS, CHIPPER-SHREDDER VACUUMS AND JET SWEEPS The limited warranty set forth below is given by Cub Cadet LLC with respect to new merchandise purchased and used in the United States, its possessions and territories, and by MTD Products Limited with respect to new merchandise purchased and used in Canada and/or its territories and possessions. a.