
Operator`s manual

Set-Up
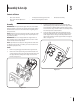
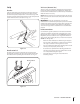
Shear Pins
A pair of replacement auger shear pins and bow tie cotter pins
have been included with your snow thrower. There are holes
provided in the plastic dash panel for convenient storage of the
shear pins. Push the pins through the holes in the dash panel and
secure with the bow-tie cotter pins. See Fig. 3-6.
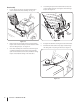
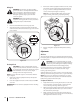
Chute Clean-Out Tool
The chute clean-out tool is fastened to the top of the auger
housing with a mounting clip and a cable tie at the factory. Cut
the cable tie before operating the snow thrower. See Fig. 3-7.
Figure 3-6
Tire Pressure (Pneumatic Tires)
The tires can be over-inflated for shipping purposes. Check the
tire pressure before operating the snow thrower. Refer to the
tire side wall for manufactures’s recommended psi and deflate or
inflate the tires as necessary.
NOTE: If the tire pressure is not equal in both tires, the unit may
pull to one side or the other and the shave plate will not sit level
on the ground.
IMPORTANT: Under any circumstance do not exceed
manufacturer’s recommended psi. Equal tire pressure should be
maintained at all times. Excessive pressure when seating beads
may cause tire/rim assembly to burst with force sufficient to
cause serious injury. Refer to sidewall of tire for recommended
pressure.
Fuel Recommendations
Use automotive gasoline (unleaded or low leaded to minimize
combustion chamber deposits) with a minimum of 87 octane.
Gasoline with up to 10% ethanol or 15% MTBE (Methyl Tertiary
Butyl Ether) can be used. Never use an oil/gasoline mixture or
dirty gasoline. Avoid getting dirt, dust, or water in the fuel tank.
DO NOT use E85 gasoline.
Refuel in a well-ventilated area with the engine stopped. •
Do not smoke or allow flames or sparks in the area where
the engine is refueled or where gasoline is stored.
Do not overfill the fuel tank. After refueling, make sure the •
tank cap is closed properly and securely.
Be careful not to spill fuel when refueling. Spilled fuel or •
fuel vapor may ignite. If any fuel is spilled, make sure the
area is dry before starting the engine.
Avoid repeated or prolonged contact with skin or •
breathing of vapor.
Figure 3-7
Clean-out Tool
9se c t i O n 3 — as s e M b l y & se t -up