
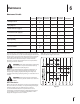
Specification

Checking and Changing the Oil
To avoid engine damage, it is important to:
• Check oil level before each use and every 5 operating hours
when the engine is warm.
• Change the oil after the first 5 operating hours and every
50 operating hours thereafter. Engine should still be warm
but NOT hot from recent use.
Oil Fill Cap and Dipstick
WARNING! Before tipping engine or equipment to
drain oil, drain fuel from tank by running engine
until fuel tank is empty.
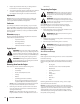
1. Carefully disconnect the spark plug wire and keep it away
from the spark plug. Refer to Figure 6-2 for spark plug
location.
• Keep the disconnected spark plug wire securely
away from the metal parts where arcing could
occur.
• Carefully attach the spark plug wire to the
grounding post, if provided.
Spark Plug
Spark Plug
Boot
Figure 6-2
2. Be sure that the fuel fill cap is on and securely tightened.
3. Be sure to find correct oil drain plug location, if present
(see the equipment Operator’s Manual instructions for
additional information).
4. Clean area around the oil drain plug.
5. Place an approved recyclable oil container under the oil
drain plug.
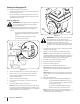
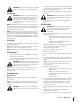
6. Remove the Oil drain plug. See Figure 6-3.
NOTE: Depending on which engine model you have, the oil
plug may be positioned differently. These positions include
on the front and/or rear side of the block, or as an extended
tube. Examples are shown in Figure 6-3.
Oil
Drain
Oil
Drain
Figure 6-3
WARNING! Used motor oil may cause skin cancer
if repeatedly left in contact with the skin for
prolonged periods. Although this is unlikely unless
you handle used oil on a daily basis, it is still
advisable to thoroughly wash your hands with soap
and water as soon as possible after handling used
oil.
7. Tip engine to position the oil flow, so it will drain from the
lowest point on the engine.
8. Drain the oil into an approved recyclable oil container.
NOTE: Please dispose of used motor oil in a manner that is
compatible with the environment. We suggest you take it in a
sealed container to your local service station for reclamation.
Do not throw it in the trash or pour it on the ground.
9. Install the oil drain plug and tighten securely.
10. Clean area around the oil drain plug.
11. Remove the oil fill cap dipstick.
12. Fill with the recommended Oil. See Figure 6-3.
NOTE: DO NOT overfill oil filler. Doing so may result in oil
carry-over to the equipment and cause malfunction or
damage.
NOTE: DO NOT allow oil level to fall below and “L” mark on
dipstick. Doing so may result in equipment malfunction or
damage.
13. Wipe away any spilled oil.
14. Check the oil level by installing the Oil Fill Cap/Dipstick.
• For threaded Oil Fill Cap/Dipstick models, rest
the cap on the threads, do not tighten down the
cap to check the oil level.
• For quarter-turn Oil Fill Cap/Dipstick models,
tighten down the cap to check the oil level.
NOTE: See the Set-Up section earlier in this manual for
detailed instructions on identifying and checking the oil on
each of these specific engine models.
14 Section 6— Maintenance