
Use and Care Manual


10 Section 3— ASSembly & Set-Up
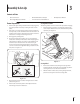
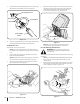
3. Place the flat washer and belleville washer over the steering
wheel and secure with the hex screw. See Figure 3-3.
Steering Wheel Cover
Hex Screw
Steering Wheel
Steering Wheel
Column
Belleville Washer
Figure 3-3
4. Place the steering wheel cover over the center of the steering
wheel and push downward until it “clicks” into place.
Install Operator’s Seat
To install the seat proceed as follows:
NOTE: The seat is shipped with the seat switch and seat
pan attached. A second person may be needed to hold the
seat.
1. Cut any straps securing the seat assembly to the tractor.
Remove any packing material.
NOTE: Be careful not to cut the wiring harness connecting
the seat and the seat switch in the bottom of the seat.
2. Remove the two shoulder screws and flange lock nuts in
the seat pan as shown in Figure 3-4.
Shoulder Screws
Flange Lock Nuts
Figure 3-4
3. Rotate the seat into position and secure the seat into place
with the previously removed shoulder screws and flange
lock nuts. Be careful not to crimp or damage the wire
harness while installing the seat. See Figure 3-5.
Shoulder Screws
Flange Lock Nuts
Figure 3-5
NOTE: Be sure to push the excess wire from the wire
harness into the seat box hole before continuing.
Lower Deck Discharge Chute Deflector
WARNING! Never operate the mower deck
without the chute deflector installed and in the
down position.
The discharge chute deflector must be installed before operating
the mower.
NOTE: For models with the chute installed skip ahead to step 4.
1. Remove the keys that are attached with a zip tie to the
chute bracket.
2. Remove the flange lock nuts from the deck. Do not remove
the push nuts or carriage bolts, leaving them in place will
aid in installing the chute. See Figure 3-6.
Figure 3-6