Electric Pressure Rice cooker / warmer CRP-J06/08 Fuzzy Series
Read all instructions before use. Save these instructions for future reference. Important safeguards ......................................................... 3 Specifications ...................................................................... 4 Caution for safety ................................................................ 5 Caution for use .................................................................... 8 Name of each part ..............................................................
1. Read all instructions before using this appliance. 2. Do not touch hot surfaces. Use handles or knobs. 3. To protect against fire, electric shock and / or injury to persons do not immerse cord, plugs, or Pressure Cooker Body in water or any other liquid. 4. Close supervision is necessary when this appliance is used by or near children. This appliance is not intended for use by young children or infirm persons without supervision.
Note: A. A short power-supply cord (or cord set) is to be provided to reduce the hazards resulting from becoming entangled in or tripping over a longer cord. B. Longer cord set or extension cords are available and may be used if care is exercised in their use. C. If a long cord set or extension cord is used. (1) the marked electrical rating of the cord set or extension cord should be at least as great as the electrical rating of the appliance.
The following must be observed to use the product safely and correctly to prevent accident and dangerous situations. Warning and Caution are different as follows. This means that the action it describes may result in death or severe injury. This means that the action it describes may result in injury or property damage. Do not use the cooker near hot things such as stove, gas stove or direct ray of light. It can cause an electric shock, fire, transformation or discoloration.
Do not bend, tie or pull the power cord by force. It can cause an electric shock or short circuit resulting in fire. Remove an alien substance on plug with the clean cloth. It can cause fire. Do not put any needle, cleaning pin etc in the ventilator or any gap of the cooker. Do not insert cleaning pin to other parts except to the valve hole of the pressure weight. It can cause an electric shock or fire. Especially be careful to keep it out of reach of children. Do not use on a rice chest or a shelf.
Do not touch the metallic surface of the inner pot, and pressure weight after cooking or warming. Don t use to be used for various purpose for inner pot. It can cause burns. Remaining hot steam can cause burns when you tilt the pressure weight while and right after the cooking. It can cause the transformation of the inner pot It can cause to spill the inner coating. Please clean the body and other parts after cooking. It can cause the transformation or smell.
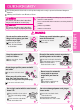
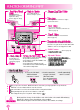
Do not try to close the top cover by force. It can cause problems. When opening/closing the top cover. When cooking/warming the rice. 1. Locate the handles of the inner pot on the slot of the main unit. (Refer to the following figure.) 2. Open and close the top cover with the Lock/Unlock handle located on Unlock . Cook and warm the rice with the Lock/Unlock handle located on “Lock”.
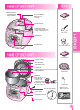
Automatic Steam Exhaust Outlet (Solenoid valve) Pressure Weight Always keep it horizontal. Manual Soft Steam Cap Lock/Unlock Handle (Set the handle to lock when cooking or warming the rice) Rice Scoop Clamp Knob Control Panel Rice Measuring Cup Cooking guide Top Cover Assy Oven Packing Top Heater Plate Pot Handle Set the pot handle on the slot of the main unit. Inner Pot(Oven) Steam Plate Dew Dish Empty the water out of a dew dish after cooking or keepwarming.
Use for Warming or reheating the cooked rice right before eating. (Refer to page 21, 22, 23) Use it for cooking the rice. The red light will be on when it's ready to operate. The red light will be on when it s ready to operate turbo fuction. Use it for selecting, the glutinous rice, normal rice, mixed rice etc. (Refer to page 14) Use it for canceling the selected function (Refer to page 27) After press the "Cancel" button for 2 seconds, the automatic voice guide function would be ON or OFF.
Measure the amount of rice you want to cook using the measuring cup and wash it thoroughly. 1 cup applies to 1 person. Correct method for using the measuring cup. Wash the rice until the water becomes clear. This makes the rice taste better. (Wash at the other pot.) After you wash the rice thoroughly, put it in the inner pot, and adjust the water level according to the marked line. Place the inner pot on a leveled surface and adjust the amount of water.
Wipe the water on the inner pot with a dry cloth and put it in the main unit. Then connect the power plug. Top cover will not close if the inner pot is not placed correctly in the main body (Place the inner pot to the corresponding parts of the main body) If there is any alien substance on the temperature sensor or the bottom surface Temperature of the inner pot(oven), wipe it off before putting the pot into the main unit. Sensor Wipe the top cover heating part well before cooking the rice.
Glutinous Rice Cooking Method Check the pressure weight is horizontal before cooking Every time you press the “Menu” button, the following menu will continuously repeat. GLUTINOUS SUSHI PORRIDGE Check the Lock/Unlock handle is set to Lock and press the “Pressure Cook/Turbo” button. It will start to cook with the “ ” mark going around clockwise. When it comes near the finishing time, the remaining time will be displayed in minutes.
Glutinous : When you want to have sticky and nutritive white rice. Turbo function for Glutinous rice Sushi: When you want to have a little more sticky and nutritive Press twice “Pressure Cook/Turbo” white rice than Glutinous rice. button after choosing the “Glutinous” Mixed/Brown : For cooking together with brown rice and some other kinds and it will switch to quick cooking and shorten the cooking time.(It takes about of grain. 17 minutes when you cook the GABA: For cooking germinated brown rice.
Cuckoo’s patented technology based on variable circuit design. User can select the degree of “softness”and “glutinosity & tastiness” to meet a user’s specific taste. Longer “SOAK” Time: rice becomes soft and glutinous. (selectable in 4 steps) Longer “HEAT” Time: rice becomes tasty (selectable in 4 steps) melanizing will occur Above 2 functions can be selected both or individually.
* 1 . The rice becomes solid and glutinous. * 2. The rice becomes soft and well-raised rice. * 3. The rice becomes soft and glutinous. While cooking, you can control the heating temperature (both the high and low temperature) depending on what you like. First mark is set step and control the steps in case. step : When you cook mixed rice and old rice or you want to have a little sticky rice. step : When you cook new rice or you don t want to have a sticky rice.
Brown rice has richer nutrients than polished rice. However, brown rice is rather tough and harder to be digested. By a least germination, the enzymes in the brown rice are activated, generating nutrients and more digestible. Check the dates of harvest and pounding. The dates should be within 1year from a harvest, 3 months from pounding. Inspect rice with your eyes. Check that embryo is alive Rice surface should be light yellow and glazing.
Method of Pre-germination Put washed brown rice in an appropriate container, pour sufficient water to soak the rice. Pre-germination shall not exceed 16 hours. Make sure to wash rice clean with flowing water before using “GABA” menu. Be careful that too hard washing may take off embryos which generate the germination. Unique smell may be generated according to the soaking time of pre-germination. When pro-germination has been completed, wash the rice and put in inner pot (Oven).
1 Turn the top handle to LOCK, press menu to select the Multi-cook. When selecting Multi-cook, the display indicates cooking time to be 20 minutes. (While using Multi-cook, the voice guide activates and says Set the cooking time with Hr/Min button. ) 2 Press “Hrs/Soak”, “Min/Heat” button to set up the time. (Please refer to the cooking guide for cooking time.) 1. Each time you press “Hrs/Soak” button, the time increases 5 minutes. 2. Each time you press “Min/Heat” button, the time decreases 5 minutes. 3.
Put it in the inner pot with the measured water after wash the rice and turn the Lock/Unlock handle to Lock . Presetting time is the time when the rice cooking is completed. (According to the amount of rice the finishing time may vary) Refer to page 10 for the time setting method If the current time is not set correctly, the presetting time also be incorrect.(Make sure not to change A.M. and P.M.) If the menu is incorrect, press the “Menu” button and select the desired menu.
How to keep warm Using Keep Warm function for more than 12hours may cause discoloration or an objectionable odor in the rice. During keep warm and reheat mode, set the cover lid handle at “Lock” (Could impact on a keep warm function or a breakdown of the clamp knob) After 24hours of warming, indicates the flashing of the time elapsed of warming. 1 2 3 4 5 6 7 8 After the cooking process is finished it is automatically switched to warming function.
Reheating Function (It reheats cooked rice like it has just been cooked.) The reheating function only works while warming the rice. While warming...... The “ ” mark rotating clockwise. The reheating course will be completed in 9 minutes with the “beep” sound. Keep the surface flat keeps the temperature of the rice constant and also reduces the dryness. During “keep warm” mode the current time is shown by pressing “Min/Heat” button and the warm processing time is shown by pressing “Hrs/Soak” button.
How to apply the warm temperature to my mode. When opening the lid, if a lot of water spills or If the rice is too soft, this is when you use this. -1 Press “Hr/SOAK” button to change the display as Select the menu you want, then the press the “My Mode” button and set-up time will be automatically entered with a buzzer sound. (If you do not press a button within 7 seconds, the function will go back to the previous function.) Press “warm/reheat” button in my mode.
How to clean Please do not touch soft steam cap right after the dish is done. It may cause scald. Detach the soft steam cap from the body like the picture. Press the hook in the back and follow the arrow to detach and clean. Make sure you clean frequently with a sponge or neutral detergent. Detach the packing towards the direction of the arrow, and then clean it. Please assemble the packing to the exact groove towards the direction of the arrow and insert the packing properly.
When cleaning the cooker always pull the power plug with dry hands and clean it after the cooker is fully cooled off. Clean the main body When cleaning the top cover of the main body, do not use benzen, thinner, detergent etc, It can cause discoloration or transformation. Wipe it with a clean cloth. Do not wash the main body. Benzene Clean the inner pot and inside the top cover When cleaning the inner pot, do not use tough scrubber, metallic scrubber, brush, abrasive material etc.
If there is a problem with your cooker, check the following details before requesting service to your dealer. Sometimes the cooker may not operate as desired if used incorrectly. Case When the rice is not cooked. Check points Do the following “Pressure Cook/Turbo” button is pressed? Press the “Pressure Cook/Turbo” button once. sign on the display. And check Is there power cut while in cooking? Re-press the “Pressure Cook/Turbo” button.
Case Check points Do the following When the time cannot be preset. Is the current time correct? Is it right AM or PM? Did you set the reservation time over 13 hours? Set the current time. (Refer to page 10) Check the AM, PM. Maximum reservation time is 13 hours. (Refer to page 20) When you smell after and before cooking? Did you clean it after cooking? Please clean it after cooking. When the top cover cannot be closed.
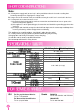
(J08 Series) (J06 Series) (J08 Series) (J06 Series)
pressure
GLUTINOUS SUSHI PORRIDGE MULTI COOK GABA NU RUNG GI MIXED/BROWN OLD RICE
Glutinous Sushi Mixed/Brown GABA Porridge Old Rice Glutinous Nu Rung Gi Multi cook Menu Glutinous Turbo Glutinous rice Sushi GABA Mixed/Brown Old Rice Nu Rung Gi Multi Cook Porridge
1 2 3 4
Glutinous Normal GABA Mixed/Brown Old Rice Nu Rung Gi Multi Cook Porridge
1 2 3 5 4 6 7 8
.
CUCKOO ELECTRIC RICE COOKER/WARMER LIMITED WARRANTY KEY Company, R&H Enterprise INC and Cuckoo Trading Canada. will repair at its option replace, without charge, your product which proves to be defective in material or workmanship under normal use, during the warranty period listed below from the data of original purchase. This warranty is good only to the original purchaser of the product during the warranty period.