
User Manual Cuddeback, Simple, Camera

Cuddeback Simple User Interface Quick Set-Up
A quick guide to seng up your Cuddeback camera that operates on our
Simple User Interface.
920-347-3810
www.cuddeback.com
cuddeback.support@cuddeback.com
Supplies Needed to Begin Set-Up
1. Required amount of baeries
2. Full-size SD card 2-32GB. We recommend the SanDisk brand
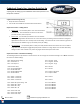
Simple User Interface - Geng Started
1. Set the Time - Turn the Rotary Dial to Time. Press the A buon
to set the hour. Press the B buon to set the minutes. Once
you have set both, move to step two.
2. Set the Date - Turn the Rotary Dial to Date. Press the A buon
to change the digit before the back slash. This is the month of the year seng. Press the B buon to change the
digits aer the back slash. This is the day of the month seng. Turn the Dial to Year. Press A buon to go down nu-
merically and Press B buon to go up numerically in the year seng.
3. Arm the Camera - Turn the Rotary Dial to a delay. The Delay dictates how fast the camera will re-arm to take an
image aer it has already been triggered by heat/moon and taken an image. Simple user interface oers delay
sengs on either side. Le side is for picture only, Right side would be picture then video.
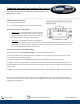
Simple User Interface - Recommended Sengs
The following explains the parameters on the camera the user can change. We recommend leaving it set to P0:0 as this leaves
the camera on default sengs.
P0:0—Default camera seng
P0:1—Parameters on
P0:2—Time Lapse on
*Flash Cameras Only*
P1:0— Strobe PWR Indoors
P1:1– Strobe PWR Close
P1:2—Strobe PWR Medium
P1:3—Strobe PWR Far
P2:1—Video = 10 seconds
P2:2—Video = 20 seconds
P2:3—Video = 30 seconds
P3:0—Video TOD (Time of Day) - O
P3:1—Video TOD - Night
P3:2—Video TOD - Day
P3:3—Video TOD - All
P4:0—Picture TOD - O
P4:1—Picture TOD - Night
P4:2—Picture TOD - Day
P5:0—Img Size - Small
P5:1—Img Size - Default
P5:2—Img Size - Large
P6:0—FAP o
P6:1—FAP On
P7:0—Exposure Centered
P7:1—Exposure Wide
P8:0—Cam ID
P9:0—Cam ID
PA:1—Burst Mode 1
PA:2—Burst Mode 2
PA:3—Burst Mode 3
PA:4—Burst Mode 4
PA:5—Burst Mode 5