FREE Extended Warranty with online registration! Extend the warranty on your Attack series camera to 18 months by registering your purchase at www.cuddeback.com. Click “Support” then “Product Registration”. Activation required within 2 weeks of registration.
About batteries A. Cuddeback recommends Rayovac, Duracell, and Energizer alkaline batteries only. Lesser batteries may not perform as required, especially in cold temperatures. I. Change all batteries at the same time. Never mix old and new batteries. II. Do not mix standard, alkaline, or rechargeable batteries. III. Remove all batteries when the camera will not be used for an extended period of time. Please get the latest camera firmware Before using this camera we recommend you visit www.cuddeback.
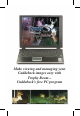
Make viewing and managing your Cuddeback images easy with Trophy Room – Cuddeback’s free PC program
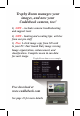
Trophy Room manages your images, and now your Cuddeback camera, too! 1) NEW – includes camera troubleshooting and support tools 2) NEW - hunting and scouting tips; articles from our pro staff 3) Plus: 1-click image copy from SD card to your PC. Fast Guard Duty image viewing. Image organization, enhancement, and classification. Complete moon & sun data for each image. Trophy Room data screen example Free download at www.cuddeback.
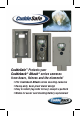
CuddeSafe™ Protects your Cuddeback ® Attack ® series cameras from bears, thieves and the elements! t 'JUT $VEEFCBDL Attack series scouting cameras t )FBWZ EVUZ CFBS QSPPG NFUBM EFTJHO t &BTZ UP JOTUBMM MBH CPMUT UP USFF BDDFQUT B QBEMPDL t .
STOP Need Help? Don’t contact your dealer. Use one of these support options: s $OWNLOAD 4ROPHY 2OOM AND USE ITS SUPPORT TOOLS s 6ISIT WWW CUDDEBACK COM FOR SUPPORT help and troubleshooting options s %MAIL US AT SUPPORT CUDDEBACK COM s #ALL US AT The store you purchased this product from does not carry parts nor are they able to service your camera. Call us at the phone number above and our customer service staff will be happy to help you.
Care and treatment A. Don’t abuse your camera 4REAT IT LIKE THE sophisticated piece of electronics that it is. ) 4REAT IT GENTLY n DO NOT ABUSE OR DROP II. Keep SD card dry and never insert wet SD cards into the camera III.
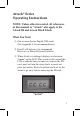
Attack® Series Operating Instructions NOTE: Unless otherwise noted, all references in this manual to “Attack” also apply to the Attack IR and Attack Black Flash.
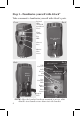
Step 1 – Familiarize yourself with Attack® 4AKE A MOMENT TO FAMILIARIZE YOURSELF WITH !TTACK S PARTS Infrared LEDs (Attack IR, Attack Black Flash) Front Back Flash (Attack) Test LED User Interface Door Camera Lens MotionHeat Sensor Battery Door Back SD Card Socket Back USB Connector LCD Screen Mount Bracket A/B Buttons Manufacturing Test Point User Interface LED Rotary Knob Video Switch Strap & Slots NOTE: After the bracket has been mounted to a tree, slide Attack’s two thumb screws down into
Step 2 – Installing Batteries and SD Card 4URN THE ROTARY KNOB TO THE OFF position. ,OOSEN THE BATTERY THUMB SCREW AND OPEN THE battery compartment door. Install four brand new alkaline D cell batteries. Make sure to observe correct polarity. Close the door and tighten the thumb screw completely. ! SERIES OF NUMBERS ARE DISPLAYED 4HESE ARE !TTACK S hardware and software version numbers.
Step 3 – Setting up the Attack® 4URN THE ROTARY KNOB TO Time position, PRESS ! AND " TO SET 4IME IS !- 0- FORMAT 4URN THE ROTARY KNOB TO Date position, press A and B to set. 4URN THE ROTARY KNOB TO Year position, press A and B to set. ,ATER YOU WILL READ Step 8 – More Features FOR INFORMATION ON THE 53" AND -%.
!TTACK FEATURES OUR 'ENIUS -OUNTING 3YSTEM 4HIS SYSTEM allows you to attach the bracket to a tree and then slide Attack on and off the bracket as needed. /NCE THE TREE BRACKET IS ATTACHED to the tree, make sure both thumb screws on the back of Attack are TIGHTENED COMPLETELY 4HEN SLIDE Attack onto the bracket.
Step 5 – Checking Attack®’s Detection Zone 4URN THE ROTARY KNOB TO THE Test position. Close the cover and tighten the thumb screw. Put Attack BACK ONTO THE TREE BRACKET .OTE THERE IS A MORE convenient method to enable test mode, see Step 7 - Checking your Attack for details). 7ALK BACK AND FORTH IN FRONT OF !TTACK 4HE RED ,%$ WILL ILLUMINATE WHEN !TTACK S SENSOR HAS detected you. Using this method you can accurately position your Attack as desired.
After the image is saved to the SD card the LCD will DISPLAY THE DELAY SETTING AND BEGIN COUNTING DOWN /NCE THE COUNTER REACHES !TTACK IS READY TO RECORD THE NEXT image. Step 7 – Checking Attack® When you check Attack it is not necessary to turn the rotary knob. Instead, press the A or B button to temporarily suspend Armed mode and view pertinent information, such as the number of images on the SD card and battery LEVEL %ACH TIME YOU PRESS THE ! OR " BUTTON NEW INFORMATION will be displayed.
9OU CAN LEAVE !TTACK IN ANY OF THE STATES THRU AND !TTACK WILL AUTOMATICALLY RE ARM IN ABOUT MINUTES 4HIS ALLOWS YOU TO CLOSE THE COVER AND LEAVE THE AREA without triggering an image. Step 8 – More Features Video Mode Attack can be set to record video. Attack records video DAY ONLY !TTACK )2 AND !TTACK "LACK &LASH RECORD VIDEO DAY AND NIGHT 6IDEO RECORDING IS ENABLED BY MOVING THE 6IDEO 3WITCH TO /.
!TTACK FLSH n 4HIS MENU ALLOWS YOU TO TEST !TTACK S mASH 0RESS " TO CHARGE THE mASH CIRCUIT 4HE ,#$ WILL BEGIN COUNTING DOWN FROM !FTER THE SECOND COUNT DOWN THE ,%$ WILL mASH GREEN TO INDICATE THAT THE mASH IS CHARGED 0RESS " AGAIN TO lRE THE mASH (CAUTION – light output from the flash is very bright!). !TTACK )2 !TTACK "LACK &LASH LEd )2 ,%$S n 4HIS MENU ALLOWS YOU TO TEST !TTACK )2 S )2 ,%$S and measure the battery strength.
Please see www.cuddeback.com for details. We recommend you check our website for updates at the beginning of your scouting season. &IRMWARE 6ERSION n NUMBERS WILL BE DISPLAYED SUCH AS 4HIS IS THE lRMWARE VERSION 4URN THE ROTARY KNOB TO A NEW SETTING OR PRESS ! TO return to the battery level display. Setting Attack Parameters Some Attack features can be changed by the user. Attack can also be programmed to become a time lapse camera.
Step 1: Press the A key to display P1 (strobe flash power) 0 CONTROLS THE !TTACK mASH POWER (This setting is ignored on the Attack IR/Black Flash and will be displayed as P1:--) 4HE AVAILABLE SETTINGS ARE SELECTED BY PRESSING THE " KEY P1:1 = FOOT mASH RANGE BEST SETTING FOR INDOOR USE P1:2 FOOT mASH RANGE P1:3 = FOOT mASH RANGE BEST SETTING FOR GENERAL USE P1:4 FOOT mASH RANGE BEST SETTING FOR lELDS Step 2: Press the A key to display P2 (video length) 0 CONTROLS THE !TTACK VIDEO LEN
Step 5: Press the A key to display P5 (quality) P5 controls the Attack image and video quality. 4HE AVAILABLE SETTINGS ARE SELECTED BY PRESSING THE " KEY P5:1 = standard resolution 5MP SMALL lLE IMAGES VIDEO P5:2 = high quality 5MP LARGE lLE IMAGES VIDEO .OTE n IMAGE QUALITY IS IMPROVED BY OPTIMIZING THE *0' AND 6)$%/ COMPRESSION ALGORITHM )MAGES WILL BE CLEARER WHEN ZOOMING BUT lLE SIZE IS SIGNIlCANTLY increased.
Time Lapse Mode (PO:=tL) 4IME ,APSE -ODE IS ENABLED WHEN 0ARAMETER IS SET TO T, )N 4IME ,APSE -ODE PICTURES ARE TAKEN AT A PRESET INTERVAL &OR EXAMPLE IF YOU SET THE TIME LAPSE INTERVAL TO HOURS THE CAMERA WILL TAKE A PICTURE EVERY HOURS By default the time lapse images are taken day and night. 9OU CAN USE 0 TO CONTROL DAY NIGHT OPERATION /NCE 0 IS SET TO T, YOU USE THE 2OTARY +NOB TO SELECT THE DESIRED TIME LAPSE INTERVAL 4IME LAPSE IS STARTED BY ROTATING the knob to one of the ARMed settings.
USB Position !TTACK CAN COPY IMAGES FROM THE 3$ CARD TO A 53" mASH DRIVE 4HIS ALLOWS YOU TO QUICKLY RETRIEVE YOUR IMAGES and take them home with you. NOTE: If the LCD displays EC:30 the USB device is either not plugged in correctly or is not compatible with Attack. We recommend using the USB drive available at www.cuddeback.com. Follow these steps to copy images from SD card to USB device: 4URN THE ROTARY KNOB TO THE 53" POSITION USB will be displayed on the LCD.
Follow these steps to erase all content on the USB device: 4URN THE ROTARY KNOB TO THE 53" POSITION USB will be displayed on the LCD. )NSTALL A COMPATIBLE 53" mASH DRIVE SEE APPENDIX ! 0RESS ! TWICE TO DISPLAY CLr. 0RESS AND HOLD " TO CLEAR THE 53" DEVICE CAUTION /NCE THE DEVICE IS CLEARED IT cannot be restored.
s 'UARD $UTY IMAGES ARE -0 AND ARE SAVED IN the folder $#)-< #5$$9 )MAGES FROM EACH day will be saved in a separate folder. s 'UARD $UTY WILL RECORD IMAGES EVERY HOURS )N A WEEK 'UARD $UTY CAN RECORD OVER IMAGES 4HIS REQUIRES A LARGE 3$ CARD 7E RECOMMEND AN '" CARD OR LARGER s 4O CHECK !TTACK WHEN IN 'UARD $UTY MODE PRESS ! 4HE CHECK PROCESS IS SIMILAR TO CHECKING !TTACK when in Armed mode.
Transfer to SD card: If you use Attack without an SD card, follow these steps to transfer the images from the internal memory to an SD card. )F !TTACK IS NOT ARMED TURN THE ROTARY KNOB TO ANY OF the Armed positions. )F !TTACK IS ARMED PRESS ! TO DISPLAY THE NUMBER OF images in internal memory. )NSERT YOUR 3$ CARD INTO !TTACK 0RESS ! 4HE AMOUNT OF FREE SPACE ON THE 3$ CARD will be displayed. 0RESS ! TO INITIATE THE TRANSFER )MAGES SAVED IN internal memory will be copied to the SD card.
Press B to initiate the transfer. Images saved in internal memory will be copied to the USB device. As they are being copied the worm will appear and the number of images remaining will be displayed on the LCD. 7HEN THE COUNT REACHES THE TRANSFER IS COMPLETE and all images on the internal memory are erased. 4O STOP THE TRANSFER BEFORE IT HAS lNISHED PRESS AND hold B.
7HEN !TTACK DOES NOT APPEAR TO OPERATE CORRECTLY In some cases the batteries may be too low to turn ON THE ,#$ OR ",/7 ICON Attack will attempt to use every amount of power from the batteries. Attack will alter its performance to prevent erroneous operation when battery voltage is very low.
Viewing Images You will need an external viewing device or computer to VIEW IMAGES &IRST REMOVE THE 3$ CARD FROM THE CAMERA Make sure to only remove the SD card when the worm is not visible. Here is a list of some viewing options. 9OU CAN VIEW THE IMAGES WITH AN OPTIONAL VIEWER OR A POINT AND SHOOT CAMERA THAT IS ABLE TO READ Attack images (Note: not all SD based cameras can view Attack images, please test any camera before purchasing).
!UTOMATICALLY COPIES IMAGES FROM YOUR 3$ CARD TO YOUR 0# AND ORGANIZES THEM BY YEAR AND DATE !LLOWS YOU TO RENAME EACH FOLDER MAKING IT EASY to find your images. Displays sun and moon data for each image, including moon phase, moon rise and set, sunrise and set, and moon and sun position in the sky at the time the image was taken.
Includes Crystal Ball with which you can use the data YOU VE COLLECTED AND ANALYZED WITH #UDDE#HARTS TO PREDICT FUTURE ACTIVITY 4HINK OF THIS AS THE TRADITIONAL moon tables, only tailored to you. !LLOWS YOU TO RAPIDLY VIEW #UDDEBACK IMAGES TAKEN IN 'UARD $UTY MODE )S FREE and works with all Cuddeback cameras. You can download it at www.cuddeback.com. Appendix A SD Card Requirements 3$ CARDS ARE SIZED IN '" 'IGABYTES THE BIGGER THE number the more images that can be saved on the card.
8000 16000 2000 4000 1000 2000 0 1000 0 500 0 250 0 Videos* 3200 16000 1600 8000 800 4000 400 2000 Images 3200 0 1600 0 800 0 400 0 Videos** Attack IR & Attack Black Flash For this chart we assume each JPG is 1MB and each video is 4MB. Your actual JPG and video file sizes will be different. **With the Attack IR every image will also record a video. *Assumes that 75% of images are at night when the videos are not recorded.
For use with Attack ® series scouting cameras Put your Cuddeback virtually anywhere! No tree needed! Set-up is simple as I, 2, 3... 1 Insert Post Mount into firm ground.
For use with Aim your camera in virtually any direction – up, down or all around! Attack ® series scouting cameras Pan & tilt Insert 2 thumb screws into bracket Lockable – cable lock to tree
For use with Attack ® series scouting cameras Put a Genius Tilt Mount bracket in all your favorite hunting spots! Slide PO PGG Tilt adjust -PDLBCMF
Genius Combo Kit – includes 2 mounts! - Pan & Tilt Mount Tilt Mount Lock Clip Universal Plate (works with all cameras) Mounting Screws Genius Pan & Tilt Mount Genius Tilt Mount
www.cuddeback.com Non Typical, Inc., P.O.