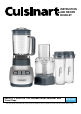
INSTRUCTION AND RECIPE BOOKLET VELOCITY Ultra Trio 1 HP Blender/Food Processor with Travel Cups BFP-650 For your safety and continued enjoyment of this product, always read the instruction book carefully before using.
IMPORTANT SAFEGUARDS over the counter or tabletop, where it can be pulled on by children or tripped over. Excess cord should be stored in the cord storage area at the back of the blender base to avoid injury caused by the longer cord. 18. Wash the blender jar, blade assembly, cover, work bowl, chopping/mixing blade, reversible slicing/shredding disc, feed tube, travel cups and travel lids before first use.
SAVE THESE INSTRUCTIONS TABLE OF CONTENTS FOR HOUSEHOLD USE ONLY Important Safeguards . . . . . . . . . . . . . . . . . . . . . . . 2 Unpacking Instructions . . . . . . . . . . . . . . . . . . . . . . 3 NOTICE: Features and Benefits . . . . . . . . . . . . . . . . . . . . . . . 4 This appliance has a polarized plug (one prong is wider than the other). To reduce the risk of electric shock, this plug will fit into a polarized outlet only one way.
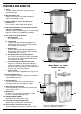
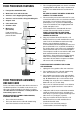
FEATURES AND BENEFITS 1. Cover Just press down into place. Tight-fitting seal prevents leakage. 2. 1. 2. Measured Pour Lid Allows you to measure and add ingredients without removing the cover. 3. 56-oz. BPA-Free Tritan® Co-Polyester Blender Jar Has a unique, sturdy, wide-mouth design. 3. 4. High-Quality Blade Assembly with Patented Stainless Steel Blades Strong enough for all blending tasks, including tough jobs like crushing ice and blending smoothies. 4. 5.
OPERATION BLENDER JAR ASSEMBLY 1. Place the motor base of your Cuisinart® VELOCITY Ultra Trio 1 HP Blender on a flat, sturdy surface. It is important that the surface be clean and dry. Assemble the blender jar by following the Assembly instructions. Once the jar is assembled and is in position on the motor base, plug the unit into an electrical outlet. To use your Cuisinart® VELOCITY Ultra Trio 1 HP Blender, begin by assembling the blender jar. 1.
CLEANING AND MAINTENANCE OF CUISINART® VELOCITY Ultra Trio 1 HP BLENDER chopping. The Pulse mode is also effective in starting the blending process when you do not want continuous power or when processing items that do not require an extended amount of blending. WARNING: FLASHING RED LIGHT INDICATES READY TO OPERATE. DO NOT TOUCH BLADES. Always unplug your Cuisinart® VELOCITY Ultra Trio 1 HP Blender from the electrical outlet before cleaning.
Don’t: by its plastic center and move rapidly up and down on the center shaft of the bowl. Use of a spray hose is also effective. If necessary, use a brush. • Don’t store food or liquids in the blender jar. • Don’t place blade assembly on motor base without the blender jar attached. The work bowl should not be placed in a microwave oven. • Don’t attempt to mash potatoes, knead heavy dough or beat egg whites. DOs and DON’Ts WHEN USING YOUR BLENDER • Don’t remove blender jar while unit is on.
FOOD PROCESSOR FEATURES 3. Place chopping/mixing blade over shaft in work bowl. Chopping blade should slide easily to the bottom of the bowl. Lower blade will almost touch bottom of bowl. 1. Food pusher with drizzle hole 2. Work bowl cover with feed tube BE SURE TO HANDLE THE METAL BLADE WITH CARE AS IT IS RAZOR SHARP! 3. Stainless steel chopping/mixing blade 1. 4. Place food to be processed in work bowl. Put cover on work bowl and turn the cover clockwise until it fits into position.
FOOD PROCESSOR OPERATION 5. To purée, follow same procedure for chopping, but let machine run until food is a smooth purée. High speed will work best for most items when slicing or shredding. The High speed is perfect for most of your food processing tasks. You may also use the Pulse button with this function for pulse-chopping. 6. New users are often surprised at how fast the processor works. You will quickly get used to its great speed. 7.
TIPS WHEN USING THE FOOD PROCESSOR TO SLICE AND SHRED 1. Assemble clear work bowl on collar and base in the usual way. (See page 8.) 2. Use moderate pressure to push down on food with pusher button, with one hand, while using your other hand to push the Low or High button. Slicing and shredding only take a few seconds. 3. Wait until disc stops spinning before removing cover. When it stops, remove cover before removing work bowl.
QUICK REFERENCE GUIDE To activate Press On/Off – It is in Standby mode. To begin blending/processing Press desired speed or pre-programmed button. To change speeds Press desired speed button. To pulse Press On/Off, then Pulse, then press and release desired speed button as needed. To crush ice Press On/Off, then press Ice Crush button and program will begin. Ice Crush program runs for 1 cycle. To stop blending/processing (and deactivate unit) Press On/Off button.
PROCESSING WITH THE FOOD PROCESSOR) CHOPPING BLADE The Food How to Prepare Fruit and vegetables eel and core if necessary. Remove large, hard pits and seeds. Cut into ¾-inch pieces P and process up to 1 cup at a time. Meat, poultry and fish hese should be very cold, but not frozen. First, cut into ¾-inch pieces. Put up to ½ T pound in work bowl. Pulse until desired consistency is reached. Check texture every 2 or 3 seconds to avoid overprocessing.
PROCESSING WITH THE SLICING/SHREDDING DISC Food To Prepare for Slicing To Prepare for Shredding Long narrow foods like carrots, celery, cucumbers, and zucchini Cut into even lengths about 1 inch shorter than height of feed tube. Stand pieces upright in feed tube, flat side down, adding enough pieces so they cannot tilt. For long shreds, cut into largest size that will fit sideways in feed tube. Stack in feed tube to about 1 inch from top.
LIMITED THREE-YEAR WARRANTY result in the appropriate relief to the consumer, the consumer may then take the product to an independent repair facility if service or repair can be economically accomplished. This warranty is available to U.S. consumers only. This warranty supersedes all previous warranties on the Cuisinart® VELOCITY Ultra Trio 1 HP Blender/Food Processor with Travel Cups.
RECIPES Power Protein Smoothie This on-the-go drink, packed with energy-dense ingredients, will keep you full, longer. Smoothies to Go Power Protein Smoothie................................................... 15 Makes about 2 cups* Very Berry Smoothie......................................................... 15 ¾ 1 1 ¼ ¾ Smoothies for a Crowd Sweet Green Smoothie..................................................... 16 Super Antioxidant Smoothie.............................................
Sweet Green Smoothie Vitamin C Smoothie This sweet—yes, sweet!—green drink will give you the extra energy boost you need early in the morning or late in the afternoon. Enjoy this smoothie when you need the ultimate cold-fighting punch. Plus, the tropical flavors will instantly whisk you away to warmer climates.
Mocha Shake Remove the Food Processor Attachment and reserve. This chocolatey coffee treat will quickly satisfy your sweet tooth. 3. Put the flour, wheat germ, sugar, baking powder, salt and cinnamon into a large mixing bowl, whisk to combine. Put the milk, egg, egg white, oil and vanilla to the blender jar. Cover and run on Low for 20 seconds to fully combine. Add half of the dry ingredients. Pulse on Low to combine; turn blender off, scrape down sides of the jar.
3. Continue cooking and replace the chopping blade with the slicing disc. Slice the carrots and then stir directly into the saucepan, adding the salt, cinnamon, allspice, nutmeg and thyme. Stir ingredients together well and then add the chicken broth. Increase heat and bring to a boil. Once soup comes to a boil, reduce the heat so that it is barely simmering. Cover and simmer until the carrots become tender, about 50 to 60 minutes. about 15 to 20 seconds, or until smooth.
3. Chill well before serving. 3. Add the kale, parsley, salt and pepper and stir to coat. Add the vegetable broth and bring to a boil. Cover and reduce heat so that the soup is just simmering. Simmer for about 30 minutes. Add the cream and continue simmering, uncovered, for an additional 20 to 30 minutes. Nutritional information per serving (1 cup): Calories 47 (6% from fat) • carb. 9g • pro. 2g • fat 0g • sat. fat 0g • chol. 0mg • sod. 399mg • calc. 23mg • fiber 2g 4.
Hummus 1. Put all ingredients in blender jar, in the order listed above. 2. Blend on Low until smooth, about 1½ minutes. Serve this brightly flavored dip with warm pita for a satisfying snack. Nutritional information per serving (2 tablespoons): Calories 110 (73% from fat) • carb. 3g • pro. 3g• fat 9g sat. fat 3g • chol. 9mg • sod. 325mg • calc. 72mg • fiber.
Peach Salsa Pesto Peach salsa is excellent served over grilled fish, chicken or even pork tenderloin. It can also be served like traditional tomato salsa with tortilla chips. We love it paired with our Crab Cakes on page 22. If you have other herbs or nuts, use them in place of the basil and pine nuts.
Crab Cakes important to mix carefully to keep the crabmeat intact. A gentle mixing hand is key to these delicate and delicious crab cakes. Pair with our Peach Salsa found on page 21. 7. From the mixture, form ¼-cup oval cakes with your hands and place them on a clean plate, separating the layers of patties with wax paper. Cover with plastic wrap and refrigerate for 1 hour before sautéing. Makes about 20 crab cakes 16 1 1 3 1 1 ¼ 1 1½ ½ 1 1 1½ 1 8.
NOTES: 23
NOTES: 24
INSTRUCCIONES Y LIBRO DE RECETAS Licuadora/Procesadora de 1 HP con vasos de viaje Velocity Ultra Trio BFP-650 Para su seguridad y para disfrutar plenamente de este producto, siempre lea las instrucciones cuidadosamente antes de usarlo.
MEDIDAS DE SEGURIDAD IMPORTANTES 17. Advertencia: el cable proveído con este aparato es largo, para permitirle colocar el aparato donde desea. Sin embargo, deberá tener cuidado donde ubica el cable. Coloque el cable sobre la encimera o la mesa de tal forma que niños no puedan jalar o tropezar con éste. Es aconsejable guardar el exceso de cable en el espacio atrás de la base. 18.
GUARDE ESTAS INSTRUCCIONES PARA USO DOMÉSTICO SOLAMENTE ÍNDICE Medidas de seguridad importantes . . . . . . . . . . . . . 2 Instrucciones de desembalaje . . . . . . . . . . . . . . . . 3 Piezas y características . . . . . . . . . . . . . . . . . . . . . . 4 Ensamblaje de la jarra . . . . . . . . . . . . . . . . . . . . . . . . 5 AVISO: Consejos útiles . . . . . . . . . . . . . . . . . . . . . . . . . . . .
PIEZAS Y CARACTERÍSTICAS 11. Disco rebanador/rallador reversible Se conecta al bol mediante el adaptador. 1. Tapa Simplemente presiónela para cerrar. El sello hermético mantiene la tapa bien ajustada durante el funcionamiento. 12. Dos vasos de viaje de 16 onzas (475 ml) con tapa Se conectan al juego de cuchillas para licuar directamente en los vasos. 2. Tapón medidor Permite medir y agregar ingredientes sin abrir la tapa. 2. 1. 3. Jarra de copoliéster Tritan® de 56 onzas (1.
ENSAMBLAJE DE LA JARRA FUNCIONAMIENTO Siga las instrucciones siguientes cuidadosamente para ensamblar la jarra de su licuadora: 1. Coloque la base de la licuadora sobre una superficie plana y segura. Asegúrese de que la superficie esté limpia y seca. Ensamble la jarra, según se indicó en la sección ENSAMBLAJE. Conecte el cable a una toma de corriente. 1. P onga la jarra (a) al revés sobre una superficie plana y segura.
ADVERTENCIA: CUANDO LOS INDICADORES LUMINOSOS PARPADEAN, ESTO SIGNIFICA QUE EL APARATO ESTÁ BAJO TENSIÓN. NO TOQUE LAS CUCHILLAS. jabonosa tibia. Enjuáguelos y permita que sequen completamente. 5. Para interrumpir el licuado o apagar la licuadora: Retire la tapa y el tapón medidor. Lávelos en agua jabonosa tibia; enjuáguelos y permita que sequen completamente. O métalos en el lavavajillas (nivel superior solamente). Lave la jarra en agua jabonosa tibia. Enjuáguela y permita que seque completamente.
REGLAS BÁSICAS Nunca haga esto: Siempre haga esto: • Nunca instale las cuchillas por sí solas sobre la base; el juego de cuchillas siempre debe encontrarse adentro de la jarra. • • Asegúrese de que el voltaje de la toma de corriente corresponda al voltaje indicado debajo de la base del aparato. No guarde alimentos o líquidos en la jarra. • No utilice la licuadora para montar claras, hacer puré de papas o amasar. • Siempre coloque la licuadora sobre una superficie seca, limpia y segura.
PIEZAS Y CARACTERÍSTICAS DE LA PROCESADORA 1. Coloque la caja de engranaje sobre la base. 1. Empujador con orificio para agregar líquido 3. Inserte la cuchilla picadora/mezcladora sobre el árbol del motor, ubicado en el centro del bol. La cuchilla debería deslizarse fácilmente hacia el fondo del bol. La parte inferior de la cuchilla casi debería tocar el fondo del bol. 2. Instale el bol sobre el bloque-motor, el asa apuntando hacia el frente. Gire en sentido horario para sujetar. 2.
que se bloquee. Introduzca los alimentos en la boca de llenado. 2. Le aconsejamos que pique los alimentos con la función de pulso. Utilizar la función de pulso permite picar los alimentos de manera uniforme, sin sobreprocesarlos. Averigüe la textura de los alimentos a menudo. Tenga cuidado de no sobreprocesar los alimentos. Para picar grueso, pulse solamente unas veces. 5. Introduzca el empujador en la boca de llenado. Siempre utilice el empujador para empujar los alimentos en la boca de llenado.
Hay dos formas de evitar que la cuchilla se caiga del bol: 1. parte los alimentos de la cuchilla, usando una A espátula, antes de vaciar el bol. Retire cuidadosamente la cuchilla, sosteniéndola por el eje. 2. ostenga la cuchilla por el eje con su dedo o una S espátula mientras vacía el bol. Para retirar el bol del bloque-motor, álcelo junto con la caja de engranaje o bien sostenga la caja de engranaje y gire el bol en sentido antihorario.
• Cuando use los vasos de viaje, coloque los ingredientes en el orden opuesto del indicado en la receta: primero los sólidos, y luego los líquidos. GUÍA DE REFERENCIA RÁPIDA Para poner el aparato bajo tensión Oprima el botón ON/OFF – El aparato está en el modo de espera. Para empezar a licuar/procesar Oprima la velocidad o la función pre-programada deseadas. Para cambiar la velocidad Oprima el botón de velocidad deseado.
GUÍA PARA PICAR/MOLER USANDO LA PROCESADORA DE ALIMENTOS Alimento Preparación Frutas y vegetales ele las frutas/verduras si es necesario. Quite las pepas, pepitas, semillas, etc. P Córtelas en pedazos de ¾ pulgada (2 cm). No procese más de 1 taza (250 g) a la vez. Carne, pollo y pescado tilice carne/pollo/pescado frío, pero no congelado. Corte los alimentos en pedazos U de ¾ pulgada (2 cm). No procese más de ½ libra a la vez. Pulse hasta obtener la consistencia deseada.
GUÍA PARA REBANAR/RALLAR USANDO LA PROCESADORA DE ALIMENTOS Alimento Preparación antes de rebanar Preparación antes de rallar Alimentos largos y finos como zanahorias, apio, pepinos, calabacines, etc. Córtelos en pedazos suficientemente pequeños para caber en la boca de llenado. Dispóngalos verticalmente en la boca de llenado, apretujándolos en ésta para evitar que se muevan durante el procesado. Córtelos en pedazos suficientemente pequeños como para caber en la boca de llenado.
GARANTÍA LIMITADA DE TRES AÑOS estas dos opciones no satisfacen al consumidor, podrá llevar el aparato a un centro de servicio independiente, siempre que se pueda ajustar o reparar el aparato de manera económica. Esta garantía es para los consumidores que residen en los EE.UU. solamente. Esta garantía reemplaza todas las demás declaraciones expresas de garantía. Usted es un consumidor si ha comprado su aparato Cuisinart® en una tienda, para uso personal o casero.
RECETAS Batido ("smootie") proteico Este batido energético perfecto para llevar satisfará su hambre por más tiempo. Batidos/licuados para llevar Batido ("smoothie") proteico............................................. 15 Rinde aproximadamente 2 tazas (475 ml) Batido ("smootie") de frutas del bosque........................... 15 ¾ 1 1 ½ ¾ Batidos/licuados para una multitud Batido ("smootie") verde dulce......................................... 16 Batido ("smoothie") súper antioxidante.................
Batido ("smoothie") verde dulce Información nutricional por porción (8 onzas/235 ml): Calorías 118 (11% de grasa) • Carbohidratos 28 g • proteínas 1 g • Grasa 2 g • Grasa saturada 0 g • Colesterol 0 mg • Sodio 5 mg • Calcio 14 mg • Fibra 4 g Este batido verde dulce – ¡Sí, dulce! – le dará el impulso de energía que necesita temprano por la mañana o al final de la tarde.
rallador, el lado rallador apuntando hacia arriba. Rallar las manzanas. Reservar. Información nutricional por porción (4 onzas/120 ml): Calorías 111 (0% de grasa) • Carbohidratos 22 g • proteínas 0 g • Grasa 0 g • Grasa saturada 0 g • Colesterol 0 mg • Sodio 107 mg • Calcio 1 mg • Fibra 1 g 3. Combinar, batiendo, la harina, el germen de trigo, el polvo de hornear, el bicarbonato, la sal y la canela en un tazón grande. Poner la leche, el huevo, la clara, el aceite y la vainilla en la jarra de la licuadora.
2. Poner el aceite de oliva a calentar a fuego medio, en una cacerola mediana. Agregar la cebolla. Mientras la cebolla está cociendo, poner el jengibre y el ajo en el bol y procesar a velocidad alta para picar. Agregar a la cacerola. la licuadora, abrir el tapón medidor y agregar a leche y la vainilla. Seguir licuando durante 15–20 segundos, hasta obtener una mezcla suave. Dejar reposar la mezcla durante ½ hora o más, en el refrigerador.
1. Instalar la cuchilla picadora en el bol y colocar el bol sobre la base. Agregar el chalote, el ajo y el puerro y procesar a velocidad alta hasta que estén finamente picados. 1. Colocar 1 taza (235 ml) del jugo, el ajo, el apio, el pepino, el pimiento dulce, el jalapeño y las cebolletas en la jarra de la licuadora. Licuar a velocidad baja durante 15–20 segundos, hasta que los vegetales estén finamente picados. Colocar en un tazón grande. 2.
Aderezo "diosa verde" velocidad baja durante aproximadamente 30 segundos para combinar. Este aderezo clásico repleto con hierbas frescas tiene un sabor muy refrescante. Es perfecto para acompañar pollo o vegetales asados, o una ensalada. 3. Sin apagar la licuadora, retirar el tapón medidor y agregar lentamente la mantequilla derretida por la abertura en la tapa (tapar la abertura con el tapón o un paño para evitar las salpicaduras).
obtener una mezcla suave. Información nutricional por porción (2 cucharadas): Calorías 10 (5% de grasa) • Carbohidratos 2 g • proteínas 0 g • Grasa 0 g • Grasa saturada 0 g • Colesterol 0 mg • Sodio 6 mg • Calcio 2 mg • Fibra 0 g 2. Para servir: colocar el humus en un cuenco poco profundo. Hacer una abolladura en el centro con una cuchara y llenar con el aceite remanente. Salpicar páprika y "za’atar" (opcional) encima del aceite.
Croquetas de cangrejo plato limpio, entre hojas de papel encerado. Cubrir con plástico y refrigerar durante 1 hora antes de saltear. El secreto de estas delicadas y deliciosas croquetas está en la mezcla final, muy suave. Sírvalos con nuestra salsa de durazno (página 21). 8. Calentar el aceite vegetal a fuego medio, en una salteadora antiadherente. Rebozar las croquetas en un poco de pan rallado. Cuando el aceite esté caliente, saltear las croquetas durante 3–5 minutos por cada lado.
NOTAS: 23
NOTAS: 24