INSTRUCTION BOOKLET Programmable Espresso Maker EM-200 For your safety and continued enjoyment of this product, always read the instruction book carefully before using.
IMPORTANT SAFEGUARDS We at Cuisinart are very safety conscious. We design and manufacture consumer products with the safety of you, our valued customer, foremost in mind. In addition we ask that you exercise a degree of care when using electrical appliances and adhere to the following precautions. When using electrical appliances, basic safety precautions should always be followed, including the following: 1. CAREFULLY READ ALL INSTRUCTIONS BEFORE OPERATING APPLIANCE AND SAVE FOR FUTURE REFERENCE. 2.
SAVE THESE INSTRUCTIONS FOR HOUSEHOLD USE ONLY WARNING: RISK OF FIRE OR ELECTRIC SHOCK The lightning flash with arrowhead symbol within an equilateral triangle is intended to alert the user to the presence of uninsulated dangerous voltage within the product’s enclosure that may be of sufficient magnitude to constitute a risk of fire or electric shock to persons.
CONTENTS Important Safeguards. . . . . . . . . . . . . . . . . . . 2 Unpacking Instructions . . . . . . . . . . . . . . . . . 3 The Quest for the Perfect Cup of Espresso . . . . . . . . . . . . . . . . 4 Features and Benefits, Diagram. . . . . . . . . . . 5 Preparing Your Espresso Machine Before Use . . . . . . . . . . . . . . . . . . . . . . . . . . . 6 Programming Your Espresso Machine . . . . . 6 Guide to the Perfect Espresso . . . . . . . . . . . 7 Guide to Milk Texturing . . . . . . . . . . . . . . . .
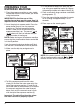
FEATURES AND BENEFITS 1. Water Reservoir Lid 2. Removable 64-ounce Water Reservoir 3. Cup-Warming Plate Used to warm the espresso cups. 4. 15 Bar Pump (not shown) 5. Power Button Used to turn the espresso maker on and off. This button illuminates when pressed. 6. Manual Button Used for a continuous pour of espresso. 7. 1-cup Button Used for a single serving of espresso – 1.5 ounces. 8. 2-cup Button Used for a double serving of espresso – 3.0 ounces 9. Program Button Used to set the number of ounces desired.
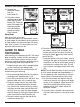
PREPARING YOUR ESPRESSO MACHINE 5. Fit the portafilter holder with either the one cup, two cup or pod filter basket (4). Secure the portafilter handle to the brew head (5) (6). 1. Place the espresso machine on a dry, stable countertop or other surface where you will be using the machine. IMPORTANT: For first time use or if the machine has not been used for some time, it is important that the machine is rinsed as follows: 2. Insert the plug into a power outlet.
PROGRAMMING YOUR ESPRESSO MACHINE The Cuisinart® Programmable Espresso Maker has programming capabilities. Based on café settings, the single and double espresso functions are set at 1.5 and 3.0 oz. However, by following a few simple steps, you can pre-program your perfect serving size down to the ounce. Programming Single Espresso 1. Prepare the portafilter holder with the one cup filter basket (8) and fill with finely ground espresso (9).
has now returned to the original factory settings and the next time the single or double espresso functions are used the espresso pours will be 1.5 and 3.0 oz. 4. The espresso machine will then return to normal operation mode and is ready to make another espresso at the push of a button. IMPORTANT: Be sure not to overfill the filter basket with coffee as this can cause the portafilter holder to leek or overflow TIP: Make sure the tamping tool is dry so that wet coffee grinds do not stick to it.
Caring for your Espresso Maker 10. Remove the portafilter handle from the brew head (21). 11. Discard the used coffee grinds or pod/ pods from the filter basket (22). Place the porta-filter holder into slide lock position when discarding grinds so basket stays in place. 21 22 23 24 25 26 Sleep Mode After 30 minutes of non-use the espresso machine will automatically switch to sleep mode. An indication that the machine is in sleep mode is that the power light will slowly flash.
TIP: The amount of foam required will vary depending on the drinks being made. For example, a cappuccino requires more foam than a latte. 10. Stop the steam immediately by turning the steam and hot water control dial to the center position. IMPORTANT: Do not boil the milk. 11. Remove the pitcher, immediately wipe the steam nozzle and wand with a clean damp cloth (28) and purge a small amount of steam. 28 USING THE HOT WATER FUNCTION any lingering coffee particles.
r *G UIF TUFBN XBOE remains blocked, use pin to clear the opening. DECALCIFICATION Decalcification refers to the removal of calcium deposits that form over time on the metal parts of the coffeemaker. For best performance from your espresso maker, decalcify the unit from time to time. The frequency depends on the hardness of your tap water and how often you use the coffeemaker. To clean, fill the water reservoir to capacity with a mixture of 1∕3 white vinegar and 2∕3 water.
ounces have been brewed the machine will stop. *This recipe can also be used to make two single espressos. Follow the same instructions for the doppio, but place two demitasse cups under the brew head instead of one. Americano Makes 1 serving (6-8 ounces) 1 measured scoop finely ground espresso or 1 espresso pod 6-7 ounces hot water Press the power button of the Cuisinart® Espresso Maker to turn the machine on.
portafilter holder. Spoon the espresso grounds into the basket. Using the tamping tool, press down the grounds with moderate pressure and clean any excess from the rim. Secure the portafilter holder in place Place one demitasse cup underneath the brew head and press the single espresso button. achieve a nice foam. When the foam has almost reached the top of the pitcher, turn the dial to the off position. Reserve steamed/frothed milk.
the dial to the off position. Turn the espresso maker back on. Wait for the machine to re-warm, if necessary. Place one demitasse cup underneath the brew head and press the single espresso button. the pitcher up and down a couple of times to achieve a nice foam. When the foam has almost reached the top of the pitcher, turn the dial to the off position. Reserve steamed/ frothed milk. Espresso will begin to brew. When 1½ ounces have been brewed the machine will stop.
and place it under the steam wand so the bottom of the wand is just below the surface of the milk. Press the steam button and while holding the pitcher at an angle, allow the steam to move the milk around. Once the milk begins to increase in volume, lift the pitcher higher so the steam wand is immersed farther into the milk. Move the pitcher up and down a couple of times to achieve a nice foam. When the foam has almost reached the top of the pitcher, turn the dial to the off position.
Place a glass underneath the brew head and press the button. Espresso will begin to brew. When 3 ounces have been brewed the machine will stop. Stir the chocolate and sugar into the hot espresso to dissolve. Pour the espresso mixture into the jar of a Cuisinart® Blender. Place the lid on and process on high. While the motor is running, drop the ice cubes in and continue to process until the mixture is homogenous, about 30 seconds. Pour into a glass.
Press the power button of the Cuisinart® Espresso Maker to turn the machine on. The lights around the power, manual, single and double espresso buttons will illuminate and when they stop blinking, the machine has been warmed and is ready to use. Place the two-cup filter basket in the portafilter holder. Spoon 2 scoops of the espresso grounds into the basket. Using the tamping tool, press down the grounds with moderate pressure and clean any excess from the rim. Secure the portafilter holder in place.
Add the espresso to the steeped milk. Over a medium-low heat, gradually bring to a boil. While the milk/espresso mixture is heating, slowly whisk the sugar and salt into the yolks. Beat together until the mixture is light and thickened. Once the milk/espresso mixture has reached a boil, slowly whisk 2⁄3 of it into the yolk mixture. Return the combined mixture to the remaining milk/espresso in the saucepan.
LIMITED THREE-YEAR WARRANTY We warrant that your Cuisinart® Programmable Espresso Maker will be free of defects in materials and workmanship under normal home use for 3 years from the date of original purchase. We recommend that you visit our website, www. cuisinart.com for the fastest, most efficient way to complete your product registration. However, product registration online does not eliminate the need for the consumer to maintain the original proof of purchase in order to obtain the warranty benefits.
Ice Cream Makers Food Processors Toaster Ovens Blenders Cookware Griddlers Cuisinart offers an extensive assortment of top quality products to make life in the kitchen easier than ever. Try some of our other countertop appliances and cookware, and Savor the Good Life®. www.cuisinart.com ©2011 Cuisinart 150 Milford Road East Windsor, NJ 08520 Printed in China 10CE113910 Any other trademarks or service marks referred to herein are the trademarks or service marks of their respective owners.
Version no.