INSTRUCTION BOOKLET Compact 2-Slice Toaster CPT-120RC For your safety and continued enjoyment of this product, always read the instruction book carefully before using.
IMPORTANT SAFEGUARDS When using an electrical appliance, basic safety precautions should always be followed, including the following: 1. Read all instructions. 2. Do not touch hot surfaces. Use handles or knobs. 3. To protect against electrical shock, do not place any part of the toaster in water or other liquid. See instructions for cleaning. 4. Close supervision is necessary when any appliance is used by or near children. 5. Always unplug from outlet when not in use and before cleaning.
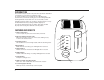
INTRODUCTION This Cuisinart® Compact Toaster is the perfect fit for any kitchen. Streamlined to sit sideways or face forward on your kitchen counter, its controls are within easy reach either way. The LED lights next to each button let you monitor the toasting process. The 9-setting LED backlit browning dial makes it easier than ever to choose the shade you want. ¿ Cuisinart® products are famous for convenience, and this toaster is no exception.
USE AND CARE Unwind the power cord. Check that the crumb tray is in place and that there is nothing in the toaster slot. Plug power cord into the wall outlet. 1. Insert Slice(s) of Bread. Be sure that multiple slices do not overlap and that the carriage is in the up position. 2. Set the Browning Control. Turn rotary dial to the desired position: Dial Setting Color 1-3 light 4-6 medium 7-9 dark LED illuminates number to indicate shade selected.
1. Insert slice(s) of bread. Be sure that multiple slices do not overlap and the carriage is in the up position. 2. Set the Browning Control. Setting 1-3: For refrigerated breads and thinner frozen items such as frozen pancakes. Setting 4-6: For toaster pastries, frozen waffles and (thin) French toast, and refrigerated bagels. To stop cycle: When the reheat cycle is complete, the toaster will raise the bread. If you wish to stop the cycle before it is finished, simply press the cancel button to interrupt.
CUISINART® COMPACT 2-SLICE TOASTER LIMITED 3 YEAR WARRANTY BEFORE RETURNING YOUR CUISINART PRODUCT This limited warranty is available to consumers only. You are a consumer if you own a Cuisinart® Toaster which was purchased at retail for personal, family or household use. Except as otherwise required under applicable state law, this warranty is not available to retailers or other commercial purchasers or owners.
Coffeemakers Cafetières Food Processors Robots de cuisine Toaster Ovens Fours grilloirs Blenders Mélangeurs Ice Cream Makers Sorbetières Cookware Batterie de cuisine Cuisinart offers an extensive assortment of top quality products to make life in the kitchen easier than ever. Try some of our other countertop appliances and cookware, and Savor the Good Life®. Cuisinart offre une vaste gamme de produits de première qualité pour vous faciliter la tâche dans la cuisine.
N’enroulez jamais le cordon autour du grille-pain, mais plutôt dans les encoches à cette fin sous la base. 5. Pour enlever tout morceau de pain resté dans le grille-pain, tournez-le à l’envers et secouez-le légèrement. N’insérez jamais d’outils durs ou pointus dans la fente car ceci pourrait endommager le grille-pain et causer un accident. 4. Pour enlever les miettes, retirez le ramasse-miettes et videz-le. Essuyez-le à l’aide d’un chiffon humide, séchez et replacez-le.
• Ne placez pas de pain et de pâtisseries beurrés dans le grillepain; cela pourrait poser un risque de feu. • Les tranches de pain inégales sont habituellement la cause d’un grillage non uniforme. • Débranchez votre grille-pain après l’usage. Bouton pour dégel La fonction « Defrost » a pour but de dégeler le pain d'abord puis de le griller et de ce fait, prolonge le cycle de grillage. 1. Insérez la / les tranche(s) de pain.
7. Bouton pour annuler Interrompt le processus de grillage. 8. Plateau à miettes coulissant (non illustré) S’enlève pour retirer les miettes accumulées au fond du grillepain. 9. Range cordon (non illustré) Pour ranger l'excédent du cordon et garder le dessus du comptoir libre. • Les tranches de pain épaisses (y compris les bagels) prennent parfois beaucoup de temps à griller étant que l’humidité doit s’évaporer du pain pour qu’il puisse commencer à griller.
¿ ¡ INTRODUCTION Ce Grille-pain petit modèle Cuisinart® est très attrayant dans toutes les cuisines. Que vous le placiez de côté ou de face sur le comptoir ou la table, ses boutons de commande sont faciles à manier. Les voyants lumineux DEL près de chaque bouton vous permettent de vérifier le processus de grillage. Le bouton de grillage à écran DEL rétro-éclairé vous offre 9 réglages pour faire griller à souhait.
IMPORTANTES CONSIGNES DE SÉCURITÉ L’utilisation d’un appareil électrique demande la prise de précautions élémentaires nécessaires, dont celles qui suivent : 1. Lisez attentivement toutes les directives. 2. Évitez tout contact avec les surfaces chaudes. Servezvous des manches ou boutons. 3. Pour éviter les risques d’électrocution, n’immergez aucune partie du Four grille-pain dans l’eau ou tout autre liquide. Voir les instructions de nettoyage. 4.
Grille-pain petit modèle à 2 tranches MANUEL DE DIRECTIVES CPT-120RC Afin que ce produit vous procure des années de satisfaction en toute sécurité, veuillez toujours lire le manuel de directives avec soin avant l'utilisation.