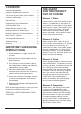
INSTRUCTION BOOKLET Fully Automatic Burr Grind & Brew™ Thermal Coffeemaker DGB-850 Series For your safety and continued enjoyment of this product, always read the instruction book carefully before using.
IMPORTANT SAFEGUARDS 16. Do not use a cracked carafe or a carafe having a loose or weakened handle. 17. Do not clean carafe or heating plate with cleansers, steel wool pads, or other abrasive materials. When using electrical appliances, especially when children are present, basic safety precautions should always be taken to reduce the risk of fire, electric shock and/or injury to persons, including the following: 18.
WARNING: RISK OF FIRE OR ELECTRIC SHOCK NOTICE This appliance has a polarized plug (one blade is wider than the other). To reduce the risk of electric shock, this plug will fit into a polarized outlet only one way. If the plug does not fit fully into the outlet, reverse the plug. If it still does not fit, contact a qualified electrician. Do not modify the plug in any way.
CONTENTS THE QUEST FOR THE PERFECT CUP OF COFFEE Important Safeguards . . . . . . . . . . . . . . . . . . . 2 Important Unpacking Instructions . . . . . . . . . . 4 The Quest for the Perfect Cup of Coffee . . . . 4 Features and Benefits . . . . . . . . . . . . . . . . . . . 5 Element 1: Water Control Panel . . . . . . . . . . . . . . . . . . . . . . . . . . 6 Coffee is 98% water. The quality of that water is as important as the quality of your coffee.
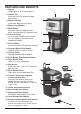
FEATURES AND BENEFITS 1. Hopper Holds up to ½ lb. of coffee beans. 2 2. Hopper Lid Seals out moisture and air to keep beans fresh. 3 1 3. Water Reservoir Cover flips back for easy filling. 4. Water Level Window 5. Brew Pause™ Interrupts flow of coffee to pour a quick cup mid-brew (20 seconds max.) 5 6. Thermal Carafe An easy-pour, double-wall insulated, 10-cup stainless steel carafe with ergonomic handle. 4 6 7. Resting Plate Scratch resistant with nonstick coating. 8.
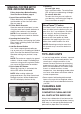
GETTING TO KNOW YOUR CONTROL PANEL 1) O N/OFF Button with LED Indicator Manually turns coffeemaker on or off. 5) S TRENGTH Control Button Press to select a regular, bold or extra-bold coffee flavor. Bars ( ) in display indicate selected flavor strength. 2) C lock/LCD Display Displays time of day, Strength and Grind control settings. 6) H our and Minute (HR, MIN) Buttons Use to program clock and Auto ON function.
PROGRAMMING YOUR COFFEEMAKER 2. Entering Set Program Time Mode Press the Program button once. The Auto ON icon and the previously selected auto-on time, or the default time (12:00) will appear. Press and hold the Program button until the time begins to flash. You are now in Set Program Time mode. Set the time you want coffee to begin brewing by pressing the Hour and Minute buttons.
BEFORE BREWING YOUR FIRST POT OF COFFEE CHARCOAL WATER FILTER Your coffeemaker comes with a charcoal water filter that eliminates chlorine, bad tastes and odors from tap water. During the manufacturing process, dust can get trapped in your coffeemaker. We recommend flushing out the system before brewing your first pot of coffee. Simply follow Making Coffee with Pre-Ground Beans, page 10.
3.Add Beans Remove the hopper lid. Add beans. We recommend keeping the hopper full to ensure there are always enough beans for the number of cups you want to brew. But be careful: Maximum capacity is ½ lb.; overfilling the hopper may jam the grinder. Replace hopper lid. grinder will grind the correct amount of beans, and automatically adjust the coffee/water ratio for low cup settings. c. Press the Strength Control button to choose a regular, bold or extrabold flavor.
MAKING COFFEE WITH PRE-GROUND BEANS 6. Brewing To brew right away Press the Brew button. The white Brew LED will light up and brewing will begin. To activate Auto ON To select the time you want coffee to start brewing, see Setting the Program Time instructions on page 7. Follow instructions Before Brewing Your First Pot of Coffee, page 8. 1. Insert Charcoal Water Filter Follow directions for the preperation and insertion of the charcoal water filter on page 8. Brew Pause™ Feature 2.
NOTE: Before decalcifying your coffeemaker, remember to remove the charcoal water filter from the water filter holder located in the water reservoir. grounds and paper filter. Remove carafe and pour out any remaining coffee. The permanent filter, filter basket, carafe and lid can be washed in warm, soapy water and rinsed thoroughly, or cleaned in the upper rack of the dishwasher. Dry all parts after every use.
TROUBLESHOOTING PROBLEM CAUSE SOLUTION The coffeemaker is beeping Filter door is not closed • Check to be sure that all components of the filter compartment are in place • Close filter door (you will hear a click if the door is properly shut) Filter basket is not in place • Open filter door by pressing the filter door release button • Hook filter basket with cover onto door • Close filter door (you will hear a click if the door is properly shut) Coffee grounds and filter from previous use are st
WARRANTY BEFORE RETURNING YOUR CUISINART PRODUCT Limited Three-Year Warranty (U.S. and Canada only) If your Cuisinart® Fully Automatic Burr Grind & Brew™ Thermal Coffeemaker should prove to be defective within the warranty period, we will repair or, if we think necessary, replace it. To obtain warranty service, please call our Consumer Service Center toll-free at 1-800-726-0190 or write to: Cuisinart, 7475 North Glen Harbor Blvd., Glendale, AZ 85307.
©2017 Cuisinart 150 Milford Road East Windsor, NJ 08520 Printed in China 17CE031597 Trademarks or service marks of third parties used herein are the trademarks or service marks of their respective owners.
MANUAL DE INSTRUCCIONES Cafetera térmica automática con molinillo incorporado Grind & Brew™ Serie DGB-850 Para su seguridad y para disfrutar plenamente de este producto, siempre lea cuidadosamente las instrucciones antes de usarlo.
MEDIDAS DE SEGURIDAD IMPORTANTES 15. No ponga la jarra caliente sobre una superficie húmeda o fría. 16. No utilice la jarra si está rajada o si el asa está floja. 17. No limpie la jarra o la placa calentadora con limpiadores abrasivos, lana de acero u otros materiales abrasivos. Al usar aparatos eléctricos, especialmente en presencia de niños, siempre debe tomar precauciones básicas de seguridad para reducir el riesgo de incendio, descarga eléctrica o heridas, incluso las siguientes: 18.
ADVERTENCIA: RIESGO DE INCENDIO O DESCARGA ELÉCTRICA AVISO El cable de este aparato está dotado de un enchufe polarizado (una pata es más ancha que la otra). Como medida de seguridad, aquel enchufe se podrá enchufar de una sola manera en las tomas de corriente polarizadas. Si el enchufe no entra en la toma de corriente, inviértelo. Si aun así no entra completamente, comuníquese con un electricista. No intente modificarla.
ÍNDICE SUGERENCIAS PARA LA PREPARACIÓN DE UN BUEN CAFÉ Medidas de seguridad importantes . . . . . . . . 2 Instrucciones de desembalaje . . . . . . . . . . . . 4 Sugerencias para la preparación de un buen café . . . . . . . . . . . . . . . . . . . . . . . . . . . . .4 Elemento 1: el agua Piezas y características . . . . . . . . . . . . . . . . . . 5 El café está constituido por un 98 % de agua. Por lo tanto, la calidad del agua es tan importante como la del café.
PIEZAS Y CARACTERÍSTICAS 10. Botón de apertura del compartimiento del portafiltros 1. Depósito de café en grano Con capacidad para ½ libra (225 g) de café en grano. 11. Puerta del compartimiento del portafiltros Acceso fácil al portafiltros. 2. Tapa del depósito de café en grano Forma un sello hermético para proteger el café de la humedad y mantenerlo fresco. 12. Portafiltros Para filtro de papel o filtro dorado permanente Cuisinart®. 3. Depósito de agua Con tapa articulada para un fácil llenado. 13.
PANEL DE CONTROL 1) B otón ON/OFF (encendido/apagado) con indicador luminoso Permite encender/apagar la cafetera manualmente. 5) BOTÓN STRENGTH (control de intensidad) Permite elegir la intensidad del café: regular, fuerte o extrafuerte. Las barras ( ) en la pantalla indican la intensidad seleccionada. 2) R eloj/Pantalla LCD Indica la hora, la intensidad del café y el ajuste de molienda.
PROGRAMACIÓN 2. Para fijar/cambiar la hora de encendido automático CÓMO FIJAR LA HORA Oprima el botón PROG. “AUTO ON” y la hora de encendido automático previamente fijada (o “12:00”, la hora por defecto) aparecerán en la pantalla. Mantenga oprimido el botón HR o MIN hasta que la hora empiece a parpadear. Ahora puede ingresar la hora de encendido automático.
ANTES DEL PRIMER USO FILTRO DE AGUA DE CARBÓN Puede acumularse polvo en el aparato durante el proceso de fabricación. Le recomendamos que limpie el sistema interno de la cafetera antes de preparar café por primera vez. Para esto, haga funcionar la cafetera según la sección “Cómo preparar café con café molido”, pero con agua solamente (sin café) y un filtro de papel. Su cafetera cuenta con un filtro de agua de carbón que elimina el cloro y el mal olor/sabor del agua corriente.
grano lleno para siempre tener suficiente café en grano para la cantidad de tazas que desea preparar. Pero tenga cuidado: la capacidad máxima es de ½ libra (225 g) de café en grano; sobrellenar el depósito puede atascar el molinillo. Cierre la tapa. unidad molerá la cantidad exacta de granos y automáticamente ajustará la proporción de café/agua cuando se selecciona poca cantidad de tazas. c.
CÓMO PREPARAR CAFÉ CON CAFÉ MOLIDO Limpie la cafetera antes de usarla por primera vez, según se indica en la sección “Antes del primer uso”. 1. Instale el filtro de agua de carbón Siga las instrucciones de preparación e instalación en la página 8. 2. Llene el depósito de agua Abra la tapa del depósito y agregue agua hasta el nivel deseado. NOTA: no pase la línea de llenado máximo (10 tazas/1.45 L); esto puede provocar un derrame. 3.
LIMPIEZA Y MANTENIMIENTO DESCALCIFICACIÓN Con el tiempo, depósitos de calcio/sarro se acumulan en las piezas metálicas de la cafetera. LAVE Y SEQUE TODAS LAS PIEZAS DESPUÉS DE CADA USO. Para un rendimiento óptimo, deberá descalcificar la unidad regularmente. La frecuencia de la limpieza dependerá de la dureza del agua y de la frecuencia de uso del aparato. Siempre apague y desenchufe el aparato antes de limpiarlo. Después de cada uso, retire el portafiltros y el filtro permanente o el filtro de papel.
RESOLUCIÓN DE PROBLEMAS PROBLEMA CAUSA SOLUCIÓN La cafetera emite un pitido La puerta del compartimiento del portafiltros no está debidamente cerrada • Asegúrese de que todos los componentes del portafiltros están correctamente instalados • Cierre la puerta del compartimiento del portafiltros (escuchará un clic que le indicará que está correctamente cerrada) El portafiltros no está correctamente instalado • Abra el compartimiento del portafiltros, oprimiendo el botón de apertura de la puerta • Co
GARANTÍA ANTES DE HACER REPARAR SU APARATO Si este aparato presentara algún defecto de materiales o fabricación durante el período de garantía, lo reparemos o reemplazaremos (a nuestra opción). Para obtener servicio bajo esta garantía, llame a nuestra línea directa gratuita al 1-800-7260190 o regrese el aparato defectuoso a: Cuisinart, 7475 North Glen Harbor Blvd. Glendale, AZ 85307. Regrese el producto defectuoso, junto con su recibo de compra y un cheque o giro postal de US$10.
©2017 Cuisinart 150 Milford Road East Windsor, NJ 08520 Impreso en China 17CE031597 Todas las marcas registradas, comerciales o de servicio mencionadas en este documento pertenecen a sus titulares respectivos.