INSTRUCTION AND RECIPE BOOKLET Cuisinart® Griddler® Grill & Panini Press GR-11 For your safety and continued enjoyment of this product, always read the instruction book carefully before using.
CONTENTS 12. Do not use appliance for other than intended use. 13. Extreme caution must be exercised when moving an appliance containing hot oil or other hot liquids. 14. To disconnect, remove plug from wall outlet. 15. WARNING: TO REDUCE THE RISK OF FIRE OR ELECTRIC SHOCK, ONLY AUTHORIZED PERSONNEL SHOULD DO REPAIRS. 16. Do not operate your appliance in an appliance garage or under a wall cabinet. When storing in an appliance garage always unplug the unit from the electrical outlet.
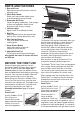
PARTS AND FEATURES 6 1 . Base and Cover Solid construction with stainless steel selfadjusting cover . 2 . Panini-Style Handle Sturdy cast-metal handle adjusts cover to accommodate thickness of food . 3 . Removable Grill Plates Perfect for grilling sandwiches, steak, burgers, chicken and vegetables . Nonstick and dishwasher safe for easy cleanup . 4 . Indicator Lights Signal Power On and Ready to Cook . 5 . Drip Tray Collects grease and can be removed from base for easy cleanup (dishwasher safe) . 6 .
ASSEMBLY INSTRUCTIONS the bread and warm the sandwich . Experiment making a variety of savory or sweet sandwiches for any meal . We recommend using fresh-baked bread to produce the best-tasting panini . Popular breads used for panini are focaccia (a flat bread frequently baked with rosemary, salt and onion on top), michetta (a small round roll with a crisp crust), ciabatta (a rectangular bread with a slightly domed crust) and thick slices of classic Italian bread .
To remove cooking plates Flat Position – Upper plate/cover is level with lower plate/base. The upper and lower plates line up to create one large cooking surface. The Griddler® Grill & Panini Press is in this position when it is used as a Full Grill. 1. T o adjust the Griddler® Grill & Panini Press to this position, locate the hinge release button on the right arm. 1. 1. Once the Griddler® Grill & Panini Press has cooled, adjust to the flat position. Locate the plate release buttons: a.
OPERATING INSTRUCTIONS User Maintenance • Never use metal utensils, as they will scratch the nonstick plates. Instead, use only wooden or heat-proof plastic utensils. Once the Griddler Grill & Panini Press is assembled properly, plug the cord into a standard electrical outlet. The red indicator light will illuminate to indicate that the power is on.
STORAGE repair, replacement, and shipping and handling of such nonconforming products under warranty. Always make sure the Griddler® Grill & Panini Press is cool and dry before storing. The power cord can be wrapped around the back of the base for storing. BEFORE RETURNING YOUR CUISINART PRODUCT If your Cuisinart® Griddler® Grill & Panini Press should prove to be defective within the warranty period, we will repair or, if we think necessary, replace it.
©2013 Cuisinart 150 Milford Road East Windsor, NJ 08520 Printed in China Any trademarks or service marks of third parties referred to herein are the trademarks or service marks of their respective owners.
RECIPES Breakfast Danish Panini . . . . . . . . . . . . . . . . . . . . . . . . . . . . . . . . . . . . . . . . . . . . 10 Grilled PB and Banana Panini . . . . . . . . . . . . . . . . . . . . . . . . . . . . . . . . . . . . . . . . 10 Tomato, Prosciutto and Mozzarella Panini . . . . . . . . . . . . . . . . . . . . . . . . . . . . . .
Breakfast Danish Panini 1 A sweet Danish-like breakfast treat, perfect with a cup of coffee. 1. Preheat grill in the closed position. Brush one side of each slice of bread with the butter. Lay 2 slices of bread on a work surface, buttered side down. Top the two slices evenly with the peanut butter, salt and honey. Then layer the banana slices evenly on each. Top with remaining bread, buttered side up. 2. Place sandwiches on the bottom grill plate and close.
Grilled Cheese with Tomato and Avocado 4. Let rest for 1 to 2 minutes. Cut in half on the diagonal and serve warm. Nutritional information per panini: Calories 313 (38% from fat) • carb. 31g • pro. 15g • fat 13g • sat. fat 4g • chol. 22mg • sod. 780mg • calc. 108mg • fiber 2g The perfect summer sandwich when tomatoes are perfectly ripe.
Grilled Reuben Grilled BLT with Cheddar A homemade version of the deli favorite. We also provide you with a very simple recipe for a quick Russian dressing. Really this is a BATC, because we use arugula instead of the traditional lettuce, and add some Cheddar into the mix.
Brie, Apple and Onion Panini Grilled Flatbread This recipe combines sweet, savory and creamy all in one sandwich. Our recipe is for a basic herb flatbread, but the possibilities are endless. See our note below for some other options, including stuffed bread.
Classic Tomato Bruschetta Grilled Antipasto Always a popular appetizer. The topping can be made up to a day in advance and stored in the refrigerator until ready to serve. For a showstopping presentation, seek out a mixture of red, orange and yellow grape tomatoes. Serve on a large platter with some wedges of grilled flatbread for your next party. The colors of the vegetables will brighten any table.
Sliders 2 3 These mini burgers are a great addition to any summer menu and kid-friendly too. 1. Preheat grill in the closed position. 2. In a medium bowl combine the pepper, jalapeño and onion with the salt, pepper, chili powder and 1 tablespoon of the oil. 3. Once the grill has preheated, carefully open it into the flat position and evenly divide the vegetables between the plates. Grill for about 10 minutes, turning occasionally, until vegetables are soft and slightly golden.
plates. Grill shrimp for 4½ to 5 minutes, turning halfway through, until shrimp are opaque. Remove from grill and garnish with parsley. Serve immediately. 1. In a small bowl combine the butter, scallion, zest, and soy sauce until smooth. Cover with plastic wrap and set aside in the refrigerator until ready to use. 2. Adjust feet to the tilted position. Preheat the grill in the closed position. 3. Coat both steaks with the oil and season with salt and pepper. 4.
Chocolate Panini 3. Place sandwiches on the bottom grill plate and close. Grill panini for 4 minutes. Allow panini to rest for 1 to 2 minutes, Cut in half on the diagonal and serve warm. A decadent treat – make sure to serve with a cold glass of milk. Makes 2 panini 4 2 4 Nutritional information per panini: Calories 252 (43% from fat) • carb. 34g • pro. 4g • fat 13g • sat. fat 5g • chol. 5mg • sod. 144mg • calc.
NOTES: 18
NOTES: 19
NOTES: 20
NOTAS: 20
NOTAS: 19
Las frutas asadas son un postre saludable y elegante; perfectas al final de cualquier comida. Cantidad: 2 porciones Cierre sus ojos y le parecerá que está sentado delante de una fogata, disfrutando de este favorito de la infancia. Sundae de piña asada Panini "S'mores" Cantidad: 2 panini 4 2 1 4 rebanadas de pan italiano o de sémola cucharadas de mantequilla sin sal a temperatura ambiente, o aceite de oliva barra de 1.55 onza de chocolate con leche malvaviscos, cortados en la mitad 1.
Una exquisita delicia. Sírvalos con un vaso de leche fría. Este simple, sin embrago sabroso pollo es ideal para preparar ensaladas o sándwiches, o simplemente para comer así.
Bistec asado con mantequilla de cebolleta Usar mantequilla aromatizada es una manera sencilla de elevar su bistec a calidad de restaurante.
Calorías 86 (70% de grasa) • Carbohidratos 5g • Proteínas 1g • Grasa 7g • Grasa saturada 1g • Colesterol 0 mg • Sodio 271mg • Calcio 16mg • Fibra 3g Mini hamburguesas Estas mini hamburguesas, llamadas "sliders" en inglés, son una gran adición a cualquier menú de verano y le encantan a los niños.
Puede asar masa simple, sin aceite, y luego añadir vegetales crudos o cocinados. También puede rellanar el pan – después de asarlo, retirarlo cuidadosamente de la placa y cortarlo horizontalmente en la mitad. Nuestra receta favorita consiste en untar el pan con una mezcla de pesto con aceite de oliva, y luego rellenarlo con queso Parmesano y un poco de queso Mozzarella fresco, dejando una orilla de ½–1 pulgada sin queso. Cerrar el sándwich y regresarlo sobre la parrilla.
segundos. Asar durante 4–6 minutos, o hasta que el queso esté derretido y que el pan esté bien dorado. 4. Dejar reposar durante 2 minutos. Cortar diagonalmente y servir caliente. * Puede asar el tocino a la parrilla antes de asar los panini. Abrir las placas y alzar los pies delanteros. Asar el tocino durante 6–8 minutos por cada lado, hasta que esté crujiente. Reservar, encima de papel toalla para absorber la grasa. Limpiar las placas cuidadosamente con papel toalla.
3. Colocar los sándwiches sobre la placa inferior y cerrar las placas, aplicando presión moderada sobre la agarradera durante 20 segundos. Asar durante 4–6 minutos, o hasta que el queso esté derretido y que el pan esté bien dorado. 4. Dejar reposar durante 2 minutos. Cortar en la mitad y servir inmediatamente.
1. Precalentar la parrilla en posición cerrada. 2. Cepillar levemente un lado de cada rebanada de pan con aceite. Poner 2 rebanadas de pan sobre una superficie plana, el lado con aceite apuntando hacia abajo. Armar los sándwiches, disponiendo en orden: el jamón, el tomate, la albahaca y el queso. Cerrar los sándwiches, el lado con aceite apuntando hacia arriba. 3. Colocar los sándwiches sobre la placa inferior y cerrar las placas, aplicando presión moderada sobre la agarradera durante 30 segundos.
2 Una delicia, perfecta para acompañar una taza de café. 4 Panini daneses para desayuno Cantidad: 2 panini 4 rebanadas de pan de pasas y canela 2 cucharadas de mantequilla sin sal, a temperatura ambiente onzas de queso crema, a 2 temperatura ambiente 1 pizca de sal kosher ¼ cucharadita de extracto natural de vainilla cucharadita de azúcar granulado 1 2 cucharadas de mermelada de albaricoque/chabacano/damasco (también puede usar mermelada de frambuesa o fresa) 1.
RECETAS Panini daneses para desayuno . . . . . . . . . . . . . . . . . . . . . . . . . . . . . . . . . . . . . . . 10 Panini de mantequilla de cacahuate y banano . . . . . . . . . . . . . . . . . . . . . . . . . . . 10 Panini de tomate, jamón Prosciutto y Mozzarella . . . . . . . . . . . . . . . . . . . . . . . . . 10 Panini de pavo ahumado, pimiento asado, queso suizo y mayonesa al pesto . . . . . . . . . . .
Todas marcas registradas o marcas de comercio mencionadas en ésta pertenecen a sus titulares respectivos.
GARANTÍA Garantía limitada de un año Esta garantía es para los consumidores solamente. Usted es un consumidor si ha comprado su aparato Cuisinart® en una tienda, para uso personal o casero. A excepción de los estados donde la ley lo permita, esta garantía no es para los detallistas u otros comerciantes.
Permita que el aparato caliente con las placas cerradas, El aparato puede demorar hasta 8 minutos para alcanzar la temperatura operativa. Cuando alcance la temperatura operativa, el indicador verde de “listo” se encenderá. Nota: El indicador verde se apagará y se volverá a encender durante el uso, cada vez que el termostato regule la temperatura de las placas. Esto es normal. Precaución: El cuerpo del aparato se vuelve muy caliente durante el uso. No lo toque.
1. Para abrir completamente las placas, utilice el botón de liberación de las bisagras. Botón de liberación de las bisagras 1. 2. Agarre la agarradera con la mano izquierda y presione el botón de liberación de las bisagras. Empuje la agarradera hacia atrás, hasta que 2. las dos placas estén al mismo nivel. La tapa permanecerá en esta posición hasta que la vuelva a cerrar.
INSTRUCCIONES DE ENSAMBLADO Utilice el Griddler® como sandwichera para asar pan, sándwiches o quesadillas . También permite asar carne de varios espesores, precisamente al gusto . el mismo espesor, para que se asen uniformemente . Función "sandwichera panini" La palabra “panini” significa “sándwiches a la parrilla” en italiano . Generalmente, los panini incluyen una combinación de ingredientes, como verduras, carne y queso, entre tajadas de pan fresco .
AVISO Para reducir el riesgo de electrocución, el cable 6 . de este aparato está dotado de una clavija polarizada (una pata es más ancha que otra) . Se podrá enchufar de una sola manera en la toma de corriente polarizada . Si no entrara en 3 la toma de corriente, inviértela . Si aún no entrara completamente, comuníquese con un electricista . 3 No intente modificarla . pieZas Y CaraCterÍstiCas 4 1 . Base y tapa Resistente cuerpo de acero inoxidable con bisagras flotantes . 2 .
ÍNDICE Medidas de seguridad importantes . . . . . . . . 2 Piezas y características . . . . . . . . . . . . . . . . . 3 Antes del prime uso . . . . . . . . . . . . . . . . . . . . 3 Instrucciones de ensamblado . . . . . . . . . . . 4-5 Instrucciones de operación . . . . . . . . . . . . . . 5 Instrucciones de mantenimiento . . . . . . . . . . 6 Instrucciones de limpieza . . . . . . . . . . . . . . . . .
INSTRUCCIONES & LIBRO DE RECETAS Cuisinart® Griddler® Parrilla/Sandwichera GR-11 Para su seguridad y para disfrutar plenamente de este producto, siempre lea las instrucciones cuidadosamente antes de usarlo.
Version no.