
Specifications


10
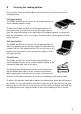
C Using the integrated drip tray
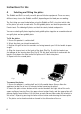
The Griddle and Grill has a clever fat drainage system. Fat is drained via a small recess at
the rear of the plates, allowing fat and grease to drip down into the integrated tray.
To insert the drip tray, insert it into the slot on the right side of the lower housing, The
edge of the drip tray with the curved shape should be inserted first. To remove the drip
tray, simply slide the tray out of the slot. Grease should be disposed of safely after cooking.
The drip tray can be washed in the dishwasher.
D Cooking with the Griddle & Grill
Once the plates and drip try are fitted and the cooking position has been selected, you are
ready to start cooking with the Griddle and Grill.
1. Ensure the unit is plugged into the mains power supply.
2. If you wish to control the temperature using the low, medium, high or sear settings, as
you would when grilling or pressing paninis, select the Grill/Panini setting on the selector
dial. The red light will illuminate to indicate that the power is on. You can then select the
desired heat level using the Grill/Panini dial.
3. If you would prefer to control the temperature using the temperature settings instead,
then select the Griddle setting on the selector dial. The red light will illuminate to indicate
that the power is on. You can then select the desired heat level using the Griddle dial.
4. When the Griddle and Grill reaches the correct temperature, the green light inside the
chosen control will illuminate to indicate that the appliance is ready to start cooking.
5. The green light will continue to turn on and off as the thermostat monitors the
temperature. This is normal.
N.B The first time you use the appliance, it may have a slight odour and may smoke a little.
This is normal and common to appliances with a non-stick surface.
When you have finished cooking, turn the selector the the ‘Off’ position and unplug the
power cord from the mains. Allow the appliance to cool for at least 30 minutes before
handling.