
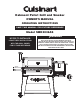
Owner's Manual


Step 2 Plug power cord into a GFCI (grounded) outdoor electrical
outlet. Use only a (GFCI) protected circuit with this pellet grill;
Never remove the grounding plug or use with an adapter of 2
prongs; and Use only extension cords with a 3 prong grounding
plug, rated for the power of the equipment, and approved for
outdoor use with a W-A marking.
Step 3 Open the pellet hopper lid. Make sure the auger is free from
debris and other objects. Turn the grill on by pushing the knob
inward and holding until the screen illuminates.
Step 4 In the cooking chamber, place your hand about 3” above the
repot and make sure you can feel air blowing out from the
repot.
Step 5 Look inside the repot and make sure the ignitor is getting hot.
It will take a couple of minutes for the ignitor to get hot. DO
NOT TOUCH THE IGNITOR! Turn the grill off by pushing
the knob inward and holding until the screen powers off and
displays “25”.
Step 6 Fill the pellet hopper with cooking pellets. NEVER USE
HEATING FUEL PELLETS AS THEY ARE NOT SAFE
FOR COOKING.
Step 7 Push and hold the control knob, the grill will start at 200°F.
NOTE: During the initial loading of the auger tube, it will
take approximately 2 minutes for the pellets to move
from the pellet hopper to the repot
Step 8 When the pellets start falling into the repot, push the control
knob inward and hold until the screen powers off and displays
“25”.
Step 9 Replace heat baffle, heat plate and cooking
grates into the cooking chamber.
Step 10 Keep the cooking chamber lid open. Turn the grill on to 200°F
by pushing the control knob inward and holding until the screen
turns on. You should see smoke coming out of the cooking
chamber as the pellets ignite in about 3 to 4 minutes.
NOTE: The ignitor will stay on for the rst 8 minutes and then
turn off.
Step 11 Close cooking chamber lid and set the temperature control
knob to the desired setting. See note below for curing process.
NOTE: Curing the grill is highly recommended before rst use. Close cooking chamber lid and
set temperature control knob to 400°F and allow grill to cure for 45 minutes. This will
burn off any oil or paint residue inside the cooking chamber before cooking for the rst
time.
SUBSEQUENT LIGHTING INSTRUCTIONS:
Step 1 Open pellet hopper lid and check the pellet level. Add more pellets if necessary.
WARNING: NEVER add cooking pellets to a hot repot by hand. You could be seriously
burned.
Step 2 Open cooking chamber lid and power on the grill to 200°F. You should see smoke coming out
of the cooking chamber as the pellets ignite in about 3 to 4 minutes.
NOTE: Always start the grill on 200°F (the default temperature) setting with the hood open.
Step 3 Close the hood and set the temperature control knob to the desired setting. To change the
temperature , push the knob in once and the SET temperature on the screen will ash. Once
its ashing, turn the knob to the desired temperature and select by pushing the knob inward
again. For best results, preheat the grill for 15 to 20 minutes with the hood closed before
placing food in the grill.
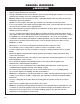
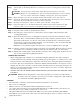
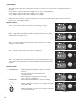
Control Panel
Temperature
Control Dial
Auger
Inside Pellet
Hopper
Firepot
6