INSTRUCTION BOOKLET Premium Single-Serve Coffeemaker SS-10 For your safety and continued enjoyment of this product, always read the instruction book carefully before using.
IMPORTANT SAFEGUARDS controls to Off, then remove plug from wall outlet. 12. Do not use appliance for other than its intended use. When using electrical appliances, basic safety precautions should always be taken to reduce the risk of fire, electric shock and/or injury to persons, including the following: 13. There is very hot water in the capsule chamber during the brew process. To avoid risk of injury, do not lift the handle or open the capsule chamber during the brew process. 1.
SPECIAL CORD SET INSTRUCTIONS If a grounding-type outlet is not available, an adapter, shown in Figure B, may be obtained so that a 2-slot wall outlet can be used with a 3-prong plug. As shown in Figure C, the adapter must be grounded by attaching its grounding lug under the screw of the outlet cover plate. A short power-supply cord is provided to reduce the risks resulting from becoming entangled in or tripping over a longer cord.
Contents Important Safeguards . . . . . . . . . . . . . . . . . . . . . 2 Important Unpacking Instructions . . . . . . . . . . . . 3 The Quest for the Perfect Cup . . . . . . . . . . . . . . 5 Features and Benefits. . . . . . . . . . . . . . . . . . . . . 6 Set-Up & First Brew . . . . . . . . . . . . . . . . . . . . . . 8 Setting Up Your Coffeemaker . . . . . . . . . . . . . . 8 Charcoal Water Filter . . . . . . . . . . . . . . . . . . . . . 9 Brewing. . . . . . . . . . . . . . . . . . . . . . . . . . . .
Element 1: The Quest for the Perfect Cup of Coffee WATER Any hot beverage is made up primarily of water. Often overlooked, the quality of the water is as important as the quality of the coffee, tea or cocoa. A good rule of thumb is that if your water doesn’t taste good from the tap, it won’t taste any better in your beverage. That’s why the Cuisinart® Premium Single-Serve Coffeemaker has added a charcoal water filter that removes chlorine, bad tastes and odors, for the purest cup every time.
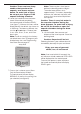
Features and Benefits 2 7 3 1 4 5 1a 5. Drip Tray 1. Charcoal Filter Holder 6. Drip Tray Base 1a. Charcoal Water Filter 7. Removable Capsule Holder 2. Water Reservoir Lid Removes for easy filling. 8. Handle Easy grip prevents slips. 3. Removable 72 oz. Water Reservoir Offers large capacity, eliminating the need for frequent refills. 9. Brewing Head 10. Brewing Chamber Holds HomeBarista™ Reusable Filter Cup or the Capsule Holder. 4. Removable Drip Tray Plate Allows extra space for travel mugs.
8 9 12 19 10 13 14 15 16 18 20 17 11 22 6 21. Power Cord (not shown) 12. Control Panel 13. Menu Button 14. Up Button ( 22. Power Switch (located on right side of Coffeemaker) ) 15. Down Button ( ) 23. BPA Free (not shown) All parts that come in contact with water or coffee are BPA free. 16. Brew Button 17. Rinse Button 18. Hot Water Button 19. HomeBarista™ Reusable Filter Cup 20. Reusable Filter Cup Compartment Conveniently stores your HomeBarista™.
Setup & First Brew NOTE: If coffeemaker has been exposed to temperatures below freezing, wait at least two hours for it to reach room temperature before brewing. An extremely cold Coffeemaker will not operate. IMPORTANT: Do not attempt to use your Cuisinart® Premium Single-Serve Coffeemaker until it has been set up for its first use as outlined below. Setting Up Your Coffeemaker 6. OPEN HEAD and AUTO OFF SET will be displayed.
Charcoal Water Filter Your coffeemaker comes with a charcoal water filter that eliminates chlorine, bad tastes and odors from tap water. Charcoal Water Filter holder figure 5 Note: We recommend changing the water filter every 60 days or after 60 uses, and more often if you have hard water. Replacement filters can be purchased in stores, by calling Cuisinart Customer Service, or at www.cuisinart.com. Charcoal Water Filter Brewing figure 4 1. The control panel will display OPEN HEAD while in Idle mode.
Note: There may be a short pause before the brewing process begins. The entire brew process lasts approximately 1–2 minutes, depending on brew size selected, and ends with a burst of air to remove all liquid from the capsule. Caution: There are two sharp needles that puncture the capsule, one above and one below. To avoid risk of injury, do not put your fingers in the capsule brewing chamber. 6. Lower the handle to close the brew head.
Hot Water/Rinse To make Hot Water: 1. Place a cup or mug on the drip tray. Your coffeemaker is equipped to dispense hot water to make hot chocolate, tea, soup, and more. Your coffeemaker is also equipped with a Rinse cycle to flush out residual flavors. The Rinse cycle will dispense about 4 oz. of hot water. 2. Lift the handle. Check to make sure there is no capsule inserted. 3. Lower the handle to close the brewing chamber. When closed completely, the control panel will indicated READY.
Brewing with the HomeBarista™ Reusable Filter Cup (included) 6. Open brew head. Remove the capsule holder from the brewing chamber by pulling up. (If you would like, store the capsule holder in the HomeBarista™ storage compartment.) The Cuisinart® Premium Single-Serve Coffeemaker can be used with a Reusable Filter Cup, which allows you to use your own ground coffee. The dishwasher-safe, capsule conveniently stores in the easy-open compartment. 7. Drop the assembled HomeBarista™ into the brewing chamber.
Stopping the Brew Process Programming Setting the Clock If for any reason you need to stop brewing after the process has started, press the BREW button, OR press the power switch on the rear right side of the coffeemaker to turn the coffeemaker off. The flow of coffee, tea or hot cocoa will stop, the heater will shut off, and the blue lights illuminating the control panel will turn off. Setting the clock is optional. When the clock is set, the time will appear on the control panel.
Clock set in READY Mode Set Hours figure 15 figure 16 b. Press or hold the button to advance one hour at a time, up to 9 hours. Note: Depending upon the coffeemaker’s current mode, other icons will be displayed as well. c. After setting the desired AUTO OFF TIME, continue pressing Menu to scroll through the remaining Programming functions to exit the programming mode. If left untouched, unit will exit Programming mode after 30 seconds.
d. If you want to set an OFF TIME, use the or buttons as above. If not, continue to next step. 3. Program your coffeemaker for a specific ON and/or OFF TIME. By programming your coffeemaker to turn on each morning, you will never have to wait to start brewing your cup of coffee. Note: To use this feature, the clock must be set to the correct time. e. To complete the process, press the Menu button to set the OFF TIME.
Programming Brew Temperature Programming Your Brew Size The coffeemaker’s default brew size preset is 8 oz. The default brew size lets you choose the brew size most often used. The coffeemaker brews at a pre-set temperature of XHOT. If you prefer a cooler cup of coffee, hot water, tea, or cocoa, you may adjust this temperature down to HOT. Simply follow the instructions below. To change the default brew size to your desired brew size: 1. Press the Menu button until BREW SIZE flashes (see figure 22). 1.
Cleaning & Maintenance Cleaning the Capsule Holder CAUTION: There are sharp needles that puncture the capsule above and below. To avoid risk of injury, do not put your fingers in the capsule brewing chamber. Cleaning External Parts We recommend regular cleaning of the coffeemaker’s external components. 1. Never immerse the coffeemaker in water or other liquids. The housing and other external components may be cleaned with a soapy, damp, non-abrasive cloth. 1.
De-Scaling Your Coffeemaker Replace funnel onto capsule holder by lining up tabs in funnel with notches on capsule holder, twist toward you until it locks into place. After cleaning, replace capsule holder, being sure to align the arrow on the capsule holder rim with arrow on the brewing chamber. Mineral content in water varies from place to place. Depending on the mineral content of the water in your area, calcium deposits or scale may build up in your coffeemaker.
Follow these steps to de-scale your unit: 1. Empty the reservoir. 2. Disable the AUTO OFF and OFF TIME features. 3. Making sure there is no capsule in the brewing chamber, fill the reservoir with 20 oz. of white vinegar, plus 40 oz. of water. 4. Place a large mug on the drip tray. Press and hold the HOT WATER and RINSE buttons to start the de-scale process. Discard contents of mug. 5. Repeat Step 4 until ADD WATER is displayed on the control panel. 6.
Troubleshooting Problem: Solution: Coffeemaker does not have power. Plug coffeemaker into an independent outlet. Make sure the coffeemaker is securely plugged in. Plug into a different outlet. Reset your home’s circuit breaker. Confirm the power has been turned on and the LCD is illuminated. Coffeemaker will not brew.
LIMITED THREE-YEAR WARRANTY (U.S. and CANADA only) The retail store shall then, at its discretion, either repair the product, refer the consumer to an independent repair facility, replace the product, or refund the purchase price less the amount directly attributable to the consumer’s prior usage of the product.
©2016 Cuisinart 150 Milford Road East Windsor, NJ 08520 Printed in China 16CE014223 F IB-13633-ESP
MANUAL DE INSTRUCCIONES Cafetera monodosis de calidad suprema SS-10 Para su seguridad y para disfrutar plenamente de este producto, siempre lea cuidadosamente las instrucciones antes de usarlo.
MEDIDAS DE SEGURIDAD IMPORTANTES Siempre apague el aparato (OFF) antes de desconectarlo. 12. No utilice el aparato para ningún otro fin que no sea el indicado. Al usar aparatos eléctricos, siempre debe tomar precauciones básicas de seguridad para reducir el riesgo de incendio, electrocución o heridas, incluso las siguientes: 13. El agua que circula dentro de la cámara de preparación durante el ciclo de preparación está muy caliente.
USO DE EXTENSIONES Si una toma de corriente con toma de tierra no está disponible, se podrá usar un adaptador para conectar el aparato a una toma de corriente sin toma de tierra (Fig. B). El adaptador debe ser puesto a tierra mediante un tornillo de metal que conecte la lengüeta del adaptador a la placa de la toma de corriente (Fig. C). El cable provisto con este aparato es corto, para reducir el peligro de que alguien se enganche o tropiece con un cable más largo.
Índice Medidas de seguridad importantes . . . . . . . . . . 2 Importantes instrucciones de desembalaje . . . 3 Sugerencias para la preparación de un buen café. . . . . . . . . . . . . . . . . . . . . . . . . . . . 5 Piezas y características . . . . . . . . . . . . . . . . . . 6 Antes del primer uso . . . . . . . . . . . . . . . . . . . . . 8 Preparación de la cafetera . . . . . . . . . . . . . . . . . 8 Filtro de carbón. . . . . . . . . . . . . . . . . . . . . . . . . . 9 Instrucciones de preparación . . .
Elemento 1: Sugerencias para la preparación de un buen café EL AGUA El ingrediente principal de cualquier bebida caliente es el agua. Por lo tanto, la calidad del agua es tan importante como la del café, té o chocolate. Si el agua tiene mal sabor, el café, té o chocolate tendrá mal sabor. Por eso Cuisinart equipó su cafetera monodosis con un filtro de carbón que elimina el cloro y el mal sabor y olor, para preparar café, té o chocolate puro, taza tras taza.
Piezas y características 2 7 3 1 4 5 1a 5. Bandeja de goteo 1. Soporte del filtro de agua 6. Base de la bandeja de goteo 1a. Filtro de carbón 7. Porta-cápsulas removible 2. Tapa del depósito de agua Removible, para facilitar el llenado. 8. Asa Antideslizante. 3. Depósito de agua removible de 72 onzas (2.1 L) Alta capacidad, para no tener que volver a llenarlo a menudo. 9. Cabezal de preparación 10. Cámara de preparación Para cápsula monodosis o la cápsula reutilizable HomeBarista™. 4.
8 9 12 19 10 13 14 15 16 18 20 17 11 22 6 20. Compartimiento de almacenaje Para guardar la cápsula reutilizable HomeBarista™. 12. Panel de control 13. Botón de programación 14. Flecha ascendente ( 15. Flecha descendente ( ) 21. Cable (no ilustrado) ) 16. Botón de preparación 22. Interruptor (en la parte lateral) 17. Botón para enjuagar el sistema 18. Botón para servir agua caliente 19. Cápsula reutilizable HomeBarista™ 7 23.
Preparación de la cafetera y primera preparación IMPORTANTE: siga las instrucciones de preparación a continuación antes de utilizar su cafetera monodosis Cuisinart® por primera vez. Preparación de la cafetera NOTA: si el aparato ha sido expuesto a temperaturas inferiores al punto de congelación, espere dos horas o más antes de usarlo. El aparato no funcionará debidamente si está muy frío. 6. La pantalla mostrará “OPEN HEAD” y “AUTO OFF SET”.
Filtro de carbón Filtro de carbón Su cafetera está equipada con un filtro de carbón que elimina el cloro y el mal olor/sabor del agua corriente. Depósito de agua Soporte del filtro de carbón Fig. 5 Nota: le aconsejamos que cambie el filtro de agua cada 60 días o 60 usos, o más frecuentemente si el agua es dura. Los filtros de repuesto están disponibles en las tiendas especializadas, en nuestro sitio web www.cuisinart.com, o llamando a nuestro servicio postventa al 1-800-726-0190.
Nota: puede que la unidad marque una pausa corta antes de iniciar el ciclo de preparación. El proceso de preparación demorará aproximadamente 1 minuto y terminará con un chorro de aire para sacar todo el líquido de adentro de la cápsula. Precaución: hay dos agujas en el porta-cápsula (una arriba y una en el fondo), cuyo papel es perforar las cápsulas. Para evitar las heridas, no meta los dedos en el porta-cápsulas. 6. Baje el asa para cerrar la cámara de preparación.
Cómo servir agua caliente/enjuagar el sistema interno Para servir agua caliente: 1. Coloque una taza en la bandeja de goteo 2. Alce el asa. Abra la cámara de preparación para asegurarse de que no contenga ninguna cápsula. Su cafetera monodosis sirve agua caliente, para permitirle preparar chocolate, té, sopa instantánea y mucho más. También incluye una función de enjuague que enjuaga el sistema interno para eliminar los sabores residuales.
Preparación con la cápsula reutilizable HomeBarista™ Guarde el porta-cápsulas en el compartimiento lateral si desea. 7. Introduzca la cápsula reutilizable HomeBarista™ en la cámara de preparación, sin empujar (Fig. 12). La cafetera monodosis Cuisinart® también le deja preparar café con una cápsula reutilizable (incluida), un método que le permite usar su propio café molido La cápsula reutilizable HomeBarista™, apta para lavavajillas, se encuentra en el compartimiento lateral de la cafetera. 1.
Cómo interrumpir el ciclo de preparación Programación Si en algún momento necesita interrumpir el ciclo de preparación, presione el botón BREW U oprima el interruptor ubicado en el lado de la cafetera; esto apagará el aparato. El flujo de café, té o chocolate se detendrá, la resistencia se apagará y las luces que iluminan el panel de control y la pantalla se apagarán. La programación de la hora es opcional. Después de fijar la hora, esta aparecerá en la pantalla.
Hora fijada Botón para fijar la hora Fig. 15 Fig. 16 b. Oprima repetidamente o mantenga oprimido el botón para fijar el tiempo de apagado automático, de 1 a 9 horas después de la preparación. Nota: otros iconos también pueden aparecer en la pantalla, según las funciones programadas. Nota: deberá volver a fijar la hora después de un corte eléctrico. Siga los mismos pasos para volver a fijar la hora. c. Siga oprimiendo el botón MENU hasta salir del modo de programación.
3. CÓMO PROGRAMAR LA HORA DE ENCENDIDO/APAGADO AUTOMÁTICO Programar la hora de encendido automático le permitirá disfrutar de una taza de café fresco cada mañana, sin necesidad de esperar que el agua caliente. Nota: para usar esta función, la hora debe ser fijada. Fija los minutos Importante: la cafetera debe estar apagada para que funcione el encendido automático. Fija la hora Fig. 19 d. Utilice los botones y para programar la hora de apagado automático.
Siga oprimiendo el botón MENU hasta salir del modo de programación. Nota: otros iconos también pueden aparecer en la pantalla, según las funciones programadas. Nota: siempre baje la temperatura por defecto en altitud (5000 pies o más). g. Para desactivar la hora de encendido/apagado automático, oprima el botón MENU repetidamente hasta que “ON/OFF TIME SET” empiece a parpadear. Oprima repetidamente el botón hasta que OFF (apagado) aparezca en la pantalla.
Limpieza y mantenimiento Limpieza del porta-cápsulas PRECAUCIÓN: hay dos agujas en el porta-cápsulas (una arriba y una en el fondo), cuyo papel es perforar las cápsulas. Para evitar las heridas, no meta los dedos en el porta-cápsulas. Limpieza de los componentes externos Le recomendamos que limpie el cuerpo del aparato regularmente. 1. El porta-cápsulas es apto para lavavajillas (nivel superior solamente), siempre que use baja temperatura para lavar. Alce el asa para abrir la cámara de preparación.
Precaución: enjuague el depósito con abundante agua después de limpiarlo a fin de evitar que rastros de detergente contaminen el agua. Eliminación del sarro Según el lugar donde vive, el agua puede ser más o menos dura, es decir contener una concentración de minerales más o menos alta. Cuando usa agua dura, depósitos de calcio (sarro) pueden acumularse en las partes internas de su cafetera. El sarro no es tóxico, pero puede afectar el rendimiento del aparato.
Siga los pasos siguiente para eliminar el sarro: 1. Vacíe el depósito de agua. 2. Desactive las funciones de apagado automático si están programadas. 3. Asegúrese de que el porta-cápsulas esté vacío y llene el depósito con 20 onzas (590 ml) de vinagre blanco y 40 onzas (1.2 L) de agua. 4. Coloque una taza grande en la bandeja de goteo, elija el tamaño “12 onzas” y oprima el botón HOT WATER. Tire el contenido de la taza. 5.
Resolución de problemas Problema: Solución: La cafetera no se enciende. Conecte el aparato a una toma de corriente que no esté activada por un interruptor de luz. Asegúrese de que el cable esté debidamente conectado. Conecte el aparato a otra toma de corriente. Revise los disyuntores/interruptores del tablero eléctrico. Oprima el interruptor y averigüe que la pantalla está iluminada. La cafetera no inicia el ciclo de preparación.
GARANTÍA LIMITADA DE TRES AÑOS (válida en los EE.UU. y en Canadá solamente) La tienda, a su opción, reparará el producto, referirá al consumidor a un centro de servicio independiente, cambiará el producto o reembolsará al consumidor por el precio original del producto, menos la cantidad imputable al uso del producto por el consumidor hasta que este se dañe.
©2016 Cuisinart 150 Milford Road East Windsor, NJ 08520 Impreso en China 16CE014223 F IB-13633-ESP