INSTRUCTION BOOKLET Cuisinart® Coffee Center™ SS-15 Series For your safety and continued enjoyment of this product, always read the instruction book carefully before using.
IMPORTANT SAFEGUARDS 18. Do not lift handle to open the lid of the Coffeemaker while brewing is in progress. 19. Do not overfill the water reservoir with water. Use ONLY WATER in this appliance! Do not put any other liquids or foods in the water reservoir except as instructed in the cleaning instructions in this guide. When using electrical appliances, basic safety precautions should always be taken to reduce the risk of fire, electric shock and/or injury to persons, including the following: 1.
WARNING: RISK OF FIRE OR ELECTRIC SHOCK NOTICE This appliance has a polarized plug (one blade is wider than the other). To reduce the risk of electric shock, this plug will fit into a polarized outlet only one way. If the plug does not fit fully into the outlet, reverse the plug. If it still does not fit, contact a qualified electrician. Do not modify the plug in any way.
CONTENTS THE QUEST FOR THE PERFECT CUP OF COFFEE Important Safeguards . . . . . . . . . . . . . . . . . . .2 Unpacking Instructions . . . . . . . . . . . . . . . . . .4 The Quest for the Perfect Cup of Coffee . . . .4 ELEMENT 1: WATER Features and Benefits . . . . . . . . . . . . . . . . 5–6 Hot beverages are made up primarily of water. If water doesn’t taste good from the tap, it won’t taste good in your drink.
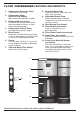
12-CUP COFFEEMAKER FEATURES AND BENEFITS 1. Coffeemaker Reservoir Cover 8. Flips back for easy filling. 2. 3. Eliminates chlorine, bad tastes and odors from tap water. Coffeemaker Water Reservoir (not shown) With water level indicator window. Showerhead (not shown) 9. 10. Cord Storage (not shown) 11. Filter Basket (not shown) Coffeemaker Control Panel Holds a #4 paper filter or a permanent filter. See detailed illustration, page 7. 5. Brew Pause 12. Filter Basket Holder (not shown) 13.
SINGLE-SERVE COFFEEMAKER FEATURES AND BENEFITS 15. Brewer Handle 16. Brew Head 17. Brewing Chamber 22. 23. 24. 25. 26. 27. 28. Holds Removable Capsule Holder or reusable filter cup. 18. Control Panel 6 oz. button; 8 oz. button; 10 oz. button; Add Water and Clean indicators. Charcoal Water Filter Holder Charcoal Water Filter Reservoir Lid 40-Ounce Water Reservoir Removable Capsule Holder Power Cord (not shown) Energy-Saving Mode (not shown) Unit lights will dim after 30 minutes of being idle.
GETTING TO KNOW YOUR CONTROL PANEL 12-CUP COFFEEMAKER CONTROLS Detailed programming and use instructions are on pages 8–10. 1. Power Switch (not shown) 7. Function Knob a. PROG Located on the right side of your brewer. Use to turn your Coffeemaker on and off. Select to program Auto On time. Coffeemaker can be programmed to automatically start brewing up to 24 hours in advance. 2. Clock Display Displays time of day, Auto On, and Auto Off times. b. AUTO ON 3.
SETTING UP YOUR 12-CUP COFFEEMAKER CHARCOAL WATER FILTER INITIAL CLEANING INSERTING THE WATER FILTER Perform an initial cleaning before making your first beverage. Follow these instructions, without adding coffee. 1. Insert charcoal water filter if you haven’t already. Instructions above. 2. Fill water reservoir. 1. Remove the filter from the polybag and soak, fully immersed, in cold tap water for 15 minutes. 2. Lift the water filter holder out of the water reservoir the 12-Cup Coffeemaker side. 3.
SETTING THE AUTO-ON TIME Plug the cord into an electrical outlet. 4. Set preferences When you turn the Function knob to PROG, the previously selected Auto On time, or the default time (12:00) will flash. a. Push the BOLD button if would like a stronger brew. BOLD button will illuminate. b. Turn the Carafe Temperature dial to Low (L), Medium (M), or High (H) and heater plate will keep coffee at the temperature you select. 1. Turn the Function knob to PROG.
12-CUP COFFEEMAKER CLEANING AND MAINTENANCE 1. Fill the water reservoir to capacity with a mixture of 1⁄3 white vinegar and 2⁄3 water. 2. Press and hold the CLEAN button. When the CLEAN LED indicator flashes, the coffeemaker is in Clean mode. Release the button. Always turn unit off and remove the plug from the electrical outlet before cleaning. 3. When the cycle is completed, 5 beeps will sound and the coffeemaker will shut off. Lift up the Coffeemaker reservoir cover.
SETTING UP YOUR SINGLE-SERVE COFFEEMAKER 7. Press the 10 oz. cup button. Light will flash slowly and the hot water will start to dispense momentarily. INITIAL CLEANING 8. The one-time cleaning process is complete. Discard hot water. Your brewer is ready to use. 6. Place mug on the drip tray. Perform an initial cleaning before making your first beverage. Follow these instructions, without inserting a capsule. 1. Insert charcoal water filter if you haven’t already. Instructions on page 8.
BREWING WITH THE HOMEBARISTATM REUSABLE FILTER CUP 7. Press the desired brew button (6, 8, or 10 oz.). The beverage will start to dispense momentarily. Selected brew button will flash slowly while brewing. The Single-Serve Coffeemaker can be used with a reusable coffee capsule, which allows you to use your own ground coffee. Try the Cuisinart® HomeBarista™ Reusable Filter Cup included with your brewer for your favorite coffee or tea. 1.
2. Cleaning the Funnel – To remove funnel from capsule holder, hold funnel in left hand, twist bottom away from you slightly and pull away from capsule holder to remove. The funnel is top-rack dishwasher safe. 2b. Follow brewing instructions on page 11. NOTE: To cancel brewing, simply press the selected brew size once again and the brewing process will be stopped. NOTE: The funnel may be tight the first few times you go to remove it; this is normal and will loosen with continued use.
CLEANING THE HOMEBARISTATM REUSABLE FILTER CUP 4. Discard contents of mug into the sink. Simply dispose of coffee grounds, then handwash both the filter cup and filter, or clean on top rack of dishwasher. 6. When descaling is complete, all LED lights will be on. 5. Repeat until ADD WATER light comes on. 7. Discard any remaining diluted vinegar into sink. CLEANING THE WATER RESERVOIR Step 2: Fresh Water Rinse 1. Repeat Step 1 three times, using fresh water in place of vinegar.
LIMITED THREE-YEAR WARRANTY (U.S. and Canada only) to be defective within the warranty period, we will repair or, if we think necessary, replace it. To obtain warranty service, please call our Consumer Service Center toll-free at 1-800-726-0190 or write to: Cuisinart, 7475 North Glen Harbor Blvd, Glendale, AZ 85307. To facilitate the speed and accuracy of your return, please enclose $10.00 for shipping and handling of the product, along with proof of purchase.
©2016 Cuisinart 150 Milford Road East Windsor, NJ 08520 Printed in China 16CE014230 F IB-13634-ESP
MANUAL DE INSTRUCCIONES Cuisinart® Coffee Center™ Serie SS-15 Para su seguridad y para disfrutar plenamente de este producto, siempre lea cuidadosamente las instrucciones antes de usarlo.
MEDIDAS DE SEGURIDAD IMPORTANTES 16. No ponga la jarra caliente sobre una superficie húmeda o fría. 17. No utilice la jarra si estuviese rajada o si el asa estuviese floja. 18. No abra la tapa durante el funcionamiento. 19. No sobrellene el depósito de agua. ¡Utilice SOLAMENTE AGUA en este aparato! No ponga ningún otro líquido u alimento en el depósito, a excepción de cuando sea para limpiarlo, según las instrucciones indicadas en este manual.
ADVERTENCIA: RIESGO DE INCENDIO O ELECTROCUCIÓN AVISO El cable de este aparato está dotado de una clavija polarizada (una pata es más ancha que la otra). Como medida de seguridad, se podrá enchufar de una sola manera en la toma de corriente polarizada. Si no entrara en la toma de corriente, inviértala. Si aún no entrara completamente, comuníquese con un electricista. No intente modificarla.
ÍNDICE Instrucciones de desembalaje . . . . . . . . . . . . .4 SUGERENCIAS PARA LA PREPARACIÓN DE UN BUEN CAFÉ Sugerencias para la preparación de ELEMENTO 1: EL AGUA un buen café . . . . . . . . . . . . . . . . . . . . . . . . . .4 El ingrediente principal de cualquier bebida caliente es el agua. Si el agua tiene mal sabor, el café tendrá mal sabor. Por eso Cuisinart equipó su cafetera con un filtro de agua de carbón que elimina el cloro y el mal sabor y olor, para preparar café puro, taza tras taza.
PIEZAS Y CARACETRÍSTICAS DE LA CAFETERA DE 12 TAZAS (1.75 L) 1. Tapa del depósito de agua de la cafetera 9. 2. Depósito de agua de la cafetera (no ilustrado) Con indicador de nivel de agua. Rociador de agua (no ilustrado) Articulada, para facilitar el llenado. 3. Mantiene el café a la temperatura deseada. Revestimiento antiadherente y a prueba de rayas. 10. Espacio para guardar el cable (no ilustrado) 11.
PIEZAS Y CARACETRÍSTICAS DE LA CAFETERA MONODOSIS 15. Asa 16. Tapa de la cámara de preparación 17. Cámara de preparación 22. 23. 24. 25. Soporte del filtro de agua de carbón Filtro de agua de carbón Tapa del depósito de agua Depósito de agua removible de 40 onzas (1.2 L) 26. Porta-cápsulas removible 27. Cable (no ilustrado) 28. Modo de ahorro de energía (no ilustrado) Para cápsulas monodosis desechable o reutilizable. 18.
PANEL DE CONTROL CONTROLES DE LA CAFETERA DE 12 TAZAS (1.75 L) Véase las instrucciones detalladas de programación en las páginas 8–10. 1. Botón de encendido/apagado (no ilustrado) 7. Selector de función a. PROG Ubicado en el costado derecho de la unidad. Permite encender y apagar el aparato. Permite programar el encendido automático. Preparación programable hasta con 24 horas de antelación. 2. Pantalla digital Indica la hora del día, la hora de encendido automático y el tiempo de apagado automático.
PREPARACIÓN DE LA CAFETERA DE 12 TAZAS (1.75 L) FILTRO DE AGUA DE CARBÓN INSTALACIÓN DEL FILTRO DE AGUA LIMPIEZA INICIAL Limpie el sistema interno antes del primer uso, según se indica a continuación. Nota: no use café durante la limpieza inicial. 1. Si aún no lo ha hecho, instale el filtro de agua de carbón (véase las instrucciones más arriba). 2. Llene el depósito de agua con agua. 1. Retire el filtro de la bolsa de plástico y remójelo en agua fría durante 15 minutos. 2.
cerca del número deseado, suelte el botón y avance un número a la vez. Cerciórese de que el indicador “PM” aparezca en la pantalla si desea fijar una hora de tarde/noche. Para confirmar la hora programada, ponga el selector de función en otra posición o simplemente espere hasta que la hora deje de parpadear. temperatura del café en la jarra. Ponga la perilla CARAFE TEMP en la posición deseada: “H” (alto), “M” (medio) o “L” (bajo).
Mantenimiento: Cualquier otro servicio debe ser realizado por un técnico autorizado. NOTA: la tapa del depósito de agua puede estar caliente; permita que se enfríe por 10 minutos antes de abrirla. ELIMINACIÓN DEL SARRO Con el tiempo, depósitos de calcio (sarro) se acumulan sobre las piezas metálicas de la cafetera. Para eliminar el sarro Cuando usa agua dura, depósitos de calcio (sarro) pueden acumularse en las partes internas de su cafetera.
PREPARACIÓN DE LA CAFETERA MONODOSIS 6. Coloque una taza en la bandeja de goteo 7. Presione el botón de preparación para taza de 10 onzas (295 ml). La luz parpadeará lentamente y el agua empezará a bajar poco después.. LIMPIEZA INICIAL Limpie el sistema interno antes del primer uso, según se indica a continuación. Nota: no use cápsula durante la limpieza inicial. 1. Si aún no lo ha hecho, instale el filtro de agua de carbón (véase las instrucciones en la página 8). 8.
PREPARACIÓN CON LA CÁPSULA REUTILIZABLE HOMEBARISTA™ 7. Elija el tamaño de taza deseado: 6 onzas (175 ml), 8 onzas (235 ml) o 10 onzas (295 ml). El café o la bebida caliente empezarán a salir del pico poco después. El indicador del botón de preparación seleccionado parpadeará durante la preparación. Su cafetera monodosis también le deja preparar café con una cápsula reutilizable, un método que le permite usar su propio café molido.
NOTA: puede que el embudo sea apretado las primeras veces que lo saque; esto es normal. Se aflojará con el tiempo. Precaución: hay dos agujas en el portacápsulas (una arriba y una en el fondo), cuyo papel es perforar las cápsulas. Para evitar las heridas, no meta los dedos en el porta-cápsulas. 3. Después del ciclo de preparación, alce el asa y retire la cápsula reutilizable. Advertencia: la cápsula reutilizable estará caliente. 4.
LIMPIEZA DE LA CÁPSULA REUTILIZABLE HOMEBARISTA™ 4. Al final del ciclo de limpieza, tire el contenido de la taza. 5. Repita estos pasos hasta que el indicador de nivel bajo se encienda. Simplemente tire los posos de café y lave la cápsula y el porta-cápsula a mano, o en la bandeja superior del lavavajillas. 6. Cuando el sistema interno esté limpio, todas las luces se encenderán. LIMPIEZA DEL DEPÓSITO DE AGUA 7. Tire la mezcla de vinagre/agua restante.
GARANTÍA LIMITADA DE TRES AÑOS (válida en los EE.UU. y en Canadá solamente) materiales o fabricación durante el período de garantía, la reparemos o reemplazaremos (a nuestra opción). Para obtener servicio bajo esta garantía, llame a nuestra línea directa gratuita al 1-800-726-0190 o regrese el aparato defectuoso a: Cuisinart, 7475 North Glen Harbor Blvd, Glendale, AZ 85307. Regrese el aparato defectuoso, junto con su recibo de compra y un cheque o giro postal de US$10.
©2016 Cuisinart 150 Milford Road East Windsor, NJ 08520 Impreso en China 16CE014230 F IB-13634-ESP