
Product Manual


4. Installation2-2017
37A055H194 (Issue 3) Copyright © 2017 Cummins Inc.
NOTICE
Class 1 wiring methods must be used for connecting the generator set.
Electrical Preparations
1. Run all wires through a single conduit (unless prohibited by the authority having
jurisdiction).
NOTICE
Be sure to account for any needed accessories, such as a remote
display, etc.
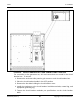
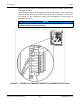
2. Connect the conduit to the generator set. Refer to the specific outline drawing in
the Outline and System Drawings section for the size and location of the hole
provided for electrical conduit connection. The existing hole may be increased
in size to match conduit used.
AC Connections
WARNING
Automatic startup of the generator set during installation can cause severe
personal injury or death.
Make sure the generator set is shut down and disabled:
1. Push the control switch OFF to stop the generator set. Allow the
generator set to thoroughly cool to the touch.
2. Turn off and disconnect the battery charger from the AC source before
disconnecting the battery cables.
3. Disconnect the negative (–) cable from the battery and secure it from
contacting the battery terminals to prevent accidental starting.
NOTICE
If a 100% rated breaker is used, 90 °C wire must be used for L1, L2, and L3
with the wire size determined by the 75 °C ampacity tables.
NOTICE
When using a circuit breaker with an adjustable, electronic trip unit, the
amperage and trip curve settings may need adjustment to match the
generator set load wiring, or downstream loads and circuit breakers. An
accessory seal kit (part number A026M166 is available to tamper-proof the
adjustable settings.
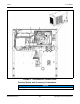
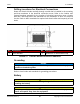
For grounding and neutral connections, look for the following symbols on the
generator set circuit breaker box.