Prime Drop-In Chiller™ Instructions for Drop-In Coil Model #2600,2601,2602,2603 Warning and Safety Instructions ....... Page 2 Chiller Installation ....... Page 3 Temperature Controller Installation ....... Page 5 Programming Temperature Controller ....... Page 6 Warranty ....... Page 8 EMAIL:INFO@CURRENT-USA.COM WWW.CURRENT-USA.
Safety Instructions WARNING To guard against injury, basic safety precautions should be observed, including the following: READ AND FOLLOW ALL SAFETY INSTRUCTIONS DANGER To avoid possible electric shock, special care should be taken since water is employed in the use of aquarium equipment. For each of the following situations, do not attempt repairs by yourself. Return the appliance to your retailer or discard the appliance.
Chiller installation 1. Before removing your Prime Chiller from the box, please note any exterior shipping damage to the box. It is strongly recommended to keep the box and packaging material in the unlikely event there is shipping damage or service is required. 2. Remove the chiller and controller from the box and inspect thoroughly for any signs of damage, even if the box does not show damage. If you notice any damage (cracked or bent cover, damaged condenser, fins, etc...
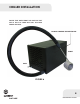
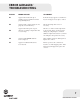
Chiller installation Ensure that both front and back of unit are at least 24" from any wall to allow proper air flow. Do not submerse coil below line Front Back Figure A WWW.CURRENT-USA.
Temperature Controller specifications/Installation Prime Chiller Temperature Controller This microprocessor based electronic temperature controller is designed to provide on/off control of heating and cooling. It is equipped with an easy to read Liquid Crystal Display (LCD) that displays a constant readout of actual temperature, control settings, relay status and system diagnostics.
Programming Temperature Controller 1. Press the SET key once to access the Fahrenheit/Celsius mode. Press the UP or DOWN arrow to modify the setting. 2. Press the SET key again to access the set point. The LCD displays the set point and S1 will be blinking on and off indicating it is in the set point mode. Press the UP or DOWN arrow to modify the set point. 3. Press the SET key again to access the differential.
Error Messages/ troubleshooting Display Error Message To Correct E1 Appears when either the up or downkey is pressed when not in the programming mode. If the E1 message appears even when no keys are being pressed, replace control. E2 Appears if the control settings are not properly stored in memory. Check all settings and correct if necessary. Appears when the probe is open, shorted or sensing a temperature that is out of range. Check to see if the sensed temperature is out of range.
Warranty Current USA, Inc. One-Year Limited Warranty Current USA, Inc. warrants this product against defects in materials and workmanship for a period of ONE (1) YEAR from the date of original retail purchase. Light Bulbs carry a 3 month warranty. Note: Current-USA, Inc. One-Year Limited Warranty does not cover damage caused by the following: Improper installation, saltwater corrosion, and electrical surges. If you discover a defect, Current USA, Inc.