USER GUIDE 4.3.
Copyright© 2015, Polycom, Inc. All rights reserved. No part of this document may be reproduced, translated into another language or format, or transmitted in any form or by any means, electronic or mechanical, for any purpose, without the express written permission of Polycom, Inc. 6001 America Center Drive San Jose, CA 95002 USA Trademarks Polycom®, the Polycom logo and the names and marks associated with Polycom products are trademarks and/or service marks of Polycom, Inc.
Contents Conventions Used in This Guide . . . . . . . . . . . . . . . . . . . . . . . . . . . . . . . . . . . . . . . 4 Information Elements . . . . . . . . . . . . . . . . . . . . . . . . . . . . . . . . . . . . . . . . . . . . . . . . . . . . . . . . . 4 Typographic Conventions . . . . . . . . . . . . . . . . . . . . . . . . . . . . . . . . . . . . . . . . . . . . . . . . . . . . . 5 Before You Begin . . . . . . . . . . . . . . . . . . . . . . . . . . . . . . . . . . . . . . . . . . . . . . . . . . .
Conventions Used in This Guide This guide contains terms, graphical elements, and a few typographic conventions. Familiarizing yourself with these terms, elements, and conventions will help you successfully perform tasks. Information Elements This guide may include any of the following icons to alert you to important information.
Conventions Used in This Guide Typographic Conventions A few typographic conventions, listed next, are used in Polycom guides to distinguish types of in-text information. Typographic Conventions Convention Description Bold Highlights interface items such as menus, menu selections, window and dialog names, soft keys, file names, and directory names when they are involved in a procedure or user action. Also used to highlight text to be entered or typed.
Before You Begin The User Guide for the Polycom VisualBoard Technology Application with Polycom RealPresence Group Series explains how to use the Polycom VisualBoard application with Polycom RealPresence Group systems, including annotating, working with slides, and capturing content. It also explains how to install a touch monitor. Note: Former name of the application The Polycom VisualBoard Technology application was formerly known as the Polycom ActiveTouch application.
Introduction The Polycom VisualBoard application allows you to show and annotate content in real time from Polycom video conferencing systems by using an electronic annotation device such as a touch screen monitor. You can use the monitor as your only content monitor or you can use it in addition to your current content monitor. When using a touch screen monitor, you can annotate the content using your finger, a stylus, or a mouse.
Use the Polycom VisualBoard Application After you install and configure the Polycom VisualBoard application, perform the following tasks that are described in the next sections: ● Start and Exit the VisualBoard Application ● Annotate with VisualBoard ● Work with Slides ● Troubleshoot If you have not yet installed and configured the Polycom VisualBoard application, refer to Install and Configure a Touch or Standard Monitor.
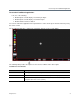
Use the Polycom VisualBoard Application To start the VisualBoard application: » Do one of the following: Double-tap the content display screen with your finger. Double-tap the content display screen with a stylus. Double-click the left mouse button. You can also launch the application from a paired device such as the Polycom Touch Control or by using the remote control. The VisualBoard application, shown in the next figure, appears on the second display.
Use the Polycom VisualBoard Application To exit the Polycom VisualBoard application: » Do one of the following: Touch with your finger, stylus, or mouse to exit VisualBoard. Close the application from a paired device such as the Polycom Touch Control. Close the application using the remote control. Annotate with VisualBoard This section describes how to annotate content in real time from RealPresence Group Series and RealPresence Immersive Studio systems.
Use the Polycom VisualBoard Application Annotation Toolbar Elements Reference Number Task Notes 1 Point to sections of a slide. Point to sections on a slide without making annotations. You see a white glow around the icon when selected. When using a mouse, the arrow pointer is always present. You do not need to touch the arrow pointer when presenting slides. 2 Select the line thickness. The currently selected line thickness is highlighted.
Use the Polycom VisualBoard Application Reference Number Icon Task Notes 7 Create a new blackboard. Create a blackboard when you or the far-site views content on a monitor. The dark background is easier on the viewer’s eyes. If you annotate on a blackboard and you display a new blackboard or whiteboard, the previous blackboard is saved automatically. The default annotation color is white. 8 Exit the VisualBoard application.
Use the Polycom VisualBoard Application Slides toolbar 1 2 3 5 6 7 8 9 4 2 From the Slides toolbar, use your finger, stylus, or mouse to perform the tasks listed in the following table. Slides Toolbar Elements Reference Number 1 2 Polycom, Inc. Icon Task Notes Select to save slides (to the My Whiteboard folder automatically created by the VisualBoard application). You hear a beep when the current slide is saved. You see a blue glow around the Save icon when selected.
Use the Polycom VisualBoard Application Reference Number 3 4 Polycom, Inc. Icon Task Notes Select the slide you want to delete. All slide thumbnails display a red “X” in the top left corner. The folder thumbnails do not display a red “X” because folders cannot be deleted. You see a yellow highlight around the active slide. Navigate to the slide you want to delete and touch the red “X” icon in the corner of the slide. The slide and all annotations are deleted from the USB memory device.
Use the Polycom VisualBoard Application Reference Number Icon Task Notes 5 Select to view the previous slide in the current folder. You see a white glow around the icon when selected. 6 The left thumbnail displays a thumbnail of the previous slide. Using your finger, mouse, or stylus, slide the thumbnail to the left or right to view other thumbnails. When you click on the desired thumbnail, it becomes the current slide and displays full size.
Use the Polycom VisualBoard Application After you insert the USB device, the graphic files in the My Whiteboard directory are read and renamed as necessary. Graphic files located in subdirectories are renamed after the VisualBoard application is launched and you select any slide in that directory. This means that graphic files are renamed if they are not in the file name format or order expected by the application. As an example, the files IMG_0001.jpg, IMG_0003.jpg, and IMG.0004.
Use the Polycom VisualBoard Application 7 Select Every Slide and click OK. 8 Remove the USB memory device from your computer and insert it into the USB port on your RealPresence Group or RealPresence Immersive Studio system Media Center Stand. Caution: Eject USB memory device first Polycom recommends that you eject the USB memory device from your PC before physically unplugging it. For Windows, right-click the drive that corresponds to the USB memory device and select the Eject option from the menu.
Use the Polycom VisualBoard Application To capture and annotate live content from other content sources: 1 Display content using your content source: VCR/DVD Laptop connected with a VGA or DVI cable 2 Double-tap the touch monitor to start the VisualBoard application and capture the content. 3 Make annotations on the displayed content. 4 Select Save to save a slide of the content with your annotations.
Use the Polycom VisualBoard Application Verify the VisualBoard application Polycom, Inc.
Install and Configure a Touch or Standard Monitor To learn how to install the VisualBoard application for use with touch or standard monitors on RealPresence Group systems, refer to the following sections.
Install and Configure a Touch or Standard Monitor Install a Monitor as a Second Monitor for RealPresence 300, 310, 500, and 700 Systems If you are installing a touch or standard monitor as a second monitor, follow the steps in this section. Touch Monitor Support and Required Components The VisualBoard application is compatible with the following touch monitors.
Install and Configure a Touch or Standard Monitor b Connect the other end of the USB cable to the USB port on the RealPresence Group system. A USB memory device can also be installed in the second USB port on the RealPresence Group system for importing and exporting slides, images, or photos.